When I first got my airbrush, I spent hours drooling over all the fancy stencils I could buy to use with my cookies. Even before I got my airbrush, I drooled over the stencils I could use for stenciling on cookies. More on that here.
One problem, though: collecting stencils can get pricey. The cheapest of them are about $5 apiece, but even those add up when you get more than 1 or 2. The more expensive ones can be $20, just for one stencil. All my money goes to diapers and baby formula. I had to think of another way.
So, today, I decided to see if I could create a stencil out of the stuff I had around the house. If I couldn’t do it, what would I lose? Exactly. Nothing. It never hurts to try.
So what are we waiting for? Let’s do this!
The first part is easy– go to Google and search for free printable images. Make sure you pick the free ones, so you aren’t infringing on any copyrights. Alternatively, you could sketch out your own, if you’re of an artistic frame of mind (notice I printed. haha).
Next, assemble your basic gear. This is what I had on hand, but you can feel free to substitute with something you like better. You need some kind of plastic folder or binder (plastic file dividers work great, and they are cheap, so an added bonus– I just picked up a pack of 6 at Walmart for 47 cents), tape, scissors, several hot pads, and an old, beat-up metal pan of some kind (that you don’t mind messing up, if accidents happen). You also need some kind of cutting tool. You could use an X-acto knife, but I had this old soldering gun, so I’m going to use that. A wood burner should work, too.
Position your image behind the plastic sheet. Give yourself several inches on each side, so that when you actually use the stencil, it protects your entire cookie.
Trace your shape with a marker. It should be easy to do that, since the plastic is kind of see-through.
Go ahead and tape your plastic piece to the back of the cookie sheet. I went ahead and used an old meatloaf pan that was black with age. Don’t use one that you really like, because there is a learning curve to this. As it happened, my grizzled veteran pan made it out, unscathed. 😉
The tape is to hold the stencil in place while you’re cutting it. See how I messed up on the head on the left? No biggie. All that matters is the finished product, so just go through the line you chose.
Be very careful when using your melting iron– it gets HOT! My first attempt at melting a stencil was tricky– I kept getting strings of melted plastic in the way of my design. Here are a few things I learned: (1) Keep an old, damp rag nearby. Periodically wipe the tip of your iron on there. This helps to cut down on the “mountain” of melted plastic that you accumulate. (2). Don’t trace right on the line– trace INSIDE the line. Since you’re actually making a thick melt line about the size of a pencil tip, rather than a razor thin line, you need to put the rest of that fat line inside the shape that you’re throwing away. Hope that makes sense. Blah. Hard to explain. But you’ll see when you start to trace one, for yourself.
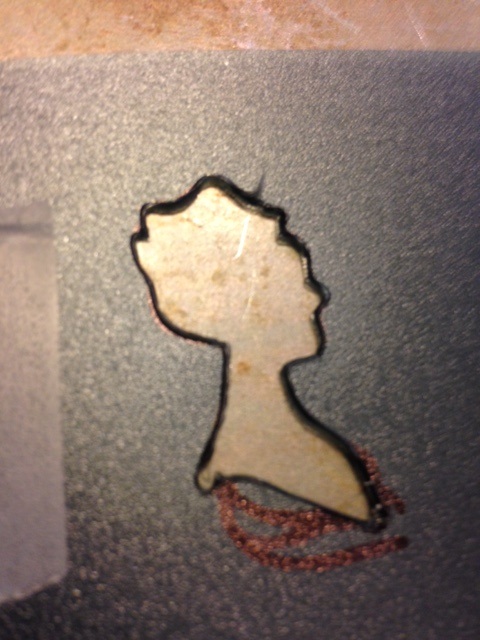
When you have finished melting your shape, pop it out with a knife. Now, you have a finished stencil. This was my first attempt, and I thought it looked pretty good, but it had a few rough spots I had to touch up after I took the cameo head out.
This was my second attempt. The second time was a lot better– I started to get the hang of it and got better at knowing when I needed to wipe my blade so I didn’t get mounds of melted, stringy plastic. I messed up a little bit on the man’s head, but I cleaned that up after I finished the main piece.
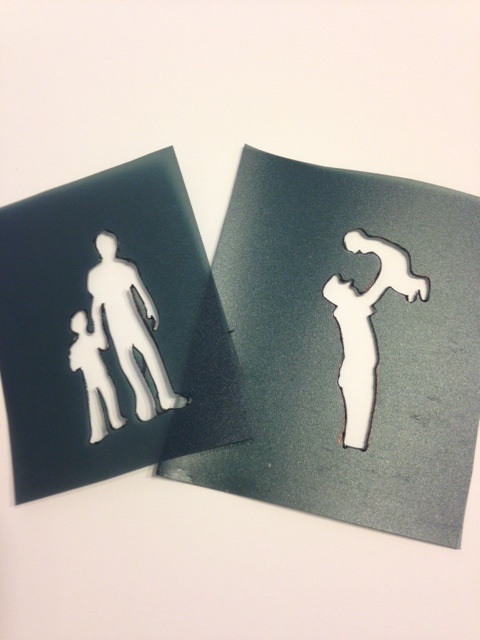
The third piece, ironically enough, was the hardest to draw, and the best one to cut. Just goes to show– never judge a book . . . er, stencil . . . by its cover.
Next, I tried a more complicated design. Keep in mind that every piece of a stencil must be connected to plastic. In the original sketch, the man actually had his foot behind him, leaving a circle of space in the center that didn’t connect to anything (you can kind of see that in my original marker trace between his feet). So I slightly changed the drawing to have both of his legs straight. That way, the center piece is connected to the bottom.
Since this stencil was smaller, it got a little sloppy on the small parts, like feet. No problem– after you remove the main stencil, use your heat rod to rub gently against those rough spots, and they will melt/smooth right out.
And there you have it– custom, gorgeous stencils for a fraction of the price. The best part is that you can pick any design you like, and make it any size you like.
You did it. And I’m just so proud of you.

Disclosure: This post may contain affiliate links, which just means that we get a few pennies if you purchase through our link. I never recommend products that I don't personally use and love. Thanks!