
Well, as a rule, this is basically a baking blog. However . . . blogs are designed to make people happy, and since sewing is something that makes me very happy, and since so many of you have asked me to show you how to make this Folded Star . . . why, I aim to please. If ye want it, ye shall have it! I have decreed it!
So what are we waiting for? Let’s do this!
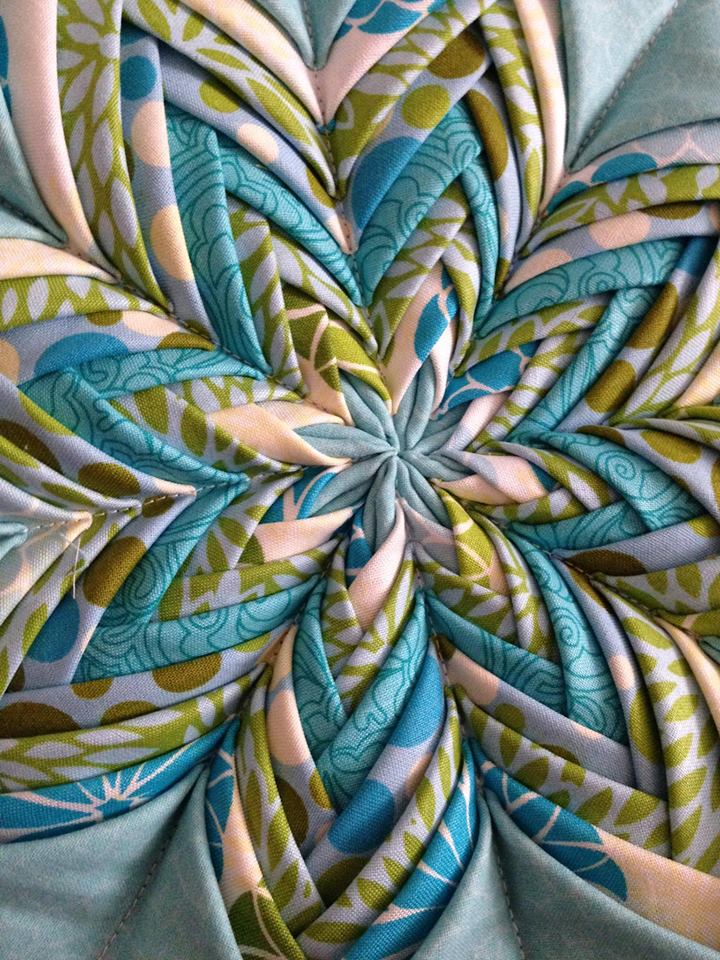
The first time I ever saw a picture of this gorgeous star, I stared, open-mouthed. Wow. It was stunning. I knew I had to learn how to do it. I just had to know how to make such beauty mine.
Now . . . take a deep breath. The folded star isn’t “hard,” per sa, once you get the hang of it. But it does take a little “doing,” as they say. The first (and second, and third) time I made one of these things, I messed them up, completely. Multiple times I threw my work to the side, in disgust, declaring that I would never figure it out. And multiple times I went back and pulled my horrible mess out of the trash and tried again. And again. And again.
And again.
I gave up many times. But I have the type of personality that keeps thinking about things and trying to figure them out, even after I’ve “given up.” I almost always come back for another try. I have an innate inability to quit on things– to let them beat me.
And so I went back to it. The beauty of this sewing piece kept pulling me back, again and again . . . like the waves of the sea, as gray and stormy as they are beautiful . . .
But I digress. I used to be an English teacher, remember? 😉 I can’t help getting a little verbose, at times.
So the nitty gritty is this. Is this pattern tricky? Yes. Can anyone do it? If you have the determination to keep trying, then yes, you can. Does it get easier with practice and time? Ohhhhh yes. I’ll try to explain it the best I can, and if you keep studying the pictures and practicing, it will become so easy that you’ll be able to do it in your sleep. 🙂 I have made so many of these that I don’t even need directions, anymore. This is a great little way to bust up your fabric scrap stash– and the stars are so beautiful, that they make a gorgeous gift for anyone.
What are we waiting for? Let’s do this!
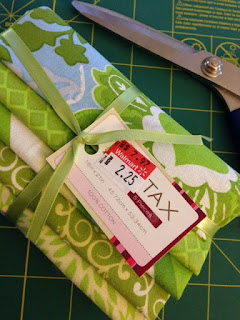
I found a couple little fat quarter bundles on sale at Walmart the other day. The colors were so pretty together and so cheap, that I snatched them up. Time to make folded stars! I’m not exactly sure how much fabric each star potholder takes– I’m estimating about a yard, when all is said and done. I usually use scraps, so it’s hard to estimate how much of the material was left before I started “carving.” 😉 All I know is that this bundle was 5 fat quarters (Is that a FAT joke??? No– fat quarters are just 1/4 of a yard of material, cut into a cute, chubby rectangle. This bundle is 5 fat quarters, so it was 1 1/4 yards of material, total, in 5 different patterns). I had some material left over, so I think you could make this work with 4 fat quarters, with some careful cutting. But I’d recommend 5 fat quarters (or your own fabric stash) so you are sure to have enough and have a nice variety of colors.

You also need a rotary cutter. You can trace and cut with scissors, but every serious quilter needs a rotary cutter. It will cut your work in half (literally, and figuratively!)
Now you need a very complicated piece of equipment (just kidding). Cut yourself a piece of cardboard 3×5 inches. You can use a 3×5 card, but cardboard works a little better because it’s thicker. If you’re not careful, a rotary cutter will slice through a regular 3×5 card, ruining your pattern and dulling your rotary blade– and that’s a no-no.
You also need 2 pieces of fabric cut into 10 inch squares. I used a quilter’s rule for this (a gigantic, square ruler). You can also use a regular ruler or yardstick to measure your square out, but it’s harder to get the angles just right. One of your 10″ squares will need to be the material you want for the back of your potholder (so, “nice” material). The other 10″ square won’t ever be seen– it’s just to hold things together, so you can cut it out of any scrap material that you have. More on this later.
Just remember . . . one “nice,” and one “naughty.” Ha. I generally cut the 10″ square first, because if you start carving up your fat quarters too early with the smaller pieces, you may discover you don’t have enough material left to cut the large piece, toward the end. Do the big pieces, first, and then use the remnants to make your smaller pieces.
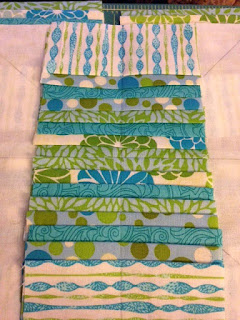
What smaller pieces? Well, your star will have 8 points. It will also have 8 layers. Therefore, you need 64 rectangles of material cut in the pattern of your 3×5 rectangle. Each set of 8 should be the same color, so that this “layer” of the star is the same color. This sounds so confusing. I’m sorry. I’m trying to make it simple, but like I said, this takes some work to get the hang of it. Basically, you need:
— 2 10″ squares (one good one in the pattern you want for your backing, and one made out of any scrap material you have
— 64 rectangles cut into 3×5 pieces. Use the same material for each set of 8, so that each layer of the star (8 points) has the same color.
When you have cut your 8 sets of 8 rectangles, go ahead and iron all your rectangles. You want to have wrong side of material up, and iron 1/4″ of the “good” side over. Do this to all of your rectangles.
Now, take your scrap material– the one that doesn’t matter what color it is. I use white because it’s easier to see the lines. Use a ruler to draw lines from corner to corner, and then up/down and sideways. This will create 8 lines, and these will be the basis of your star and its 8 points.
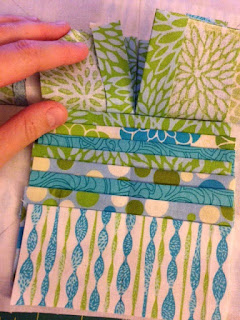
At this point, you should have 8 sets of 8 rectangles. You could use 8 different colors, or you could have several layers the same color (i.e, if you want 2 green layers in your star, you would need 2 sets of 8, or 16 green rectangles, total). They should be ironed the way I mentioned, above. Turn the rectangles right side up, and make a stack layered 1/4 inch apart, each. Arrange your colors in the way you want your final star to look. Play around with the colors until you get it the way you want the star to be when you finish it.
The ironed part of the rectangles should be at the tops of the rectangles, with material right side up.
Go ahead and line up all 8 of your sets, using the one you made, first, as the pattern. After a while your eyes can kind of go crazy trying to assemble all these things, so go slowly and carefully to make sure all the layers are in the same order. If you accidentally switch one, it will be painfully obvious in your final star.
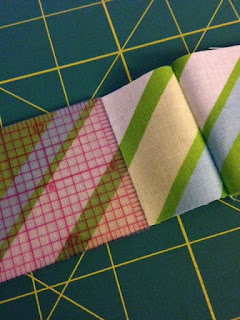
Now, take your first set of rectangles, and center it against the up and down center line of your scrap material. Its top will be right along the sideways line. Position it so that the up and down line cuts it in half. Draw a light pencil line down the center. This will help you to sew the line straight in a minute. Pin if you like.
Now, take a second block of layers and put it as a mirror image of the first set. See where my thumb is? It’s right on the place where the 2 sets meet– see how there are 2 lines the same color? These are the tops of 2 different sets. They should exactly meet with no space in between. Draw a line down the center of this one, too. I should point out that these blocks are mirror images of each other– the tops touch. If they were people, their heads would be touching, rather than standing on each others’ shoulders. Make sure you rotate one stack before placing the two together, rather than just lying them on top of each other right from your pile.
Sew a straight line through both of those. I don’t pin these, anymore, because I’ve done so many of them that I don’t need to, but I used to pin when I first started. It might be good to pin them, until you get the hang of it, so they don’t shift while you sew. Again, these are lying “nose to nose.” If the layers were numbered, then, starting from the top, you’d have 8,7,6,5,4,3,2,1,1,2,3,4,5,6,7,8. The “ones” meet in the center. Hope that makes sense. Ask me if you have questions. Study the pictures to make sure you know what you’re doing before you sew. “Measure twice, cut once.”
You can probably see where this is going, but we are going to sew each block of rectangles on the individual lines that we drew, at the beginning. Let’s do the sideways lines, next. Flip over the blocks you just did, and add another block to the sideways line between them. Draw your line on the material and sew it onto the scrap material in the same way you did the first ones. All of your “noses,” or layer 1’s, will be touching your center. You should have same fabric touching every time you center one of these– mine is that green fabric with the light blue flower pattern. This is going to be my star center.
Turn your fabric around and sew another block on the opposite side of the line you just sewed– noses together, again.
Don’t get frustrated. I was basically starting to hyperventilate at this point, the first time I tried this. You’re just sewing one completely rack of blocks on each of those 8 points. That’s all you’re doing. You can do it. Take a deep breath and read the instructions again, if you need to.
We now have 4 block sets on the North, South, East, and West points of this star. Now it’s time to do the diagonal corner pieces. These are kind of tricky. But don’t give up. You can do it.
See that diagonal line? Place your block right on it, make sure it’s centered, draw your line, and sew it down.
This is my block set up and ready to sew on the diagonal. The trick with these diagonal ones is that you want them to exactly meet the center, but not one bit lop over into the other points. If you accidentally sew over one of those other folded pieces, then the star will look funny when it opens. When I first started, I used to overcompensate and sew the centers so far away from each other (to avoid crowding), that my star had a huge spot of nothing in the center. You don’t want that, either. You want them to meet, but not overlap.
This is a close up of my centers. See how they come as close as it is possible to get, but none of them are overlapping? That’s what you want. If you want to learn to quilt, you have to give up your concept of personal space. Haha. This isn’t a quilting project, per sa, but it uses so many of the same principles and skills that it might as well be.
Finish sewing all your other quadrants the same way. Yes. It totally looks like a hot mess right now. But even supermodels look rough in the mornings. With a little TLC, this is going to be one beautiful star. It just needs a little help.
Yes. You’re probably frustrated right now. I can’t tell you how many of these freaky looking fabric explosions I threw away and then retrieved. It looks like a bad Monday bed-head mixed with a windy day and no hairspray. This huge fabric heap looks impossible to finish.
But it’s not. Let’s help this ugly duckling turn into a gorgeous swan.
Reach into the heap and find a bare spot– it really doesn’t matter which one, to start. Push the layers back so you can see the bare triangle underneath. There is a lot of material, here, and it can be hard to hold it open, at first (it gets easier as you go). Think of it as braiding hair– it can be hard, at first, but the more hair you braid and “tame,” the easier it gets to separate and braid the rest. Same principle.
Take your first layer and fold it down to meet the white piece. You’re basically taking it and folding it into a triangle.
Take that triangle and fold it double into a smaller triangle.
Do the same on the other side– fold down to triangle, and then fold that triangle down again into a really thin triangle.
Now, take both of those double folded triangles and bring them toward each other. They should perfectly meet in the center of the bare spot. Bring them down like a drawbridge coming down.
Now, holding those double triangles down with a finger (yes, it was terribly hard to hold all this stuff and take pictures– you’re welcome ;), take the next layer of material and fold it down into a triangle.
You did this already. The difference is that, with this triangle, you don’t fold it twice– you just fold it once. The first piece is the only one that gets a double fold. All the rest of the triangles will just be single folds. Easy, right?
Take your 2nd layer, 1 folded my triangle and “drawbridged” it down across the doubles I just made.
Do the same on the other side– grab the second layer of material (in mine, white material with blue flowers), fold once in a triangle, and “drawbridge” it down across.
Do the same with the third layer. Mine is blue. Fold it down into a triangle.
Drawbridge the triangle across the 2nd layer. Fold the 3rd layer, other side, into a single triangle. Drawbridge that across the other. Hope you can see where we’re going with this.
At this point, I like to make a few reinforcing stitches to hold this thing together. Keep them low so that they don’t show when you fold the layers over.
Go ahead and do another 2 layers. Do the same thing you did before– fold the rectangles down into single triangles, and then drawbridge them across each layer before. “Drawbridge” isn’t a verb, but it should be. You get that concept, right?
After 2 more layers, reinforce stitch at the bottom, again.
Two more layers, and more reinforcement stitches. Then, do your final layer. Place your reinforcing stitches WAY down there (I have placed lines around my stitches since they were hard to see, with the white thread and white fabric). Keep this last reinforcement stitch as low as you can, since it has to be covered at the end.
You now have your first section of the star finished. Go ahead and do the same thing with the next section– double fold the first layers, drawbridging them. Single fold the other layers, drawbridging them and then reinforce stitching every 2 layers, sticking as close to the bottom as you can so the stitches don’t show.
The more material you get “tied up,” the easier it gets, because you don’t have to shove all that material out of the way. Before you know it, you have all 8 sections completed, and this gorgeous star is gazing back at you, whispering, “And you said you couldn’t do this!”
I’m so proud of you!
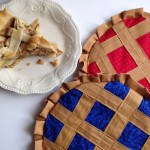
Now . . . to make this star into something useful. Today, we are making a potholder. Generally, potholders have to be “filled” with something– batting or Insul-Brite. But this one has so much folded material, that it really doesn’t need anything else. I generally don’t like these for a “reach into the oven and grab something hot” potholder– they are a little thick for grabbing anything. But they work super well for placing on the table and holding a hot dish. Not only are they pretty, but the surface is flat, and the heat almost “irons” them. It’s weird but cool. You’ll see what I mean after you use this little guy a few times. As they say, these are like a fine wine– they get better with age. 🙂
First, though, we need some corners. Cut yourself 2 4″ squares (a small quilter’s rule works great for this, but a ruler works, too– just be careful of your angles) out of the same material that you used for your final star layer.
Cut your square in half, corner to corner. A simple ruler works fine– just use your rotary cutter to make a nice, even slice.
Now, you need to cut the spare fabric off your star. Go ahead and cut off the scrap fabric corners and trim the unruly ends of the star, itself. I didn’t really measure this, because it won’t show– just cut the spare scrap material off.
Sew your triangles to these corners, creating one side of your finished square. It will be a little big– but that’s OK. We wanted it to be a little large. We can always trim off the side scraps, but we can’t add anything once it’s on there. I always do the corners a little oversized for this reason.
Go ahead and use a quilter’s rule to trim up your corner nice and pretty. It should be pretty much right, but this will square it up, nicely.
Do the same thing for all 4 corners, making your octagon into a square. *Note: You can keep this as an octagon, if you like (but still trim the scrap fabric corners– this was the white fabric in the block we just created). I will mention that the reason I choose to make this into a square is that it’s much easier to bind, at the end, if you have to miter only 4 corners instead of 8. Just my two cents. You’ll see what I mean, in a minute. Just know that corners=work, and you’ll be glad you have only 4 of them, instead of 8. Don’t let the beauty of that hexagon fool you. It’s like a crazy ex wife– seemed pretty at the time, but turns out to be a whole ‘lotta trouble and drama, down the road. 😉
Cut yourself a strip of the same fabric you used for the back. This strip will be your binding and should be 2″ wide. I have a nice 2″ ruler (also a quilter’s ruler– sorry– I quilt a lot and have lots of cool rulers. It looks like a geometry lesson around here when I sew ;), so I rotary cut around that. Sew your ends together and press your seams open. To do this, simply iron the seams open and flat on the wrong side. It will make your material lie flat, rather than rounded up, like my picture, above, after it is first sewn.
Iron yourself some edges. I don’t measure these– I just turn maybe 1/4″ over on the back and iron them– one edge on each side. This will make it so much easier when I bind the sides, to have these seams pre-ironed.
Place the star together– wrong side of star against wrong side of back fabric. Pin your freshly ironed binding strip you just made to the back. For now, we are just doing one side. Yes, technically you can do both at the same time, but I have found from experience that it looks neater for this small project to do just the back, first, and then do the front, by itself. A real quilt is bound completely differently, but that’s another lesson for another day 🙂
Basically, you aren’t “wrapping” this binding around the side of your fabric, yet. You are just sewing a flat strip to your back. Eventually, your binding strip will make a “U” around the raw side of the potholder. For now, it’s lying flat, and you’re just sewing that one end to the back. I hope that makes sense. I wish I could reach through the computer and show you, in person, because it would be so much easier. If you get stuck, ask any questions and I’ll do my best to answer them. Like I said, this takes some practice, but once you get it, you’ve “got it,” and you’ll be breezing through this.

Once you have sewn your binding to the back, flip the potholder over (star side showing) and create the “U” around the raw side of the fabric with your binding strip (Buzz Lightyear: “Where’s that bondage strip???” haha). Sew it to the front in the same way you did to the back. If you feel like God’s gift to sewing and want to do this all in one step, go ahead with your bad self. I like to take that extra step of sewing the binding to the back, first, so I don’t end up with random places where the binding wasn’t perfect and I missed the seam.
Miter your corners as you go– basically this means to fold them at an angle and sew over it. This neatly tucks the extra material in place that you have from making the corner. Remember I told you that you’d be glad you only have to do this 4 times instead of 8? You’re welcome.
Here is a close up of one of my mitered corners on the back. It should be a diagonal angle. These things can be a little tricky to fold, at first. Definitely practice until you get it right, and then pin before sewing.
Here’s an even closer close up. This corner is on the front. These corners are “back to back” on each other. It takes some creative folding to get them just right– this is why I recommend pinning, before sewing. Don’t wing it, or you’ll be doing a lot of seam ripping.
And there you have it! Your potholder is complete!
You did it!
Seriously. The first time I actually succeeded at making one of these, I had a terrific sense of accomplishment. I kind of stared at it, thinking . . . “Wait a minute. I think . . . I think I did . . . it.” It was kind of a surreal moment. And then I felt like jumping up and down and shouting. If you messed up (basically, if you’re human), don’t worry– I messed up many times, too. If you’re patient and keep trying, I promise you WILL get this.
I’m here to answer any questions you have! And I can’t wait to see what you make!
You did it. And I’m just so proud of you. 🙂

Disclosure: This post may contain affiliate links, which just means that we get a few pennies if you purchase through our link. I never recommend products that I don't personally use and love. Thanks!


Is it possible to make this large enough for a pillow, for the couch? Any ideas
Thanks
Hi Nancy. Since it has so much folded material, I think a huge one would weigh too much to be useful for a couch cover. I think you might have luck putting a single design on a pillow or as an accent in the center of a quilt, rather than as a blanket. Mostly if I think I’d like to try something, I do some experimenting with scrap fabric to see how it works before I use the good stuff. Hope this helps. Thanks for stopping by.
Emilie – You are AWESOME!!! I have hunted and hunted for this pattern but all I found were very expensive and you are giving all your work away without getting anything. You are an Angel in disguise! This is like a pattern I did years ago (before my youngest was born, and she is now 40) and no longer had directions or a pattern to. Think it was too many years😂 Quilting is my pastime so I have plenty of scraps, now just to gather them to make one of your beauties. Thank you so much for sharing your wonderful and easy to read pattern!!!
Thank you so much for taking time to say that. I have always enjoyed learning from others and sharing things I have enjoyed doing, but you’d be amazed how many readers are rude and demanding, even when they pay nothing. Thank you for being the exception. 🙂
Hi, Jenny here I just love this, I wanted to make a cushion that my daughters dog chewed up, I have don’t the cutting out now just to put it together, maybe even make a quilt
I love the idea of a cushion 🙂 A quilt would probably be pretty heavy, since the fabric is so wrapped and layered. Maybe a nice weighted blanket for autism? 🙂 <3
Thankyou for the pattern looks awesome in moves, now in blue
I’m glad you enjoyed it 🙂
I have been looking everywhere for a tutorial for this. I’ve done the Amish folded star before but couldn’t figure out how to do this technique until now. Can’t wait to get started. Thank you so much.
Aww that makes me so happy to hear! I’m so glad you found it helpful! I’d love to see the photo of your finished star! — Emilie
Amazing tutorial! Tried a part of the star with paper,was delighted with the results! The way the triangles dovetail into each other forming the pattern! Will definitely try it with material. Thank you for the clear detailed instructions and pics.
Thank you so much– that makes my day! 🙂 I’m glad it was helpful and that you enjoyed it 🙂
Thank you. Not sure how long this should take but I spent 4 enjoyable hours at it. I must say in folding the triangle shapes Ithought it was going to be one hot mess because it didn’t look like much until I had four sections complete. I really didn’t believe I could do it. As I am a quilter I have a ridiculous amount of fabric and spent sometime playing with fabric to get the colors coordinated. Many thanks I really enjoyed making this.
Oh that makes me so happy! I am a quilter, too, and it’s nice to have a project for the scraps. It takes a little practice to get the stars tight, but it sounds like you knocked it out of the park! Thank you so much for taking time to comment and let me know. 🙂 — Emilie
Muy hermosa la estrella y la explicación la entendí muy bien la boy a hacer
Estoy tan contenta de que te haya gustado! — Emilie
When I first looked at this star, I loved it, but thought there is no way I can make that! Wrong! With your exceptionally clear instructions I was able to put together my first Star Potholder! I won’t show it on here, I will wait for my 2nd or 3rd. Now I can see where I need to be more careful. But your instructions are very, very good! And the pictures are awesome! I do have one little idea though. How about sewing or gluing a small square of fabric in the very center on the foundation 10″ square that is the same color as the center of your star. That way, if your points don’t meet up exactly, you won’t be able to see and of the foundation scrap. Just make sure to draw your lines on the scrap so you know where to start. Great tutorial!!!
Aww that makes me so happy! And great ideas and tips too! Well done! 🙂 Thanks for stopping by– Emilie
I always wanted to make a potholder like this but never could find such good instructions,lm going to copy yours and making one. Your instruction look pretty easy.good job.
Aww I’m so glad you found them helpful! I can’t wait to hear how yours turns out! 🙂 — Emilie
Emilie, thank you soooooo much for this tutorial. Your encouraging words kept me going and all my folding is done. I’m leaving my border until tomorrow as I just can’t stop looking at my star!
I’m heading to Facebook now to share……and I do so hope you get to England one day…..crumpets smothered in butter….yum
This makes my day! Thank you so much for giving it a try. Your star is gorgeous!
Thank you Emilie, for your beautiful project. The instructions were clear, with beautiful pictures.
I’m so glad you enjoyed it. I wish I had a key for making differently sized ones. It all started as a way to use up scrap material. You’ve given me an idea 🙂 Thank you for trying it out. 🙂 So glad you enjoyed it. — Emilie
What would be the measurements to make a 12 inch, 31cm cushion. Thank you.
I’m not sure. I just used scrap material I had and ended up with a random size finished product. I would experiment a bit. Good luck!
I love this! I made one. I couldn’t do the quilting at the corners but I’m happy with it. I have a question for you, how long does it take to make one of these with more experience? This took me forever hahaha. I’m hoping they get faster because I want to do more, just not sure if it’s going to take this long always. I love your work by the way. Happy Crafting
What a sweet thing to say– thank you! I’m not a professional just enjoy sewing projects, and I agree– the first time I did it it took HOURS. haha. Now I can do one in about 15 minutes once the pieces are cut out. But I have probably made 25 or 30 of them at this point. It definitely gets easier with practice. 🙂 Thank you for taking time to stop by and leave this sweet comment. — Emilie 🙂
Can you tell me what this pattern is called? Like if I wanted to order it? Thank you! Your tutorial is amazing.
Hi there Terri– I didn’t use a pattern. I just made this from scrap fabric that I had. I did cut myself a template of the rectangle from a cereal box and used that to trace on the fabric to make them easier to cut out. But there is no real pattern– just the rectangles placed a certain way, which I tried my best to show in the tutorial. Let me know if I can help further! 🙂 Thanks for stopping by. — Emilie
I made one! I’m so happy! But how can I share a picture with you?
Yayyyy I can’t wait to see! You can send me a facebook message if you like (https://www.facebook.com/cookiesforengland/). Good job! 🙂
Sent!
It looks amazing! 🙂
Thank u.your instructions to do this beautiful folded star was one of the bests.i love this project. Thank u.i through I’m not going to do this my first go.but I did.
Aww I’m so glad you found them helpful! Happy sewing 🙂 — Emilie
Pingback: Cherry Pie Potholders – Cookies for England