As a Mom, I often find that getting my kids to eat is one of the biggest challenges I face. OK. Perhaps potty training and sleeping through the night are a bit bigger. But you get my meaning. Kids don’t like to sleep. Kids don’t like to eat. Come on kids . . . these are the best things in life! Someday you will want to do nothing else. 😉
This recipe, though, is one that is a definite crowd pleaser– even for kids. This food is amazingly delicious, which appeals to parents, and it’s awesomely sticky and messy, which definitely appeals to kids. As a kid, I always got excited when I saw my Mom pull this recipe from the oven for supper. Its delicious mix of exotic spices and sweet, syrupy honey made a sticky concoction that was irresistible. We kids used to jokingly call it “Green chicken,” because the glaze leaves a syrupy sweet smear on your fingers that almost looks green. I still chuckle when I think about calling it that. The yellow butter and brown honey carmelize onto the meat and make this recipe one that everyone gobbles up. Bring this to your next BBQ– I bet you’ll take home an empty dish. 😉
I’ve had this recipe for so long, that I’m honestly not sure who the author is. I’ve also changed it up and tweaked it so much, that I’m not sure the original author would even recognize it. (A game of telephone, anyone?). I think the original came out of an old Taste of Home magazine, and over the years, I have adjusted it and made it my own. If anyone knows the original author, let me know, and I’ll happily give credit.
What are we waiting for? Let’s do this!
“Green Chicken”
Ingredients:
6-8 pieces of bone in chicken
4 tbsp. butter, melted
Sticky Sauce:
1/4 cup brown sugar
1/4 cup honey
1/4 cup lemon juice
1 tbsp. soy sauce
1 1/2 tsp. curry powder
Directions:
Salt and pepper chicken pieces, to taste. Roll chicken pieces in flour to coat (I usually put about 1/4 cup in a bowl and roll the chicken in it. It won’t take much). Melt 4 tbsp. butter and place in a greased glass 13×9. Place floured chicken in pan, turning once in butter to coat. Bake, uncovered, at 350 for 30 minutes.
After 30 minutes, remove chicken from oven (chicken is NOT done yet). Pour Sticky Sauce ingredients over chicken. Bake for 45 minutes to an hour longer, basting chicken with sauces every 30 minutes or so. Toward the end of baking time, baste every 5-10 minutes. The sauce will get thicker and stickier each time you baste as it bakes.
Are you ready to see this juicy temptress in pictures? Here we go!

Remember those mad chicken cutting skills we learned the other day?
Here are the directions, in case you need a refresher. This is a great way to use up some of those dark meat pieces, if you are using the chicken breasts for something else. Of course, you can do this recipe with chicken breasts, also– but leave the bones in, because you don’t want the chicken to be done before the sauce has thickened (thickening the sauce takes about 1 hour).
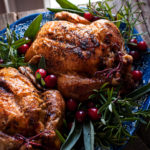
I usually use 2 thighs, 2 legs, and 1 chicken breast, cut in half– but you can do what you want. This is America. Do it your way. Lightly salt and pepper the chicken to taste.
After you have seasoned your chicken pieces, toss them lightly in flour to coat them. It doesn’t take much– maybe 1/4 cup flour for all the pieces. I just roll the pieces in flour and then kind of shake off the excess.
Meanwhile, melt 4 tbsp. of butter and pour the butter into a greased 13×9 pan. I think the original recipe called for a whole stick of butter (8 tbsp.), but I find that I get just as tasty of results with 4 tbsp, and I save some calories. Feel free to taste and adjust as you like! That’s what makes a good recipe– personalizing it to your own tastes. I find that I have better luck using a glass pan– not sure why. The sauce seems to thicken better in a glass pan. Perhaps the little chickees like to see what’s going on– these are females (hens), after all. I don’t know. But I use glass, anyway.
When you have seasoned and floured the chicken pieces, place them in the butter. Turn once to coat. The pieces don’t have to be completely covered, but the chicken should be nicely buttered.
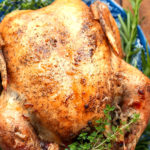
When your little chicks are ready for the oven, they will look like this. They aren’t too pretty right now. Chickens, like beautiful women, take a little work to get ready . . . but they’re worth it.
Bake these buttered pieces at 350 for 30 minutes. Don’t put the sauce on yet. While the chickens are doing this first little jaunt at the sauna, you can mix up your sauce.
Squeeze you some lemons. When life makes you lemons . . . make sticky chicken. Oh yeah. Well . . . you can make lemonade too, if you want. Get 1/4 cup of lemon juice. Add 1/4 cup brown sugar, 1/4 cup honey, and 1 tbsp. soy. I won’t blame you for tasting the brown sugar. Mmmm . . .
And then, your beautiful curry. Mmmmm. This effervescent jewel will make your entire house smell incredible. Add 1 1/2 tsp. and stir.
The sauce will be thin– make sure you get all the honey mixed in there, since it tends to settle to the bottom. Stir well and wait until the chicken has baked 30 minutes.
After 30 minutes of parbaking, the chicken comes out. This is like the gorgeous date with curlers in her hair. It’s coming along nicely, but it still needs work and some finishing touches to make it shine. Pour your sauce over it. It will seem very watery and not at all sticky. Don’t worry. Time heals all wounds.
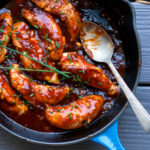
Put the chicken back in the oven, and bake for another 45 minutes to 1 hour. Every 20-30 minutes, pull the chicken out and baste. This just means to use a spoon to carefully pour sauce over the chicken pieces. Each time you do this, the sauce will thicken and adhere to the chicken a little more.
Don’t let any of that sauce go to waste . . . take it out and baste, baste, baste! Sorry. Homemade poem. Haha. “You’re a poet and don’t know it!” (Sorry. You were thinking it. I know it).
I find that, toward the end of the baking time, you really have to watch the corners of the pan. They tend to dry out and want to stick. Keep stirring the sauce and making sure the liquid is evenly distributed. I also baste more frequently toward the end, since the sauce is thicker. The last 15 minutes, I baste about every 5 minutes. Each time you pour sauce over the chicken, it gets thicker and more, well . . . saucy. You are creating a masterpiece, here.
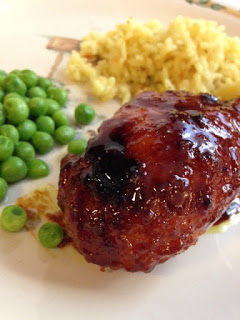
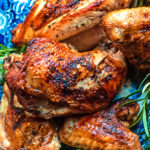
And just to point out . . . by this time, your kitchen smells absolutely incredible. You’re going to have everyone in town coming over with made-up excuses, hoping to be invited to dinner (“Um, I just wanted to return this book I borrowed . . . three years ago . . . ). When your chicken is done (you can carefully stick a knife in a thigh, and if only clear juices come out, they’re done), take it out and baste one more time. After that, I usually let the chicken sit for 5 minutes or so. This wait time seems to help the sauce stick really nicely.
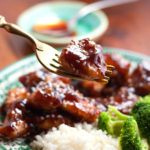
And there you have it, folks. Your kitchen smells divine, your husband is thanking his lucky stars that he has a wife like you, and your neighbors are devising ways to borrow yet another cup of sugar. I like to serve this amazing chicken with rice pilaf, a vegetable or salad, and biscuits. To make fool-proof biscuits, check out my tutorial
here.
Another neat thing . . . the chicken pan will definitely need to soak (that sauce is STICKY), so you don’t have to do the dishes right now. And any reason to delay the inevitable dish duty gets an A OKAY from me. 😉 Enjoy it, and would you please pass the chicken?
You did it. And I’m just so proud of you.

Disclosure: This post may contain affiliate links, which just means that we get a few pennies if you purchase through our link. I never recommend products that I don't personally use and love. Thanks!