Yum
I remember it like it was yesterday: it was a special occasion, and my whole family went to Pizza Hut to celebrate. These were the “glory” days of Pizza Hut . . . when the booths were red and squishy, the lighting was low, and the Pepsi was served in gigantic plastic pitchers delivered right to your table. Somehow, Pepsi always tasted better in those red plastic cups, too. With crushed ice. Boy. Those were the days.
On this particular occasion, we sat down to order, and, as kids do, we began to quibble over toppings. We kids always wanted the same thing– PEPPERONI! And my parents always wanted the same thing . . . horrible, icky “Supreme.” Boy. I always felt like it was a dastardly ploy on my parents’ part . . . they would eat a slice of each kind– their nasty Supreme, and our precious Pepperoni, and then there would be only Supreme left to take home. They never had to worry about us taking the leftovers, because we hated Supreme. In my childhood mind, Supreme pizza was some kind of nasty secret weapon that parents invented to ensure that they received some pizza before their kids could inhale all the leftovers.
I hated that stuff.
Well guess what? I am now an adult. I’m not sure if it really is all some kind of gigantic conspiracy, but now . . . (whispers . . .) Supreme pizza is my absolute favorite.
Grab your stuff and hold it down . . . because the Earth just stopped spinning!
But, oh . . . there is just something so very gorgeously delicious about this beautiful delicacy. The vegetables are crisp and brightly colored. They are absolutely scrumptious, too– providing a feast for the eyes, as well as for the tummy. When we made basic pizza dough before,
here, I mentioned that this can be a quick and easy meal– with dough that you can make in advance and freeze or refrigerate for the day that you need it. Imagine whisking a homemade, pizzeria-quality pizza out of your oven in 20 minutes, flat, when you get home from work. Add a fresh green salad, and dinner is ready in a snap. You can do it!
What are we waiting for? Let’s do this!
I have been making and tweaking this recipe since I was a teenager, and you can feel free to make and pass along, but please credit back here so no one steals my work 🙂
Sensational Supreme Pizza
Ingredients:
1 cup warm water
1 tbsp. white sugar
2 tbsp. olive oil
2 1/2 tsp. INSTANT yeast (not active dry or rapid rise)
3 cups flour (may be more or less, depending on humidity)
1 tsp. salt
1 1/2 tsp. onion powder
1 1/2 tsp. garlic powder
1 tsp. Italian seasoning
Directions:
Mix warm water, sugar, oil, and instant yeast together in a bowl. (*Note: if you are using active dry or rapid rise yeast, you will add a 5 minute “proofing” step. With instant yeast, you can skip the proofing step). Add in about 1/2 cup of flour. Whisk. Add in salt and rest of seasonings, whisking well. Add in just enough flour to form a stiff dough. Knead on floured silpat until dough is soft and pliable, like a human earlobe. Place in greased bowl and mist top of dough with cooking spray. Cover and allow to rise until doubled– about an hour to an hour and a half, depending on how warm your kitchen is.
When dough is doubled, punch down and place on a pizza pan that has been oiled with 2 tbsp. of olive oil. Oiling your fingers, press dough into flat, round shape. Let sit 15 minutes (preheat your oven during this time). Bake bare crust at 425 for 5 minutes and remove from oven. Place your sauce and desired toppings (not frozen toppings) on the pizza. Return to oven and bake roughly 10-15 minutes, or until cheese and toppings are golden. Serve immediately.
Now, in pictures!
As I said, we have done this pizza dough before,
here. But today we are putting a new twist on it. Start by mixing your warm water, sugar, olive oil, and instant yeast (can be added directly to the recipe without a “proofing” step, unlike the little packets of yeast you get at the grocery store– get it
here
) together in a bowl. Whisk well to combine.
Remind yourself that soon you will have pizza. And let everything else go.
Add a little flour, and your spices. Whisk to combine. Continue adding flour until you have a soft, knead-able dough. Knead the dough until it is the consistency of a human earlobe (again, more on this dough at the original pizza tutorial. I am anticipating that you are all expert pizza dough makers, by now, so I’m skipping a lot of the basic info. Feel free to go back to the
basic pizza tutorial if you need some pointers). Place the dough in a greased bowl and mist the top with cooking spray. Cover and allow to double in size (45 minutes to an hour).

When the dough has about 15 minutes left to go, preheat your oven to 425 degrees. I recommend using a Cast Iron pan or skillet to bake your pizza. I have made homemade pizza for many years, but I tell you . . . that CI is a game changer. The first time I used it, I couldn’t believe the difference. The crust comes out so crispy and professional looking. Plus, the pan keeps the pizza nice and warm so that, if anyone comes back for seconds (or thirds . . . who are we kidding, here?), the pizza is still piping hot. The skillet I have is
here
.
When the dough is finished proofing (rising and doubling), go ahead and smear 1 tbsp. of olive oil along the sides and bottom of your pizza pan. Use a little more olive oil to gently press the dough into a circle. Don’t use a rolling pin for this– that will deflate the bubbles in the pizza dough. And we want a happy, peppy crust! 🙂 If you want, you can sprinkle this oiled crust with seasonings or parmesan cheese. Fresh herbs, like basil and oregano, are great, too, if you have them.
Par-bake the crust (basically, stick a naked crust in the oven so it can bake a little bit and not be soggy in the center) for 5 minutes at 425 degrees. Use silicone hotpads for handling the heated cast iron skillet . . . that baby gets HOT! Seriously. It does. I’ve burned through hot pads. OUCH!
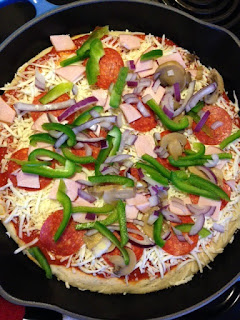
While the crust is par-baking for 5 minutes, dice up your toppings. I am using pepperoni, diced Canadian bacon, canned mushrooms, and finely diced red onions and green bell peppers. Real Pizza Hut Supreme pizza also uses sausage and sometimes black olives, but I didn’t have those, so I left them off. And it still turned out great!
Slice the onions and peppers very thin– the thinner the slivers, the easier they will cook on top of the crust. The larger your vegetable chunks, the more likely you are to have a crunchy salad instead of pizza toppings. I am using canned mushrooms, rather than fresh, for that same reason– fresh mushrooms take a little longer to cook down, and speed is the name of my supper game.
When the crust has baked, naked (NAKED!! Someone give me a towel! Shriek!!!) for 5 minutes, CAREFULLY take it out of the oven. Spread your pizza sauce (I use 1/2 small jar of pizza sauce and freeze the other half for next time) thinly over the top. You should be able to see white dough through the sauce– you just want a thin layer.
Next, sprinkle some shredded mozzarella cheese over the sauce. I know it’s tempting to be like, “Pizza places charge me $5 for extra cheese? Let the heavens open! We’re doing quadruple cheese, baby!!!” I know it’s tempting. I know it. But restrain yourself. You’ve got a lot of stuff resting on this pizza. You want to make sure that your crust gets baked– and throwing 5 feet of cheese on top isn’t going to help. You can probably get away with fulfilling your lusty, cheesy dreams on a simple cheese pizza . . . but like makeup, adding more ain’t gonna change what’s underneath. Sometimes less is more. So be modest with your cheese . . . for now.
Sprinkle your toppings over the cheese. Try to sprinkle them evenly– again, that even baking thing. Pop the whole ‘shebang back into the oven at 425 for about 15 minutes, until it looks like the toppings are done and the cheese is a little brown. You can taste a vegetable if you want to see if they are baked. A little crunch is OK. Another note– sometimes fresh vegetables seem to be especially juicy. You can’t really control if your veggies were heavy drinkers, or not, before they came into your life. And, sometimes, a little pool of liquid will start to form in the center of your pizza. Oh no!! It’s ruined!!! My whole life is a lie!!!!!!!!!!!!!!!!
Not so fast. It’s an easy fix– I promise. If you see that the veggies are leaking a little water into your beautiful pizza, reach carefully into the oven (with your heavy duty potholders!) and gently tip the skillet up a bit. Allow the liquid to flow to the sides of the pan. The CI is hot enough that the fluid will immediately boil and evaporate, leaving nothing but flavor and a gorgeous pizza behind. You may have to “drain” this liquid a few times during the baking process, especially if you really loaded the pizza up with veggies, like I did. But just remember this little trick, and you’ll be fine. No one will ever know the difference.
When the pizza is done, carefully take it out of the oven. Gaze at it and breathe a sigh of contentment. It looks like a professional pizzeria pizza. And it tastes like it, too.
You did it. And I’m just so proud of you.

Disclosure: This post may contain affiliate links, which just means that we get a few pennies if you purchase through our link. I never recommend products that I don't personally use and love. Thanks!


Pingback: German Potato Salad – Cookies for England
Pingback: French Pork Chops with Mango Chutney and Garlic Mashed Potatoes – Cookies for England