I grew up in a small Pennsylvania town. It was a tiny, Mayberry type place, where people knew their neighbors and would give you a call when they saw that your dog was out. They were homespun, decent people who brought meals to your house when you were sick, and fed you along with their own kids, when you were over at their house. You could have campouts in tents with your friends in the backyard, on a fine summer night, under a sky glittering with a million stars, without being the least bit afraid. You could borrow your neighbor’s clothesline to dry your clothes, when yours was full. Neighbors brought over a plate of brownies, when they made them– just to be nice. A kid couldn’t have been happier, growing up there, passing those beautiful days roaming the fields and back woods and coming in, exhausted, happy, and suntanned, when your Mom finally called you, at dusk, for dinner.
My Mom was (and is) an incredible cook. Most of her meals were crafted around homegrown vegetables and herbs from her enormous garden. She was practicing the farm to table concept, long before it became popular. She specialized in delicious, simple dishes that somehow managed to nourish the soul as well as the body. Looking back, I realize that, perhaps, the meals tasted better because we all worked hard to put the meal on the table. We all planted, tended, and weeded the garden (we kids under protest, if necessary), and we worked beside my Mom, as she taught us to prepare the meals. When I tired of cooking and wanted to quit, she told me to keep going. And now, I’m glad she did.
One of my favorite meals that Mom made was roast chicken. There is nothing quite like the savory, homey smell of a chicken roasting in the oven. What is perhaps most surprising is how simple this dish is to prepare. And I’m always a huge fan of dishes that taste amazing with minimal effort, on my part. Mom knew what she was doing when she taught me to make this– and, with this dinner success under your belt, you’ll be hooked, too.
What are we waiting for? Let’s do this!
Simple Roast Chicken
Ingredients:
1 whole chicken, rinsed and giblets removed
2 medium Russet potatoes, scrubbed and cubed
5 carrots, peeled and chopped into 2 inch pieces
1 onion, peeled and cubed into chunks
2 tbsp. olive oil
Salt and pepper to taste
1/2 cup water
Directions:
In a large Dutch oven, stir together chopped vegetables with 1 tbsp. olive oil. Lightly salt and pepper vegetables to taste. Rub remaining 1 tbsp. olive oil over chicken and salt and pepper chicken to taste. Roast at 375 for 1.5-2 hours, until chicken tests done (I go for 170-175 degrees at the thigh with a meat thermometer, but it is technically “done” at 165 degrees). Allow chicken to rest for 10 minutes before cutting, so that juices can recirculate throughout the meat.
Now, in pictures! 🙂

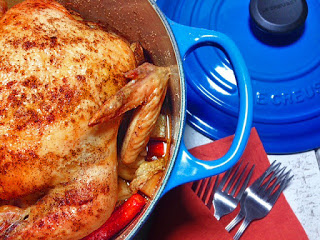
This recipe is one of those “fix it and forget it” meals that begs to be on the busy Mom’s mealtime rotation. You can throw this together the night before, and it’s all ready to pop into the oven when you get home. To begin with, grab a big Dutch Oven– cast iron is great, because it really gets the chicken nice and crispy, while also browning the vegetables and giving them a nice carmelized outside. My absolute favorite Dutch Oven is the Cadillac of cast iron– the gorgeous Le Creuset here . These little beauties last forever, and you can make everything from no knead bread to gorgeous, caramelized vegetables and roasts. They are well worth the investment.
You can really load up the vegetables, here– I like to use about 5 carrots, 2 potatoes, and 1 onion, all cut into large chunks. But you can add more vegetables, if you like. You can also use parsnips very nicely in there– just make sure that your vegetables are the “hard” kind (like carrots) that will stand up to several hours of cooking time without getting mushy. Just roughly chop the vegetables into largish pieces, and peel or don’t peel– it’s up to you. Toss the vegetables in about a tbsp. of olive oil, and lightly salt and pepper the vegetables, if desired. This dish is great because it truly is a one pot wonder– you have your main course, vegetables as a side, and a delicious broth, at the bottom, for a killer gravy.
I’m being figurative, of course– the gravy won’t kill anybody– unless it’s from when the person stuffs his face so full of your delicious meal that he explodes. But what a way to go . . .
Pour about 1/2 cup of water into the vegetables– this will form the basis for a delicious, meaty broth.

Next, rinse your chicken under cold water and remove the giblet packet from the cavity. Just a note– whenever you handle raw chicken, make sure that you completely sanitize any tools or surfaces that the chicken touches. I keep a spray bottle of Clorox kitchen cleaner right beneath the sink so that I can quickly clean the counters and sink, when I am finished rinsing a chicken. Don’t forget to wipe off any surfaces that your fingers touched, also, like the handle of the faucet.
Place your chicken on the bed of vegetables. Aww. Isn’t that cute. The little chicky is nice and cozy in that nice little bed you made for him. And don’t worry. The bed will be . . . (evil chuckle) . . . nice and warm very shortly. Haha! Sorry. O_O Serious.

Drizzle a little olive oil over the chicken, using one hand to pour and the other hand to rub the oil over the skin. Make sure that you get the oil in between the wings and also under the little guy as much as you can reach– don’t hurt yourself, but just try to grease up all the surfaces. Lightly salt and pepper the chicken and use your “oily” hand to rub the spices all over the bird. You can use other spices, too, if you like, but salt and pepper is easy peasy and tastes great.

And that’s it, really. If you want your chicken to look prettier, you can tie the legs together with a short piece of kitchen twine. But don’t worry if you don’t have any– your bird will cook perfectly well, without the twine, too– the legs will just stick out at crazy angles.
Pop the chicken, uncovered, into the oven at 350 degrees. The lowest safe temperature for chicken is 165 degrees, but I prefer to get my chicken a little more “cooked” than that. It really just depends on your ideal chicken preference. Here is a basic temperature breakdown:
165 degree chicken will be cooked but very juicy and a little pink
175 degree chicken will be cooked, juicy, and not pink
180 degree chicken will be well cooked, moist, but not dripping juice
Personally, I prefer 175-180 degree chicken. My friend, Jacqui, jokes that I must have very active salivary glands, to eat chicken like this. Haha. Well, to each his or her own. I like my chicken to be moist, but definitely not dripping any kind of fluid on my plate. Eeeewwwww. The thought makes me cringe. But everyone’s tastes are different. It takes me about 2 hours, at 350 degrees, to get my chicken just the way I like it. During the last 10 minutes of cooking time, if my chicken isn’t quite as done or as brown as I like, I turn the heat up to 425 degrees, just to really crisp and brown the skin. Mmmm . . . taking that first, crackling bite is a pleasure not to be missed. Keep an eye on your chicken’s temperature, and when it is about 5 degrees away from optimal temperature, turn up the heat and finish it off to golden glory.
To check little chicky’s temperature, insert your meat thermometer into the part of the chicken between the breast and the thigh– stick it in several inches, so that you are getting the temperature of the inside of the bird. I, personally, also check the breast temperature. When you get your ideal temperature, based on the chart, above, remove the chicken from the oven and allow it to sit for 15-20 minutes before carving, tenting with foil, if you desire. The beautiful Dutch Oven will keep it nice and hot, and the resting time will help the juices to sink back into the meat, so that it will be moist and not drip juice all over your cutting board.

When your chicken is ready, remove it from the pan to a cutting board. Cut down the center of the breastbone, and then make a horizontal cut, across, to remove each breast. Slice the breast meat on the board, by the entire bird, for a wonderful presentation. Don’t resort to chipping away chunks of white meat, again– it looks so professional and beautiful when you slice the breast meat, separately. You can also remove the wings and legs, separately, if you like. If you need a reminder on how to cut up a whole chicken, check out my tutorial here.
Make gravy by cooking the juices in the bottom of the pan, separately, with a few tbsp. of flour mixed with water. Don’t keep adding flour– the gravy will thicken as it heats. A quick tip is to make your gravy during that resting period that the chicken needs before serving.
And then . . . watch the beauty unfold. Dish up caramelized, roasted vegetables, alongside expertly carved and perfectly cooked roast chicken, drizzled with homey, peppery gravy. Is it any wonder I decided I loved to cook? Mom knew what she was doing.
Moms always do.
Because you did it. And I’m just so proud of you.

Disclosure: This post may contain affiliate links, which just means that we get a few pennies if you purchase through our link. I never recommend products that I don't personally use and love. Thanks!