Photo by Jill Lang
When you start the hobby of decorating cookies, it doesn’t take long to realize two things: (1) your cookie cutter collection takes up a lot of space, and (2) you always seem to need a cutter you don’t have.
If you have unlimited space and money to spend on cookie cutters, then you don’t need this post. But, if you, like me, find yourself constantly wanting a cutter that doesn’t exist, or you just need a cutter for one thing and don’t want to store it forever, hoping you’ll someday make those random Frog Prince cookies again, then read on!
Cookie cutters are actually fairly simple and fun to make, once you get the hang of it. I started down this street of custom cutters when I needed a cutter that I couldn’t find anywhere to purchase. I looked EVERYWHERE. There was nothing that I liked. The only solution was to either give up or make my own.
So I went to the tool guy in my world– my brother. He is one of those handy dandy, all around “I can fix that” kind of guys, and I knew he’d have some ideas. He did. A few days later, I got a neat package in the mail– a roll of aluminum sheeting, a pair of needle nose pliers, and a riveting gun. Yes. He sent me a gun through the mail. Ha. Don’t worry– it’s basically a souped up stapler. Don’t alert the media.
These materials are all fairly inexpensive– and you can find all of these things at your local Lowe’s. I think he paid less than $20 for the supplies, and there is enough metal there for hundreds of cookie cutters. Sounds like a win win to me! Thanks, bro.
Want to start making your own cookie cutters? What are we waiting for? Let’s do this!
The first thing to do is sketch out your design. It’s good to add the “inner” details, even though they won’t be on the cutter, itself, just so you get an idea of how the decorated cookie is going to look. I wanted a wheelbarrow that was kind of facing partly forward, rather than purely sideways. I put a load of apples in there, but I tried to make the top kind of on the straight side, in case I wanted to have a wheelbarrow of pumpkins, or something else.
Once you’re happy with your sketch, use a dark pen or marker to trace a “hard” outline. Try to keep the shapes fairly smooth without tons of twists and turns, so that your cutter is easier to bend.
Now, use a piece of string or thread and “measure” how long the cutter is. Basically just lie the string along your outline so that you know how long you need the metal to be.
Once you have your string “measurement,” cut a piece of metal the correct length. I usually give myself an extra half inch or so, for finishing purposes.
So what is this metal? Well, I cut my aluminum sheeting into 1″ strips and taped the coils with masking tape, so I could have some whenever I needed it. When I need some, I just uncoil a strip, cut the length I need, and tape it back up for next time. Easy peasy. You can also use aluminum cans, cut into strips, but it will be a hassle trying to “piece together” those small strips. Sheeting is probably 12 feet long, so you don’t have to cobble pieces together.
Once note on cutting aluminum sheeting . . . it is sharp. Either use gloves while cutting it, or just be super careful. You can also turn down one edge of your metal by placing it against a ruler and bending a small portion back on itself. I did that for the first cutter, but I found that, after cutting, the metal wasn’t super sharp, and since I just needed this cutter for a few uses, I didn’t want to waste time crimping the edge. Just be careful.
Now, for the fun part– making your cutter and seeing your design come to life! Start with a longish straight section of your design. That way, when you finish, you will have a straight piece to bolt together, rather than trying to end on a curve. This will make more sense in a minute.
I generally like to use the needle-nose pliers to fold the bends. Continue to check your cutter against your pattern to make sure that the angles are right.
For the curves, I tried using the pliers, but I found that this created kind of a “blockish” circle, since I could see every pinch of the pliers. I had better lucky bending the circles with my hands– just be careful of the edges.
If you want to, draw out a few other sketches to make yourself a nice collection. The more cutters you make, the better you will get. My first attempt was ROUGH. My second was OK. My third was pretty good. The more I practice, the better and quicker I get. And you will, too!
When you finish your cutter, you have a variety of choices of how you want to finish it. My brother got me a rivet gun for about $13, so you can go that route if you want to. Double sided tape works, too, especially if you’re just wanting the cutter for 1-2 uses. If you only need the cutter for one use, you can also use regular tape, since you won’t have to worry about washing it if you’re throwing it away after just one use. I think hot glue might work, too, although I’ve not tried it.
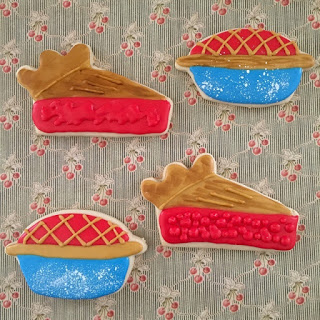
Here are the cookies that I made with my cutters. How neat is that . . . the ideas have come to life.
I loved this “slice of pie” cutter. I think it has all kinds of possibilities– you could do pie in so many colors and with so many “fruits.” I just love the thought of pie slice cookies for a 4th of July picnic– or how about for Labor Day, which is coming up quickly?
Photo by Jill Lang
These little pies are so cute– I tried to do a speckled enamel on there, but it needs work. No worries! That’s what practice is for 🙂
Photo by Jill Lang
Photo by Jill Lang
Whatever you decide, just have fun. Your only limit is your own imagination! I can’t wait to see the types of cutters and cookies you create! And I know that I’m going to be doodling away and thinking up all kinds of fun designs. The possibilities are endless. 🙂
You did it. And I’m just so proud of you.

Disclosure: This post may contain affiliate links, which just means that we get a few pennies if you purchase through our link. I never recommend products that I don't personally use and love. Thanks!







Pingback: Cute Hedgehog Cookies – Cookies for England
Pingback: Enchanting Elf Cookies – Cookies for England