Yum
It was one of those days. When I went to get the baby in the morning, she had apparently had the world’s largest spit-up in her crib, and was happily painting the walls, crib, and bedding with it. I went to make the kids breakfast, then realized I had forgotten to get groceries, and all I had was hot dogs. Yes. We did have hot dogs for breakfast– don’t tell the breakfast police. It was as hot outside as the surface of the sun, and I loaded baby, toddler, about a billion pounds of gear, and a huge sack of heavy library books into the car so that we could return the books before they were late and we had to pay a fine. We had to drive super slowly because the road to the library is windy, and my son gets carsick (and drivers just LOVE a car that goes slowly. Ugh). When we finally got there, I got the stroller out, the books loaded, the carseats unfastened, and the kids set to go . . .
And the library was closed.
It was one of those days that called for a calming cup of tea, and a delicious, comforting scone. And so, AFTER I got groceries, I whipped up these espresso chip scones– with a little bit of coffee to perk up your day, and a little bit of chocolate . . . because the lone library squad deserves it.
What are we waiting for? Let’s do this!
Espresso Chip Scones
(adapted from Allrecipes.com and reinvented for my own taste)
Ingredients:
2 cups all purpose flour
1/3 cup sugar
1 tsp. baking powder
1/4 tsp. baking soda
1/2 tsp. salt
1 tsp. espresso powder (get this
here
)
1/2 cup (1 stick) butter or margarine, chilled
1/2 cup sour cream
1 egg
1 cup chocolate chips plus 1/4 cup more for melting and drizzling on top, if desired
Directions:
Mix dry ingredients together. Cut in butter with a pastry cutter. Stir in chocolate chips. Add in the beaten egg and sour cream until the mixture is moistened into a heavy dough. Roll the dough into a flat circle about 1.5″ thick. Cut into 8 wedges and place on a silpat-lined baking sheet. If you prefer mini scones, make 2 smaller rounds before you cut out your scones. Bake at 400 degrees for 15-18 minutes, until a toothpick inserted into the center of a scone comes out clean. When scones have cooled, drizzle with melted chocolate and allow to dry on a cooling rack.
Now, in pictures! 🙂
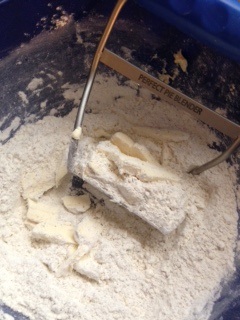
The lovely thing about scones is that they can be whipped up in a flash, for a nice, warm treat when life calls for a calming cup of tea. Start by whisking your dry ingredients together, just to make sure they are combined. Now it’s time to “cut in” the butter. Cutting in butter just means to incorporate some sort of fat (we are using butter) into dry ingredients, while keeping the fat cold. These little pockets of butter give scones their delicious lift and those beautiful, flaky layers. You can cut in your butter with anything from 2 forks to a couple of knives, but I have never found a tool better for cutting in butter than the Perfect Pie blender,
here
. Unlike traditional pastry blenders, this one has a flat base, which makes it so much easier to get to the bottom of the bowl. I use this little baby for everything from scones to biscuits to quick breads and pie crust. If you do any type of baking, you need this tool in your life.
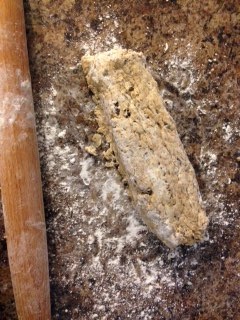
After your butter is cut down to about the size of small peas, stir in your chocolate chips and then add in the beaten egg and sour cream. This part takes some muscle– it’s almost like stirring play-dough. But channel your inner superman (or woman!) and stir away. Keep working it, and the dough will eventually come together. Pat the dough into a line and cut it into small triangles (you can also make a circle and cut it, pizza-style, if that’s easier). And since you’re ALREADY in pizza mode, maybe that is God telling you to order pizza for supper? (*Innocent Face*)

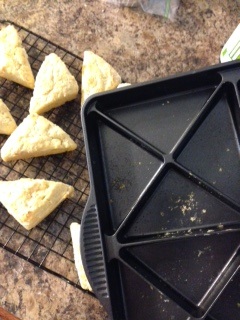
Once you get the little triangles cut out, go ahead and place your scones on a silpat lined baking sheet. A silpat is another thing that I use almost every day– save the planet and save your baked goods– because it’s basically washable parchment paper. Get a silpat
here
. I have a whole arsenal of awesome scone tools, because these little beauties are like the sweetness of your Grandma in baked good form . . . they make you feel better just knowing they’re there.
Of course, you can also use an adorable scone pan or even mini scone pan, which makes perfectly adorable little triangles a snap. Sometimes I cut the scones, separately, and sometimes I use this little mini scone pan,
here
. However you do it, you’ll be biting into a delicious, flaky treat in a very few minutes, and no one will care how you got there– just if there are enough scones for seconds. 😉
And once you’ve solved that conundrum, all that remains is for you to bake these little beauties for 15-17 minutes at 400 degrees. The amazing smells wafting throughout your house and luring your neighbors to your doorbell are free.
If you like, you can drizzle the scones with melted chocolate when they cool (the silpat is great for that, too– all the extra mess just wipes off!). Or just have one plain, with a cup of tea or coffee. It’s hard to beat a freshly baked scone, still warm from the oven. So have one. Take a sip of tea. Think great thoughts.
Because you did it, and I’m just so proud of you.

Disclosure: This post may contain affiliate links, which just means that we get a few pennies if you purchase through our link. I never recommend products that I don't personally use and love. Thanks!


I like your photos and how they set the mood for the recipe 🙂
Aww thanks, Nicole! Chocolate always makes me think dark and moody. 😉 Thanks for stopping by!
These look amazing! And pizza mode for the win!
Hehe. 😉