Raisins get a bad rap. When I pack snacks for my kids, raisins are always last on the list of foods requested. At a party, when someone unearths a tray of (chocolate chip?) cookies, people dive and then quickly pull back, full of bitter disappointment. Raisin cookies! Bah.
But I really think that the fate sealed upon the lowly raisin is undeserved. They are delicious, sweet, and just a touch spicy. They accent everything from cookies to old fashioned cakes with the grace of a classy grandmother.
I have always loved raisin bread. There is just nothing that says “sit down at Grandma’s table and unload all your troubles” like a fresh, buttery slice. Just the aroma of its delectable, homey fragrance is enough to waft me back to childhood.
What are we waiting for? Let’s do this.
You know you’re a baking nerd when the King Arthur flour catalogue is your favorite magazine 😉 The most recent issue had this gorgeous slice of raisin bread on the cover, and I decided that it had been far too long since I made this amazing bread. Historically, I have had bad luck baking raisin bread. However, I think that, with a little practice, anyone can conquer this little beauty.
I changed the recipe a bit from the one included in this King Arthur flour catalogue; here is the recipe as I amended it– feel free to tweak to suit your own tastes, as well.
Recipe:
1 1/2 cups warm water
2 tbsp. honey
2 tbsp. softened butter
1/2 cup whole wheat flour
3 cups all-purpose white flour
2 tsp. salt
2 tsp. INSTANT yeast
Filling:
6 tbsp. sugar
2 1/4 tsp. cinnamon
1 tbsp. flour
3/4 cup raisins
Directions: Mix the warm water, honey, softened butter, instant yeast, and whole wheat flour. Whisk well, breaking up the butter into small pieces with your whisk. Add the salt and 1 cup of white flour. Whisk. Switch to a wooden spoon and gradually add flour until you have a sticky dough. Scrape dough onto a floured silpat and knead until dough is soft and no longer sticky. Continue adding flour as needed, as you complete this step.
Place dough in a greased bowl, turning once to grease top. Cover with a clean kitchen towel and allow to raise until doubled in size– roughly 1 1/2 hours. When dough has doubled, punch it down and roll into a rectangle the size of your silpat. In a separate bowl, mix 1 egg and 1 tsp. water. Whisk this until the egg is completely beaten (this is an egg wash). Brush your rectangle of dough with egg wash and cover with filling mixture. Roll dough into a log, pinching edges to seal. Place in greased 8.5×4.5″ loaf pan and cover, allowing to rise to 1″ above the pan. While dough is rising, preheat your oven to 375 degrees. Bake loaf until inside registers 190 degrees, covering top with foil when loaf reaches desired brownness.
Here is the drill, in pictures:
Mix your warm water, honey, yeast, and butter together. Use instant yeast (if you are using active dry or rapid rise yeast, add a 5 minute proofing step for the yeast to foam). More on the different types of yeast
here. Spray your table spoon with cooking spray so that the honey will slide out of it, easily, without sticking.
Add 1/2 cup of whole wheat flour. Adding a small portion of whole wheat flour to baked goods is a good way to increase your whole grains without sacrificing taste. You can add more, if you want, but it will make the dough heavier. Heavy the bread equals heavy the heart.
Your mixture should look like this– use the whisk to break up the butter into small pieces.
Add your salt. Remember– salt and yeast are like exes at their child’s wedding– you have to break them up a bit (in this case, with flour). More on this
here.
Whisk in the salt, and then add about a cup of regular flour. Whisk until your dough becomes almost too stiff to whisk. At that point, switch to a wooden spoon.
Gradually add flour, little by little, until you have a stiff dough. You may not need all 3 cups– just use enough to get the stiff dough– don’t force it.
Knead your dough on a floured silpat until it is soft and smooth– no longer sticky.
More on kneading
here. (That is, if you really NEED to KNEAD . . . it’s on a NEED to know basis . . . confused yet?)
Place your dough into a greased bowl and mist the top with cooking spray. I used butter flavored spray so that you could see it easily.
I wanted to take a picture of the tiny dough ball in the bowl, so that you can see how much it has grown when I show you the “after” picture.
This is a little trick to make the raisins softer– it is optional, but I always do it. I place my raisins in a little hot water and microwave for 1 minute. I let them sit while the dough is rising. When the dough is finished (after about 1.5 hours), I drain them out and squish out the excess water. It makes them more tender and soft.
These are your filling ingredients. Go ahead and mix those up so your filling is ready to go.
There it is. This is where the magic happens.
Here is our dough after it has been rising for 1.5 hours. See how it fills that bowl right up? It’s nice and puffy– go ahead and push it down and listen to it deflate. That’s always so fun.
Take your dough and place it on a lightly floured silpat. Roll it out to the size of the silpat.
Take an egg and mix it with 1 tsp. of water. Mix well.
This is called an egg wash. It makes breads nice and brown, when it is brushed on before baking, and it helps breads with “centers” stick together, when it is added to the inside. That’s what we are going to do, today, so we don’t get huge air pockets in our bread.
Brush egg wash over the rolled out bread dough. You won’t need to use the entire egg.
Sprinkle your raisin and sugar mixture overtop of the egg wash-brushed bread dough. It looks kind of gross now– I admit. But just wait . . . it’s the ugly duckling. Time will make it gorgeous.
Gently roll up the log, with the raisins inside.
Pinch the dough closed at the edges, so none of the good stuff escapes. And you always thought pinching was wrong. Go ahead. Take out all your childhood pinching angst on this bread.
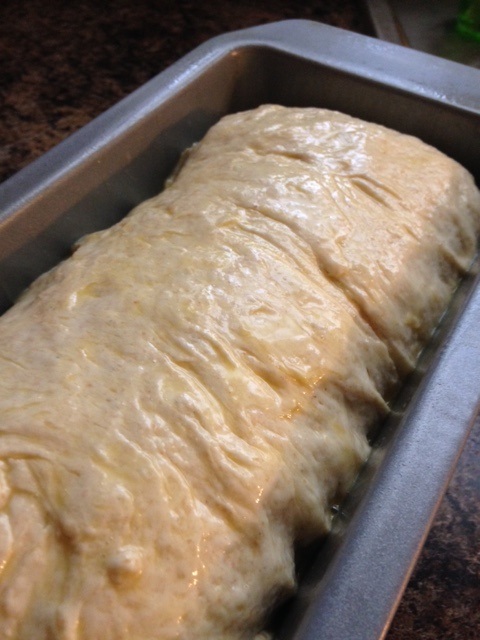
Here is your log, all nice and sealed up. Wrap that baby up as tightly as Mom wraps you up when she is cold. Never mind if you’re cold or not. Mom’s cold. Put on a sweater.
When you put your loaf in the pan, put the “seam” at the bottom. It will look prettier with that part not showing. Keep in mind that this is an 8.5×4.5″ pan, rather than a traditional 9×5 loaf. I had a little egg wash left, so I coated the top. This will just make the bread nice and shiny brown when it’s done. You don’t have to do this– I just wanted to use the egg up. Bake at 375 for roughly 40 minutes (cover with foil if bread is brown enough), until internal temperature registers 190 degrees. More on taking a loaf’s temperature
here. Look at you, babying this loaf. First, you wrapped it up nice and warm, and now you’re taking its temperature. You’re such a good Mom. haha.
Mmmm . . . it smells absolutely incredible. It seriously smells like Christmas morning or something, with all the cinnamon wafting around here.
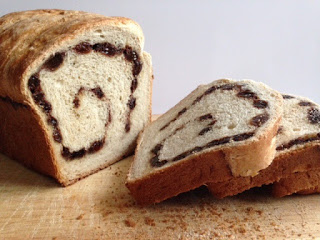
It’s always so fun to cut into a “loaded loaf” and see what it looks like. This one didn’t disappoint. The egg held it together, with no air pockets. Soaking the raisins made them nice and plump. This bread smelled divine while baking. Delish!
And it tasted even better, slathered in melted butter.
Yes. It absolutely tastes as good as it looks. Taste it soon. Mmm. You won’t be disappointed!
There are lots of variations, too. Try nuts in the filling– cherry almond, maybe? Feel free to substitute craisins for the raisins, and you have an awesome holiday breakfast for Christmas. No matter how you make it, it’s sure to be a hit. And the amazing smells are free. 🙂
You did it. And I’m just so proud of you.

Disclosure: This post may contain affiliate links, which just means that we get a few pennies if you purchase through our link. I never recommend products that I don't personally use and love. Thanks!