
Cops get a bad rap for loving doughnuts (or “donuts,” if you prefer). I mean, who DOESN’T like doughnuts? Seriously. I’d worry more about cops if they didn’t like those things.
There are few things in life more amazing than a hot, fresh doughnut. When the Krispy Kreme sign goes on, the line fills up even faster than you can come up with an excuse. There is just something about the light, airy center of a doughnut, combined with your choice of favorite toppings, that sends this simple treat over the top.
And you can totally make them at home. That’s right! You can have fresh, homemade doughnuts ANYTIME YOU WANT. Without the doughnut shop run. Without the sting of disappointment when you find that your favorite flavor is already sold out. You can, truly, have your cake and “eat it, too.”
My sister bought me an old, vintage Better Homes and Gardens cookbook for Christmas. She knows I love almost anything vintage, and this book is no exception. I have loved looking through it, and I especially love seeing the handwritten notes in the book from the previous owner. This lady, whoever she was, made a special note about these little beauties– and I can imagine her making them, in her 1950s kitchen, for her “Leave it to Beaver” family and kids, many times, throughout the years. I think it’s neat to recreate a true piece of the past with a living, tasty example. How neat.
These doughnuts are similar to the heavier “cake” style doughnuts that you find at Dunkin’ Donuts or Duck Donuts (in beautiful OBX!). Tell you what. I’ll do one post, for this kind, and soon I’ll do another post of how to do the lighter, Krispy Kreme style doughnuts, too– deal? That way, the doughnut monster inside you will be satisfied, no matter what your favorite.
What are we waiting for? Let’s do this!
Delicious Homemade Doughnuts
(adapted from Better Homes and Gardens cookbook)
Ingredients:
1 1/2-2 cups all purpose flour
2 1/4 tsp. instant yeast (or 1 packet active dry yeast)
1/2 cup warm milk
1/4 cup sugar
1/8 cup shortening
1 egg
Glazes and toppings, if desired
Directions:
Whisk together warm milk, sugar, shortening, egg, and instant yeast. If you are using active dry yeast, you will need to proof your yeast before adding it. Whisk in enough flour to form a thick batter and continue to add flour until the dough is firm enough to knead. Knead dough on a floured surface until it forms a soft dough. Cover and allow to rise in greased bowl for roughly 1 hour, until doubled in size. When doubled, roll out dough to 3/4 inch thickness and cut out doughnut shapes. Allow doughnuts to rise, covered, for 40 minutes until quite puffy. Fry in hot oil for 1 minute per side, until doughnut browns. Flip over and fry the other side, watching carefully not to overcook. Roll in desired topping and allow to dry on a drying rack until ready to eat.
Now, in pictures!

Start out by combining your milk, sugar, shortening, egg, and instant yeast. If you are using regular active dry or rapid rise yeast (like the kind you find in the grocery store), you need to add a proofing step. I love that instant yeast keeps for years in the freezer, and I can just add it like any other ingredient, and I’m good to go . . . no proofing required. 😀 Try instant yeast– you’ll never go back. Get it here .
.

Add in enough flour (1/2 cup, or so), that you can whisk this mixture together and get the lumps out. Yeast dough is a lot like marriage . . . it requires a little substance to really start to work out the kinks 🙂 When the shortening has been whisked into teeny clumps, go ahead and add more flour. Add flour until you have a nice, stiff batter.
At this point, scrape your dough onto a floured silpat and knead, adding flour as necessary, until the dough is smooth and supple, like a human earlobe. I know– I use that comparison, a lot, but that really is what it feels like! I swear!

Place your dough ball in a greased bowl and mist the top with cooking spray. Cover the bowl with a kitchen towel and allow to rise in a warm place for roughly 1 hour-90 minutes. When your dough is nice and puffy, and about doubled in size, it’s ready.

Gently deflate your dough onto a lightly floured silpat. Roll out the dough with a rolling pin to 1/2-3/4″ thickness. Think about doughnuts as you do this. Imagine the fresh doughnut glory you’re about to win. You’re so close, now! It won’t be long!

Cut out your doughnut shapes. You can use a large and small circle cutter, if you want to do the traditional doughnut shape, or you can get creative and do any shape that you want. How about heart doughnuts for Valentine’s day? How about Christmas trees for Christmas Eve breakfast? Egg shapes for Easter brunch? How about your intials? Goodness. You have no limits, here. Live it up.
Whenever you have cut out your shapes, place them on a silpat-lined cookie sheet and cover the sheet with your kitchen towel. Put the tray back in the warm spot and allow the doughnuts to rise for 30-40 minutes, until they are nice and puffy. When the doughnuts have about 8-10 minutes left to rise, start your oil heating.
It doesn’t really matter what kind of oil you use– you can use canola, vegetable, lard, or even melted shortening. Personally, I really like to use peanut oil– it just seems to turn out a great product that doesn’t get heavy with grease spots. But it’s all about personal preference, on this one. If you have a cast iron pan or Dutch Oven, break it out. Those babies fry like nobody’s business (well . . . technically I suppose it IS your business since these ARE your doughnuts . . .), and they hold the heat super well, even when cold ingredients are added.
You want your oil to be about 325 degrees, if you have a candy thermometer to check it. If you don’t have a candy thermometer (I do not), then you want to watch for the oil to start shimmering, like a mirage on the highway on a hot day. A doughnut will start to foam, immediately, but not freak out or spatter (meaning oil is too hot) when placed into the oil (you can sacrifice a doughnut hole to check your oil temp, if you want). I find that, for me, putting the stove on about 3.5 is perfect for frying. But every stove is different, so you may have to experiment, a bit.
More doughnuts for experimentation??? YESSSSS . . . all in the name of science, right? You’re such a martyr. ha.

When your oil is hot and your doughnuts are nice and puffy, carefully put a few of them into the oil. I want to mention, here, that you need to have all of your desired glazes and toppings ready to go. These babies go FAST. When you are trying to make doughnuts, for the first time, get all your toppings laid out, and then fry a single doughnut, rather than several at a time, as I have, here. Until you get the hang of what you’re doing, you don’t want perfectly good doughnuts burning.
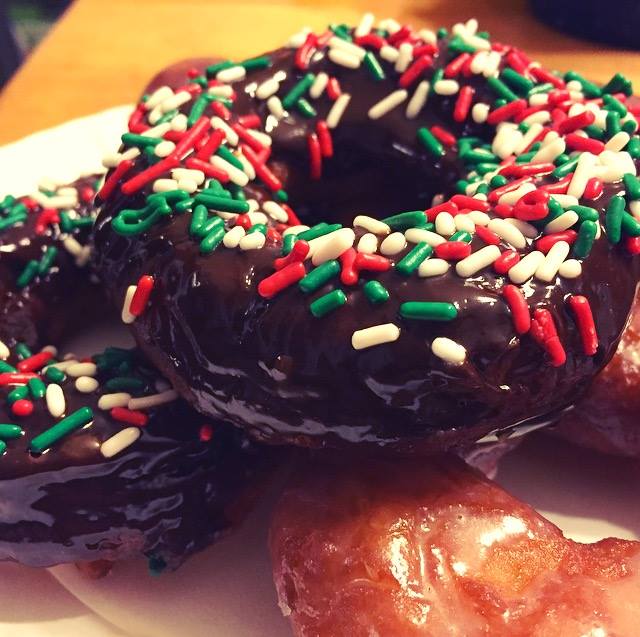
You can use any toppings that you want– today, I am using a simple glaze (2 cup powdered sugar, 1 tsp. vanilla, and 1-3 tsp. milk– add it slowly so your glaze doesn’t get too runny), and a simple chocolate ganache (1 cup semi sweet chocolate chips and 1/2 cup heavy cream, melted together over low heat) with sprinkles. You can also use simple cinnamon and sugar, or just powdered sugar– just have your mixture, ready, so that the hot doughnuts can jump right in there and get this party started!
Everyone good? OK then. Let’s make some doughnuts!
The doughnuts take about 1 minute, per side. It’s super fast. I’m telling you. You’ve been warned. One minute you’re sliding those sweet little puffballs into the oil, and then you’re watching in awe as they sizzle and dance around the pan . . . and a second later, they’re done. Watch carefully so that they don’t burn. When they start to get a little brown around the edges (you can see this best, in the “hole” part– check out my photo, above), go ahead and use tongs to flip them over. After about 30-45 seconds, on the other side (the second side doesn’t take as long), remove them from the grease and throw those suckers into the toppings! If you are working with 1 doughnut at a time, place the others on a paper towel while you wait.

Here is a sweet little doughnut hole (doughnut holes are done, like, as quickly as you can say “doughnuts.” They seriously take almost no time at all– maybe 10 seconds? So watch them really closely to avoid burning). When you take the doughnuts out, throw them right in the glaze. Use your tongs to coat the doughnut on both sides with the sweet evil that you are about to ingest.

Place the glazed doughnuts on a drying rack over a . . . you guessed it– silpat lined baking sheet. I seriously use these little darlings every day. Silpats are some of the best things I have ever purchased. I use them for EVERYTHING. The worst messes wash off slicker than promises from a politician’s mouth. Slippery, these babies. So don’t worry about all that dripping glaze . . . it will clean right up, lickety split. You can double dip the doughnuts if you want a really delicious, thick glaze. Yes. In this case, double dipping is OK. I won’t tell if you won’t.

This little guy is getting a delicious chocolate bath in the ganache. You can coat the whole doughnut, if you want, but I’m just doing the top, because they’re easier to grab, that way.

Sprinkle some color on there, too, if you have any sprinkles. For some reason, sprinkles on doughnuts just make me happy. You have officially “made doughnuts” when you have them come out looking like that. And it’s so easy! Ahhh . . . I love impressive food that is secretly easy. Score.

Let your doughnuts sit there and cool. Or don’t. Shove one in your mouth, hot and fresh. Let your eyes roll back in your head. Wow. You made these. You can even freeze the dough, ahead of time, so that you have fresh doughnuts when you want them– say, on Christmas morning, when everyone wants to be spending time with family, instead of chained to the stove, making breakfast. You can do it! I’ll talk more about freezing doughnuts in the next post– the Krispy Kreme style doughnuts.
YUM.
You did it. And I’m just so proud of you!

Disclosure: This post may contain affiliate links, which just means that we get a few pennies if you purchase through our link. I never recommend products that I don't personally use and love. Thanks!


Pingback: Homemade Krispy Kreme Doughnuts – Cookies for England