Um . . . what the heck is a Lowel EGO light? I thought Anton Ego was the guy from Ratatouille that didn’t like food. And that guy certainly didn’t light up anyone’s life. Oh . . . I’m just so glad you asked. Let’s discuss. *Pulls up chairs to the table and passes you a cup of coffee.*
*And a cookie.* Hey– it’s not the New Year yet. This is still technically Christmas. Have another cookie. 😉
Homemade Lowel EGO Lights
When I first started food blogging, I quickly realized something about food blogs . . . in order to get decent photos, you need decent light. The “decent light” that most food bloggers use and recommend is natural light. The only problem is that natural sunlight is only at its best from, like . . . 2-4 in the afternoon. Yes. And it gets even shorter in the winter. This creates the awkward problem of either cooking supper at 2:00 in the afternoon (why yes! The food is fresh dear . . . why do you ask? *tries in vain to chew through iron-clad, dried out ziti . . .*), or purchasing some sort of expensive indoor light studio. And both of those options were pretty yucky to me. So I set out to devise a solution. And would you believe I got the job done for around 20 bucks? Yep. Needing money for diapers will push you to get creative. 🙂 So let’s walk through the process, and soon you’ll be taking gorgeous indoor photos, at 11:00 at night if you want to, without refinancing your car to do it. 😉
What are we waiting for? Let’s do this!

Let’s start with what most food bloggers use for indoor light photography. Once you understand the reasons that many people use the more expensive equipment, you can harness those reasons and create a more affordable alternative. To start with, the holy grail of indoor food photography lighting is the Lowel EGO light. The basic perk of this pricey light system (usually bloggers use at least 2 of these lights, possibly more, for each photo setup) is that it provides a soft, clear light that closely resembles daylight.
To create this gauzy, dreamy light, we need some sort of white, semi-sheer material. Do you notice how you can see my finger a little bit through this material? I’m not sure what this material is called, but I found it at Hobby Lobby for about 2 bucks per yard (and make sure to use those 40% off coupons!). It’s kind of a stiff cheesecloth/gauze type stuff. But any type of partially sheer white material will work. I’ve also used a white semi-sheer curtain in the past, and even a white plastic tablecloth will work, in a pinch, although it’s not as durable as cloth.
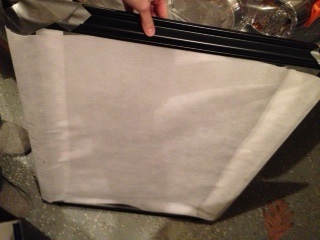
Why YES duct tape DOES fix everything! haha. I took a cheapie 16×20 picture frame and removed everything but the outside. I took my material and duct taped 2 layers to my frame. Yep. I have just made a homemade “scrim,” which is a photography tool used to diffuse light and give a soft, white glow to indoor photos. And since no one ever actually SEES this scrim, it doesn’t matter that it looks a little . . . rebellious. 😉
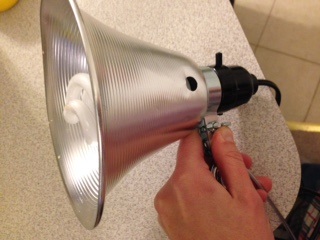
Now let’s talk lights. Contrary to popular belief, you don’t actually need super expensive studio lighting. See, that homemade scrim you just made will soften any light that you use, so the lights I have are these cheapies here. These are about 5 bucks each. That’s right. 5 bucks. YESSSSSS.
The important part is that you need to get natural daylight bulbs like these here. Not just any light bulb will work; the daylight bulbs give off a pure white light that, when diffused through a scrim, looks exactly like natural daylight. The bulbs aren’t terribly expensive (the ones I recommended are about 7 bucks for 4), and I generally use the 60 watt equivalent ones.
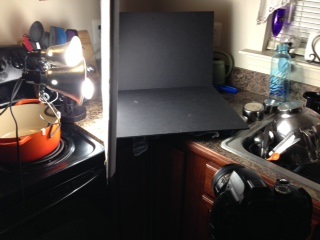
The setup doesn’t have to be super fussy, either. Here is a quick picture of my basic photo setup. Why yes . . . that actually IS a sink full of drying dishes. See? No one will see anything but the setup in the center, so enjoy the irony. 😉 I use 2 of those clamp lights (a cast iron pan works great for a base to clamp them to because it’s super heavy 😉 with daylight bulbs, diffused by my scrim. For background I usually use a piece of black foam board. You can also use white foam board if you prefer a lighter photograph. Sometimes I use an extra piece of white foam board or poster board on the right of the photo to bounce some light back, but it’s not absolutely necessary.
For the bottom, I usually just place one of my homemade photo backgrounds on the black foam board and lay out my food styling setup on it. For this next photo I used an old piece of 100 year old reclaimed barnwood. It looks amazing in photos.

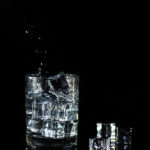
I made this photo using the setup, above. Yep. You can take photos like this, at 10:00 at night, if you want to. You can do this (whispers) AFTER the kids are in bed. You can TAKE YOUR TIME. You can take photos WITHOUT little hands grabbing at you and saying “Mommeeeeeeeeeeee are you done taking pictures? I want to eat that so bad that my face is HURTING . . . ”
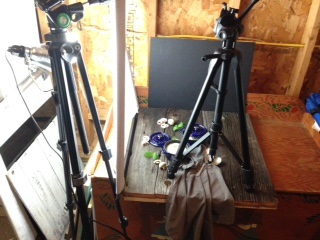
Here is another similar photo setup in my garage. Yep. Totally in the middle of car parts and extra paper towels, you can have food photo bliss. See all that junk around? See the tripod sitting on top of the whole thing? See my stack of photo boards lying there on the left? I’m telling you– the ONLY thing that matters is that teeny little bit of pretty food styling in the center. So don’t stress. 🙂
Now let’s discuss the setup. I have my 2 natural daylight bulbs, in clamp lights, to the left. I have a homemade scrim propped up in between the light and the setup. I used a black foam board backdrop and the barnwood surface to set my food up on. I found that I didn’t need an extra reflector for this particular photo because I loved the dark moodiness of the shadows, but you can easily add another piece of white foam board to the right of the photo if you need to lighten everything up.

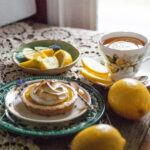
This is one of the photos I took with that easy peasy “garage” setup. Crazy isn’t it? Amazing how something so lovely could come out of a pile of homemade mish-mash like that. But guess what? You will never be able to tell, when adoring your gorgeous photos, that you used a $20 setup instead of a $600 luxe light setup.
And no one else will be able to tell, either. You’re oh so welcome.
You did it. And I’m just so proud of you.

Disclosure: This post may contain affiliate links, which just means that we get a few pennies if you purchase through our link. I never recommend products that I don't personally use and love. Thanks!


Thank you so much for this much more affordable alternative to the Lowel EGO lamp that virtually every other source tells you that you must have…that or natural light, which when you work from 9-5 and cook after you get home is just not a thing. I am definitely giving this set up a shot.
You are so welcome, Betti! 🙂 I agree– those EGO lights are just not in my budget as a busy Mom. I really hope you love this– I made the whole ‘shebang for about 20 bucks. 🙂 Let me know if you need any help and I’ll be glad to help! Good luck. 🙂