
Yum
Have you ever had a French Macaron? I mean, a REAL French macaron– not the American Coconut Macaroon. Macaron with 1 “o” is a delicate, utterly divine meringue cookie filled with your choice of filling. It is truly a rare treat not to be missed. Oooh La La!
Now, like most beautiful things, the Macaron has a catch. It is devilishly difficult to make. But gird up your loins, fair fellow baking enthusiasts! Because I am going to show you just how exciting achieving these monsters of the baking world can be! P.S. I want to give a shout out and wave to my frozen Canadian buddy, Joan. *waves* Hi Joan. 😉 And with that, let’s make macarons!
What are we waiting for? Let’s do this!
Mint Chocolate French Macarons
Macaron Ingredients:
100 g. egg whites
1/4 tsp. cream of tartar
50 g. white sugar
200 g. powdered sugar
110 g. almond flour
Mint Chocolate Ganache Ingredients:
1 cup semi-sweet or dark chocolate chips
1 cup heavy cream
2-3 drops peppermint extract
Directions:
Whip room temperature egg whites, cream of tartar, and white sugar with the whisk attachment until the whites reach stiff peak stage. Meanwhile, pulse your almond flour and powdered sugar in a food processor until the mixture is well combined. Sift your almond flour/powdered sugar through a sieve and throw away the pieces that are too large to pass through the sieve. When the whites have whipped into stiff peaks, fold the almond/sugar mixture into the whites gradually and carefully until they reach proper “macaronage.” Pipe meringue circles onto a silpat, using a template, if desired, and slam the cookie sheets 15 times on the counter to dislodge air bubbles. Allow circles to dry for 20 minutes before baking at 285 for 20 minutes, one sheet at a time, in the center of the oven (move oven racks, if necessary). Do not open the oven until the 20 minutes are up, and use an oven thermometer for best results. When your macarons are done, they should feel “firm on their feet.” If the macaron shells are soft or crack when gently touched, bake for 2 more minutes and test again until they are firm on their feet. Remove entire silpat to cooling rack and allow to cool, completely, before removing almond shells from the silpat.
To make mint chocolate ganache, microwave chocolate chips and cream in a bowl in 30 second increments just until chocolate can be stirred into cream (mixture should be warm but not hot– keep stirring until all the chocolate is melted into the mixture). Add peppermint extract and stir well to combine. Place mixture in the refrigerator for 8-10 minutes, until it is slightly cooled and the consistency of pudding. Do not allow mixture to completely harden. When ganache is of a pudding consistency, use a cookie scoop to place 1 tsp. inside each meringue shell and top with a second meringue wafer. Lightly twist to “cap” the macaron. Store covered in the refrigerator until ready to serve.
Now, in pictures! 🙂

Ahhhh, macarons. You are deceptively sweet, with your devilishly difficult success rate. But don’t worry– we will be enjoying macaron success in no time! 🙂
To begin with, know this: MACARONS DO NOT ACCEPT BAKING SHORTCUTS. That’s right. I am all for substituting and cutting useless effort in the kitchen, but macarons are the one recipe where you can’t cut corners. They will know, and they will deflate just to punish you for your insolence. So when I tell you to weigh the ingredients, or sift the ingredients, and you mentally start to say, “Yeah . . . I don’t need to do that . . .” then know that your macs are already starting the revolution process. If you want a shortcut, try brownies or funfetti cupcakes. Those are forgiving. But macarons? Not so much.
I recommend that the first time you attempt to make macarons, you read through the directions, completely, before you begin. Meringue is a temperamental beast, and everything in the process moves pretty quickly, so you need to have all your equipment and ingredients set out and ready to grab. Everybody ready? *lowers face mask* Let’s do it! 😀
First, you need to use a food processor to process together your powdered sugar and almond flour. The food processor I have is this workhorse from Black and Decker, here, and it has never failed me, through all my macaron failures and successes. I must strongly recommend, as well, that you use a kitchen scale to weigh your ingredients for making macarons. *whining begins in background* “Do we HAVE to???”
Yes. I know it’s a pain, but you have to weigh your ingredients for these bad boys. Yes, I bought a kitchen scale (this one from Salter is the one I have, and it’s luscious) just for this recipe. Yes, there is just something so delightfully OCD about weighing your ingredients down to the precise speck. It’s insanely awesome, really.
Meanwhile, let’s talk egg whites. This is the *whispers* ONE area where I kind of take a shortcut, when making French macarons. Traditionally, french macarons call for egg whites which have been “aged” on the counter, covered, for a week. Seriously??? Who has a week to wait every time you want to make these? I use plain, cartoned egg whites from Aldi (I can’t attest to other brands since this is the kind I always use). I weigh them out with my kitchen scale and set them into the bowl of my stand mixer. My stand mixer (I have the Kitchenaid artisan, here
) is the workhorse of my kitchen. I honestly think that, if I had to give up everything else and just keep one tool, it would be this mixer. I have no idea how I survived without one. If you bake or cook with any regularity, you owe it to yourself to invest in one of these. They last a lifetime and save your arms from the endless whisking and heavy mixing of a hardworking kitchen. You’re welcome.
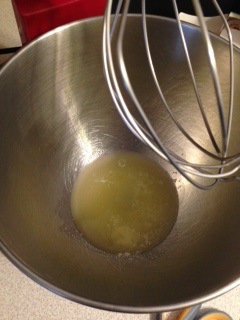
So yeah . . . anyway, place your egg whites, cream of tartar, and white sugar (also weighed via kitchen scale) into the bowl of your stand mixer. Make sure that your bowl is completely clean, because even one drop of oil will keep the egg whites from whipping, properly. I know. They’re such divas, right? Start your mixer going on medium speed, using the whisk attachment, and keep a close eye on the egg whites so that you don’t accidentally overbeat them. More on that in a moment.
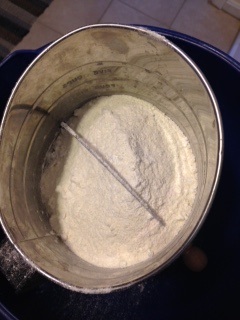
While your sweet little Kitchenaid mixer is going to town whisking your egg whites into light, effortless perfection, let’s go back to the almond flour/powdered sugar mixture that you just ground together in the food processor. This lovely white powder needs to be sifted. (SERIOUSLY???? I didn’t think anyone had used a sifter since, like, Grandma times. Do I really need one of these?).
Again, yes. I know it’s a pain. I know you probably don’t own a sifter. But I went out and got one, just for this recipe (the one I have is about 10 bucks here). Sift your powdered sugar/almond flour so that it’s nice and aerated and light.
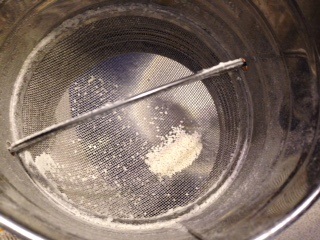
There– you see? This “gritty stuff” (how’s that for scientific terminology? haha) in the bottom of your sifter is the pieces of almond that aren’t fine enough to fit through the sifter. Go ahead and throw those away, because if you include these larger pieces into your macarons, your meringues will become pebbled on top, and sometimes even tear. I told you– they are more delicate than the princess and her infernal pea. They demand perfection! PERFECTION!!!! PERFECCCCCCCCTIIIONNNNNNNNNNNN!!!!!!!!!!!!
Sorry. I got carried away there for a minute.
But anyway, throw the little gritty stuff away.
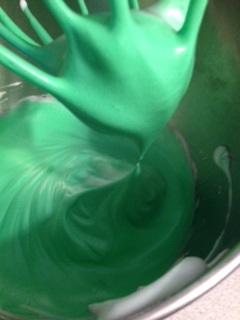
By now, your egg whites should have reached the soft peak stage. This just means that when you remove your beater, the egg whites form a point that will bend over when you turn the beater sideways. At this point add about a pea sized amount of gel food coloring if you want (I use this food coloring here). Don’t use the liquid food coloring, because it will mess up the ratios that you have worked so hard to measure out correctly. Once you have added your food coloring (you don’t have to add color if you prefer not to), continue whipping the meringue until it reaches the stiff peak stage. See how the points “froze” in place when I lifted the beaters out? That’s what you want. Don’t beat past this stage, or the egg whites will start to break down and separate (AKA, macaron kaput. Pink slip. Fat lady singing. End of game).
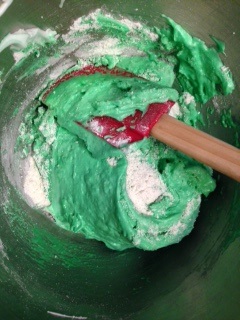
Now that you have perfectly whipped your egg whites to stiff peak perfection, let’s start the most tricky part of the macaron making process– the “macaronage.” Achieving proper “macaronage” just means that we want to fold our almond flour/powdered sugar mixture into our egg whites to JUST the right consistency. Learning what this perfect macaron batter looks like definitely takes practice, and when I first started making these temperamental little beauties I ruined countless batches by either undermixing or overmixing the batter. So I will do my best to describe what you’re looking for so that you can nail this on the first try.
I sprinkle my sifted mixture over top of the meringue in 3 different “sprinkles.” I shake about 1/3 of the mixture on first, and then fold with my silicone spatula until it’s somewhat combined. Then I sprinkle another 1/3 of the powder. Fold a bit more. You won’t completely mix everything together at this point to avoid overmixing the egg whites– just fold several times until it is mostly combined. Then the last bit of powder. NOW we will finish getting everything completely together.
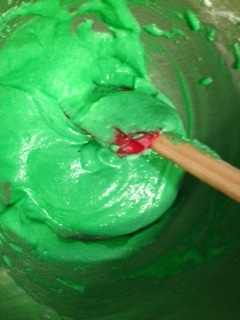
There are many tips and tricks which pastry chefs have offered for how to tell when you have achieved proper macaronage. Some people say that the batter should “flow like lava.” Personally, I have never seen lava flow– I don’t know about you. Others say that it should “rest lightly” on the spatula. Again, if you have kids, as I do, you probably don’t know what it means to rest– much less rest lightly.
So here’s my best way to describe how to know when you’re done folding and should STOP before you accidentally overmix your batter. I fold and J-fold (down through the center and around the side) the batter several times and then quickly lift up my spatula with some batter on it. If the batter “drops” like a solid, back into the bowl, then it needs more folding. I fold 2-3 more times and test again. When the batter is thick, but it forms a line from spatula to bowl for about a second before breaking, it’s ready. Basically it will almost look like you “pulled” a string of batter out of the bowl, and it came up with your spatula for about a second before oozing back down into the bowl. It won’t fall down in a lump. It won’t seem liquidy. It will seem like a thick strand pulling up and holding to the spatula for a second before slithering back down.
Yes, that seems hard to describe, and it is. Which is probably how we ended up with descriptions like “flowing like lava” in the first place. It’s really hard to describe– but once you “get it right,” you will get it. You will know exactly the consistency you’re looking for and will be able to nail it every time. In the meantime, I have tried to describe it the best that I could. I watched a lot of videos online and read a lot of books, but I didn’t really “get” it until I practiced enough that I knew what to look for. And once I got it right, I was able to repeat my success, and you will, too. Don’t get discouraged! 😀
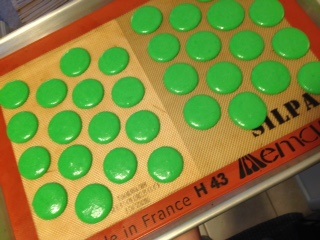
Once you have achieved proper macaronage, then it’s time to pipe our macarons onto cookie sheets and prepare them for baking. You absolutely should not do this with a snipped off ziploc bag. After you worked so hard to get your batter right, you deserve perfectly round, exceptionally beautiful macarons. I use a cupcake decorating tip (like the plain round one included here) and pipe my circles onto a silpat mat
to be sure the little darlings don’t stick when they are FINALLY finished. You can print out a free macaron piping template online, or you can just make your own (I traced circles on a piece of paper using the lid from a juice container). The silpat is easy to see through, so you can pipe all your macarons over the template, and then remove the paper before baking.
After you have piped all your sweet macaron circles, slam your cookie sheets on the counter about 15 times. Oh my gosh I’m serious. These cookies have built in anger management therapy– that’s how frustrating they are to make, with all the finicky little steps. I lift my cookie sheets about 5-6 inches above the counter and slam them down 15 times– this step releases the air bubbles from the meringues so that you won’t get deformed, warty-looking macarons. And this step also releases your anger from all the stupid steps that you had to take on these cookies (don’t worry– we will be eating cookies soon and everything will be OK ;).

After you have slammed the cookie sheets and made the neighbors wonder what the heck is going on with all that banging happening next door, let your cookies just . . . sit. Yep, that’s right. They need to rest. Like proper ladies of leisure, they just need to rest right now, before they do anything else.
The 20 minute rest helps the meringues to form a “skin.” When you gently touch one with your finger, it should be slightly dry and not stick to your skin. If it sticks, then the cookies need to rest another 5 minutes or so to dry out a little bit more. During the rest period, preheat your oven to 285 degrees.
Not 275. Not 295.
285.
Your oven, like most ovens, probably fudges on the truth a little bit, when it tells you the temperature is right. Ovens actually lie so much that they could probably almost enter a career in politics. It seems to come easily to them. So even though it’s a pain, invest in a cheapie 5 dollar oven thermometer (like this one here). Go by that temperature, no matter what your oven says. I find that I actually have to set my oven to 300 in order to get a true 285.

Bake your macarons, one sheet at a time, in the middle of the oven (“Do I really have to . . .” *hairy eyeball*). Yes. You really have to. Bake them for 20 minutes. Do not open the door. Do not “peek in to see if they are OK.” Do not pass Go. Do not collect $200.
When 20 minutes is up (keep an eye on your oven temp THROUGH the door during this time and make sure it stays at 285 “on the nose”), gently press on the side of one of the meringues with your finger. If it crushes in, then they aren’t done. They need another 2-3 minutes of baking. If it feels “firm on its feet” (they feel slightly firm and don’t move or crush when lightly pressed, then they are done.

Remove the macarons from the oven and immediately sweep your entire silpat, macarons attached, off the baking sheet and onto a cooling rack. Yes. They really will burn their little French behinds if they don’t immediately move to cooler areas from the mean old cookie sheet. The nerve! *waves smelling salts in the air and gestures for the butler* Let them cool completely. And I mean COMPLETELY before extra carefully peeling them from the silpat.

While the cookies are cooling, go ahead and melt your ganache and cream in the microwave, stirring every 30 seconds until the chocolate can be stirred completely into the cream (it takes me about 2-3 “30 second heats” to achieve this). Stir in a few drops of peppermint extract. Seriously. After the nightmarishly difficult macarons you just made, whipping up this ganache is like taking a walk in the park. With an iced tea in your hand.
Let your ganache sit in the refrigerator for 8-10 minutes, until it is the consistency of soft pudding. Don’t let it in there too long or it will harden completely, which of course will make it impossible to place on our delicate little meringue beauties without breaking them. Use a cookie scoop (the one I use for macarons is the orange one, here, but I have all sizes and ADORE them– most useful thing you will ever buy) to place 1 tsp. of mint ganache gently onto one of the meringue wafers. Lightly twist another meringue on top of the ganache mound. Voila. You did it, my darling. You just made the most difficult cookie in the universe and made it look like that walk in the park. Bravo!

Of course, after that marathon of creating, there remains but one task. Scoop up one of these minty, tempting little beauties and take a bite. Leftover macarons can be stored in the refrigerator for up to a week, but they are at their best exactly 24 hours after baking. “Are they really that picky that they need 24 hours . . .”
Sigh. Yes.
But luckily, they taste pretty amazing right away, also. So have one. Have two. Share with a friend and blush with pride when the friend can’t BELIEVE you MADE THESE YOURSELF!!! You deserve every scrap of that praise.
Because you did it. And I’m just so proud of you.

Disclosure: This post may contain affiliate links, which just means that we get a few pennies if you purchase through our link. I never recommend products that I don't personally use and love. Thanks!


Pingback: Blue Cornflower Macarons – Cookies for England
Pingback: Red White and Blue Fruit Tart – Cookies for England