
Yum
When I was a kid growing up in Pennsylvania, I loved visiting my grandparents’ dairy farm. I remember running barefoot through those carefree summer days, with skinned knees, lots of sunburn, and a smile. I remember sleeping with the windows open, and a cool night breeze rustling the curtains. There was a little creek that babbled and bubbled away, lulling me to sleep while I watched the lightning bugs light up the night like so many little sparklers. There were kittens in the barn and crayfish in the creek– plenty of fun to fill up an entire, childish summer. It was a magical time.
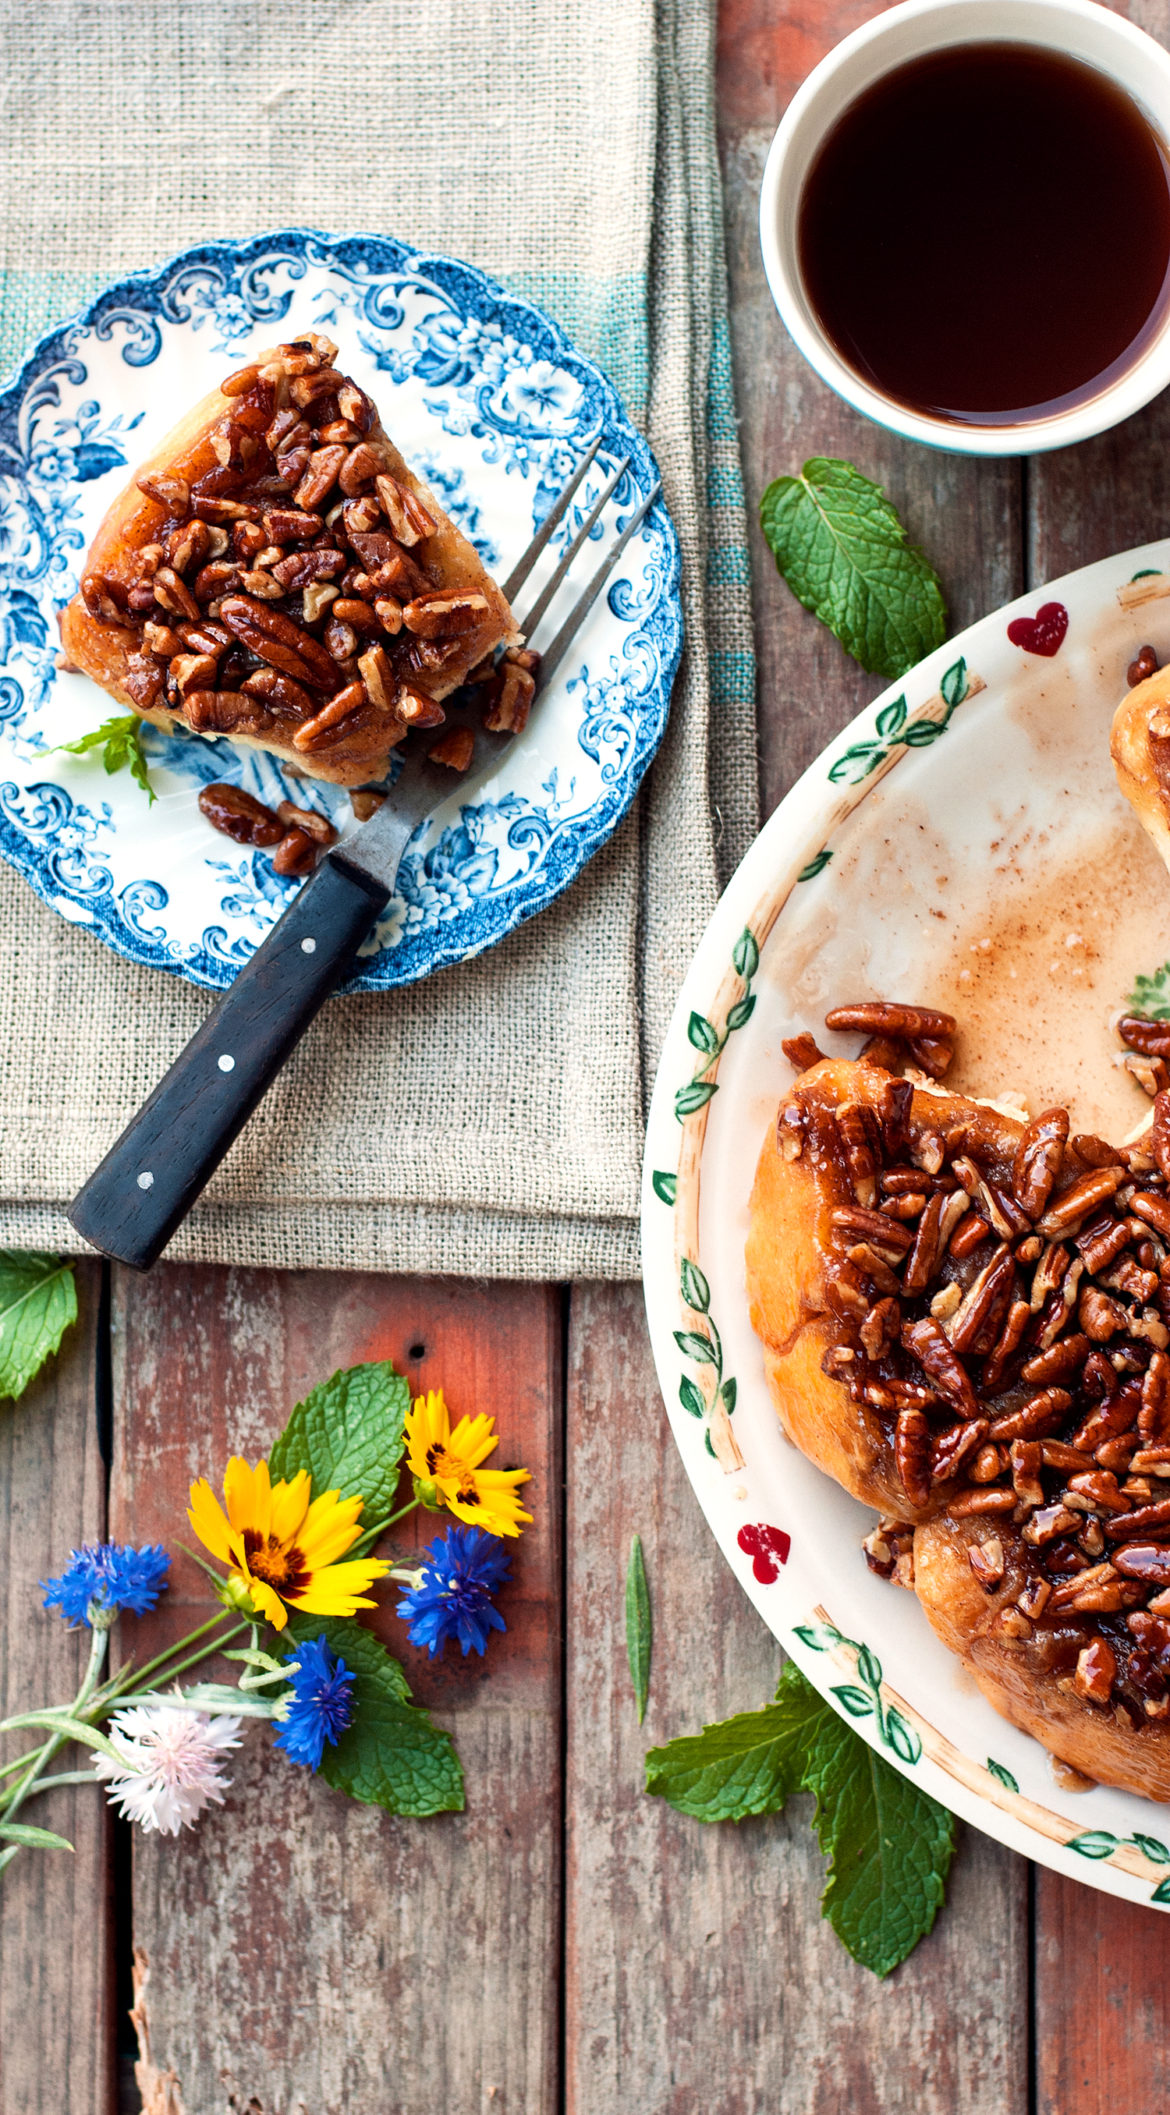
And then, if I was lucky, when I came downstairs in the morning I was greeted with the smell of these cinnamon rolls just coming out of the oven. Gram would pull them out, flip them over onto a plate, and put them on the table for breakfast. I also remember my Mom making these rolls for Christmas breakfast– a plate of nutty, gooey loveliness to dig into as we listened to Bing Crosby crooning “White Christmas” and looked out the window at the snow falling. And, now, I make them for my own family. There’s just nothing better than a recipe passed down from the best cooks in your family, and I hope that you love these classic sticky buns as much as I always have.
What are we waiting for? Let’s do this!
Old Fashioned Sticky Buns
(Adapted from Taste of Home and my Grandma’s recipe)
Cinnamon Roll Ingredients:
1/2 boxed yellow cake mix (I just eyeball it)
2 1/4 tsp. instant SAF gold instant yeast (or 1 package active dry yeast)
1 1/4 cups warm water
2.5-3 cups all purpose flour (just enough to make a soft dough)
Softened butter, sugar, cinnamon for sprinkling (more on this in a minute)
Caramel Pecan Topping
1 cup brown sugar
1/4 cup butter or margarine
2 tbsp. light corn syrup
1/4 cup water
1 cup chopped pecans, optional
Directions:
In the bowl of your stand mixer, mix together cake mix, instant yeast
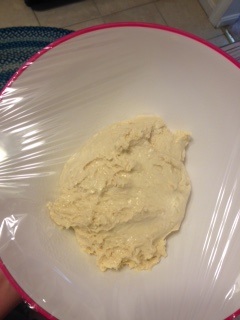
(or active dry yeast after proofing step), and warm water. Gradually add in flour until mixture forms a soft dough. Switch to dough hook and knead dough, gradually adding flour just until the dough is tacky and slightly sticky, but “cleans” the side of the bowl when you mix. Remove dough to a greased (with cooking spray) bowl. Cover and allow to rise for 1 hour, or until dough is doubled in size.
While the dough is rising, make your sticky syrup (this will need to be cool by the time you put the rolls into it for the second rise). Bring all your syrup ingredients, except for pecans, to a light boil for 1 minute. Divide the mixture into 2 greased (with cooking spray) 9 inch round pans. Sprinkle pecans overtop of the syrup and allow pans to cool prior to placing rolls into the syrup.
When the dough has doubled in size (about an hour later), gently punch down dough and, on a floured surface, roll dough out into a rectangle about 12×15 inches large. Spread dough gently with softened butter (I use plain ‘ole country crock soft spread), and then sprinkle with sugar and dust with cinnamon to taste. Roll up, starting at a long end, and pinch edges together to form a seamless roll. Use a sharp knife to cut into 16 equal parts (this works best by “dividing in half” again and again until you get 16 equal parts). Place 8 rolls in each round pan and cover with a kitchen towel. Allow to rise in a warm place for 30 minutes, or until puffy and almost touching. Preheat the oven during this time.
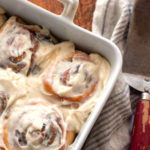
Bake rolls at 375 degrees for 18-20 minutes, or until golden brown. When you remove from the oven, immediately cover with a plate and flip rolls over, before taking off the baking pans and revealing the sticky-topped rolls. If you let them cool in the pans before trying to flip, you won’t be able to get them out. Don’t ask me how I know this. 😉
This sounds complicated, but it’s not hard. It’s just a lot of steps. Let’s take a look at the process in pictures. 🙂
Making yeast dough is not really hard. It just takes time. You have to get to “know” the way your dough feels and looks. This means that you need practice . . . which MEANS that making MORE CINNAMON ROLLS is really a labor of love, honing your craft. Eating gorgeous, jeweled, nut-studded breakfast delicacies is really part of the job description. Makes perfect sense to me 😉
Start out by mixing your 1/2 cake mix, instant yeast, water, and about 1.5 cups of flour together in the bowl of your stand mixer. If you’ve never worked with instant yeast before, then get ready to change your entire baking game. Unlike regular active dry yeast, instant yeast doesn’t need a “proofing” step (added to warm water for like 10 minutes, allowed to foam . . . you know– it’s a pain). Instant yeast can be kept in your freezer for years and added right from freezer to your recipe measured in like any other ingredient. SOOOOO much easier. I use Instant Gold yeast
for sweet breads, and Instant Red yeast
for regular bread dough.
I highly recommend using the Kitchenaid mixer when you make cinnamon rolls because you get the handy dandy dough hook, which makes whipping up yeast dough a snap. 🙂 Once you add in your 1.5 cups of flour, switch to the dough hook and gradually add flour until you have a soft, somewhat sticky dough that “cleans” the sides of the bowl without sticking to it. That’s when you know your dough is ready to go. Put your dough ball into a bowl misted with cooking spray, and mist the top of the dough, again. Cover and allow to rise in a warm place for about an hour, until the dough has roughly doubled in size.

While all that jazz is going on, let’s make our SWEEEEET syrup. Since you don’t want to put dough into boiling hot syrup (lest you kill your sweet little yeast which is going to bat trying to make gorgeous, fluffy rolls for you), it’s good to make this syrup right after you put your dough out in the warm garage to rise (wait– not everyone uses their humid VA garage as a proofing box? Hmmm. *looks at feet sheepishly. haha), because it will then be cool by the time you’re ready to nestle your sweet rolls into it.
Bring all the ingredients (except for the nuts) to a boil for 1 minute. The boiling step just makes sure that your sugar doesn’t kind of “sift out” and become grainy. Spray two 9″ round baking pans (deep pie pans work fine too) with cooking spray, and pour the syrup equally into the two pans. Sprinkle chopped walnuts or pecans overtop of the syrup, and let the mixture cool while you’re waiting for your dough to rise. This way, the syrup will be cool when your dough is read to roll. You multi-tasker, you. So talented. I love working with you.

When your dough ball has doubled in size (it takes about an hour), it’s time to make our cinnamon rolls! 🙂 I roll out the dough on a floured surface into a rectangle about 15×12 inches or so. Don’t stress or measure– just a nice big rectangle. Don’t use tons of flour, but keep adding a little flour as you go to keep things from sticking to your counter.

Once you have your rectangle of dough rolled out, it’s time to “fill” our rolls. I use plain old country crock (because it’s soft), but you can use super soft butter, or even warm (not hot) melted butter, if you want to. Just spread a light layer of butter all over the dough (the back of a spoon works well for spreading because it doesn’t tear the dough). Then sprinkle white sugar all over the butter. I just eyeball this– make sure you have a nice snowfall on there, without absolutely burying it. You should still be able to see butter a little bit, through the sugar. Sprinkle the sugar with cinnamon. Then, starting with the longer end, roll up the dough into a roll, pull it tight and pinching the edges together when you’re finished, so your “roll” doesn’t decide to go rougue and unroll. 😉 Place 8 rolls in each pan (where you have already made your syrup/nut mixture and let it cool– you clever one, you!) Cover the rolls and let them rise, again, for about 30 minutes, until they are puffy and almost touching each other in the pan.

About 15 minutes into your second rise time, go ahead and preheat your oven to 375 degrees. I also highly recommend a cheapie oven thermometer. You’d be amazed how often when your oven “beeps” the right temperature, that it’s off by, well . . . 50 or 75 degrees? An oven can be off by a lot. A $5 oven thermometer may be just the ticket to take your baking woes to baking successes. 😉 When the rolls have puffed up nicely (about 30-35 minutes), and are almost touching, pop them into your preheated oven. Bake for 18-20 minutes until the rolls are golden brown.

Now. Let me tell you this from HARD experience, you have to flip these babies over as soon as they come out of the oven, or you will NEVER get them out of the pan. 😉 The easiest way to invert the rolls without burning yourself is to place a plate, upside down, on top of the baking pans, and then flip the whole ‘shebang over using hot pads. Lift off the pan and you will be greeted with steaming, glistening, sweet nutty goodness. Oh my gosh.
Now comes the part where I read you all the disclaimer information that no one listens to. I *should* tell you to wait until these decadent, luscious beauties cool, before you eat them. I should tell you to eat broccoli instead. I SHOULD tell you that you should eat lettuce leaves and salad the rest of your life. I should do all of those smart, “good for you” things.
But I won’t. 😉
I say, grab yourself a sweet roll, sticky in its divinely sweet caramel glaze. Swipe some extra nuts from the neighboring roll. No one will EVERRRRRR know . . . and just close your eyes and enjoy. Pretend it’s Christmas morning. They’re that good. Savor every bite– you’ve earned it.
You did it. And I’m just so proud of you.

Disclosure: This post may contain affiliate links, which just means that we get a few pennies if you purchase through our link. I never recommend products that I don't personally use and love. Thanks!


Pingback: 50 Recipes from a 1950s Housewife- A Cultivated Nest