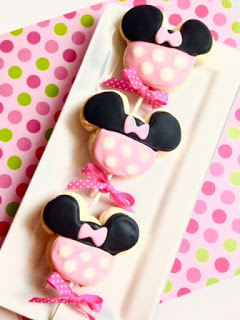
Jill Lang, my fabulous photographer friend, has been trying to teach me to take better food photos. Although I’m not nearly as talented as she is, I am enjoying learning. Believe it or not, I actually took this photo of my Marvelous Minnie Cookies! I think I’m getting better. At least . . . I hope so. And Jill probably hopes so, too, because eventually I know she’s going to get sick of my asking her thousands of questions a day. 😉
Well . . . even if I’m just a novice food photographer, I can definitely show you how to make these cute little cookie pops to make the day of the little Minnie Lover in your life 🙂
What are we waiting for? Let’s do this!
Quick note: You need royal icing transfers for this tutorial. To find out how to make these transfers, check out my tutorial here.
First, you want to bake your cookie pops. Here is my handy dandy tutorial on how to make cookie pops here. I always love how cookies can look rough, and the icing cleans them right up, covers their flaws, and makes them look professional. Let’s give these cookies a makeover and make ’em look like supermodels 😉
First, use a 17 second light pink (or red, if you prefer) icing and outline the bottom of the cookie. Allow this to dry slightly before you fill the cookie– I usually just outline my entire batch (2 cookie sheets’ worth), and by the time I’m done outlining, the first cookies are ready to go.
Lightly flood the pink section with the same 17 second light pink icing. Don’t overfill these cookies. We are going to be adding white dots, and we don’t want the icing to overflow.
Go ahead and add 5 nice white dots to the pink icing, while it is still wet. Go quickly so that your pink icing is still wet when you add the white. That way, it will dry in a single layer. This is called the “wet on wet” technique– basically adding several colors of icing while the colors are all still wet, so that they will dry in a single, smooth layer.
Let the pink polka dot section dry for several hours, or overnight, if possible. When you’re doing dark colors up alongside light ones, you don’t want those colors to run. Make sure the pink is dry before going on to the next step.
When your pink is dry, outline the top and ears in 17 second black icing.
When the outlines have dried a bit (usually after outlining the other cookies, like I did with the pink sections), go ahead and flood them in black. HOWEVER . . . you need your icing transfers ready, before you flood this black, so read all the directions before you do that part.
I mentioned at the beginning of this tutorial that you needed some royal icing transfers. See how to make those here. Basically, this just means that you have to plan ahead, a little bit. About 2 days before you want to make these cookies, take some wax paper and outline/flood some “Minnie Mouse bows” in pink. These bows will dry for about 2 days to make sure that they are completely dry and ready to use. Royal icing transfers are kind of like edible stickers . . . you can peel them off (carefully) and stick them onto wet icing when you’re making cookies. It’s awesome, and these are a great way to use up leftover icing. See how many of these bow transfers I made? Now, I will have adorable bows for baby shower cookies, birthday present cookies, or more Marvelous Minnie Cookies! Oh, I just love transfers.
I collected the transfers I wanted and had them in a little dish beside me while I was making these. I flooded the black part, allowed the cookie to dry for about 20 seconds, and then added the transfer, squishing it down, slightly. You don’t want to add the transfer IMMEDIATELY after flooding, but pretty close. A good rule of thumb, for me, was to flood 2 cookies, and when I had the second cookie flooded, the first cookie had just enough “skin” over the icing to add the transfer without it slithering around all over the place.
Allow these cookies to dry overnight.
Then, get cutesy!!! Add some gorgeous polka dot bows to the sticks to really kick up the adorable factor– as if they weren’t adorable enough!
Oh my goodness. Cuteness overload. These are going to make a little girl very happy at her 3rd birthday party this weekend!
And there you have it. These can be cookie bouquets, which are adorable, especially set in several sets on the favor table. Guests can take one home when they leave. Food that doubles as décor? Count me in! They can also be placed by each child’s plate for a cute dessert. You could also wrap them, individually, in clear cellophane bags, for a cute party favor for the guests to take home.
However you decide to do it, these Minnie cookies are going to be Marvelous.
You did it. And just I’m so proud of you 😉

Disclosure: This post may contain affiliate links, which just means that we get a few pennies if you purchase through our link. I never recommend products that I don't personally use and love. Thanks!
