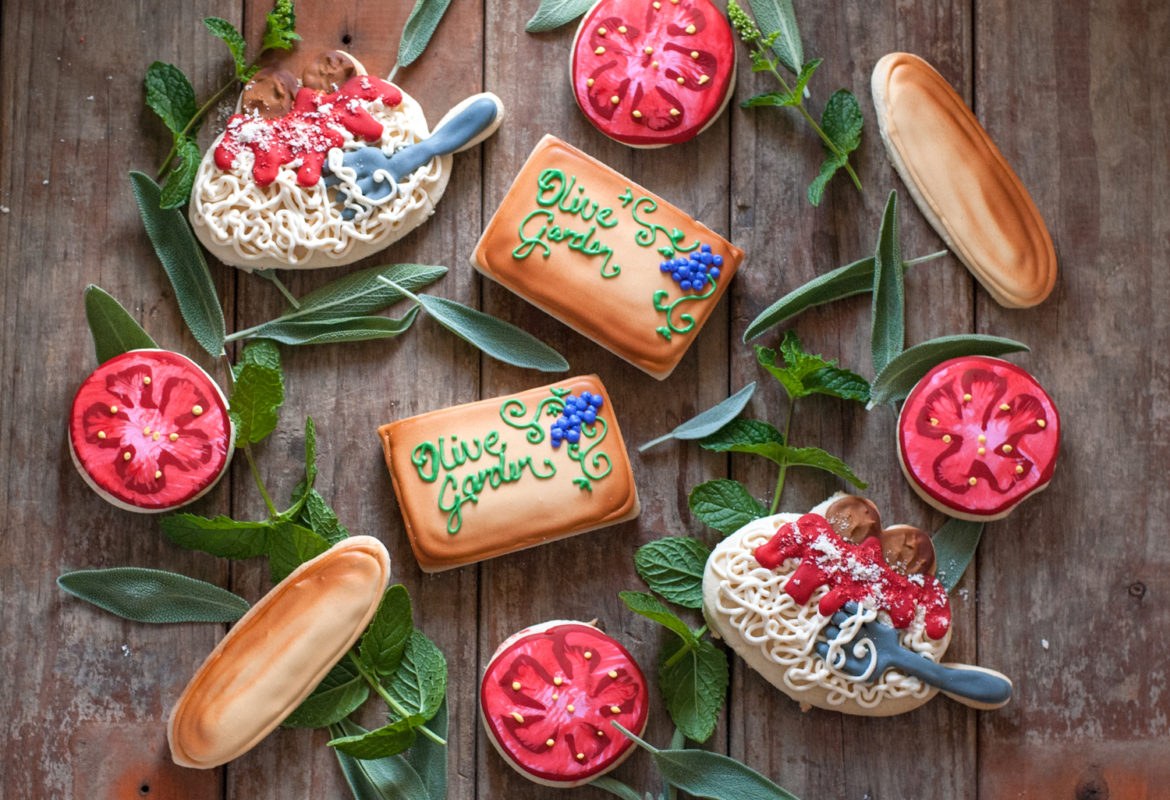
Olive Garden Sugar Cookies
I love Olive Garden more than should be allowed. I never get tired of those warm, garlic breadsticks . . . the salad perfectly dressed, just so that I can pick out the Pepperoncinis. haha. The little man standing there for hours until I tell him to halt, there is enough cheese. *Jeopardy music . . .*
Olive Garden, you are the love of my life. Will you “Marinarry me?” 😀
Let’s take a look at some cute little Olive Garden Sugar Cookies and how to put them together. 🙂
When I first started my sugar cookie decorating journey WAYYYYY back when I started this blog, I found myself constantly frustrated when I wanted to make a certain shape of cookie but didn’t have the right cutter. I started assimilating my (now extremely large) cookie cutter collection. But buying specialty cutters was expensive, and then it was annoying to store the collection as it developed into a size large enough to have its own zip code. SOOOOOO . . . when you need a cutter that you just intend to use once or twice, and you don’t feel like buying it . . . make your own. And how do you make your own cookie cutters, you say? I’m so glad you asked. 🙂 Grate a little more cheese over my spaghetti and I’ll tell you . . . 😉
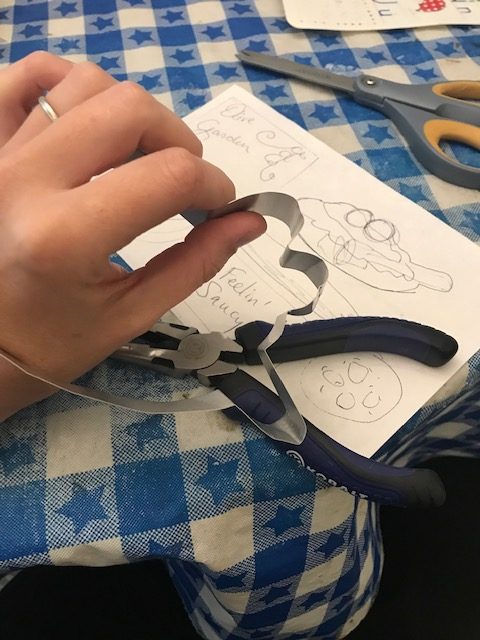
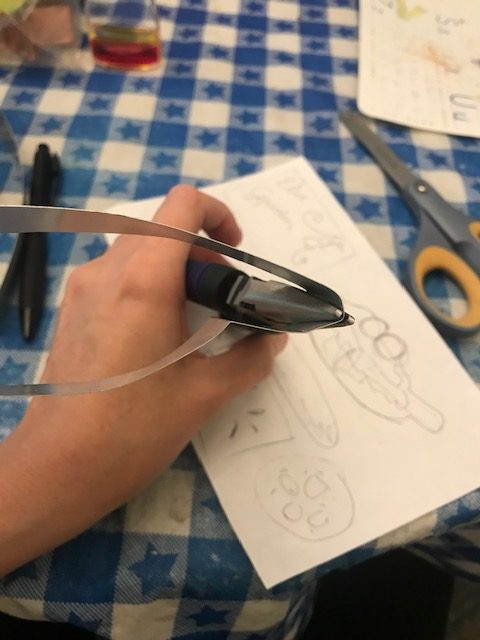
The first thing to do when making your own cookie cutter is to sketch out a drawing (you can even color in the finished cookie colors, if you want to visualize it better). Trust me– DO NOT skip the drawing step. You wouldn’t believe some of the crazy shapes I’ve gotten when I tried to wing it without a pattern. After you’ve drawn out your shape, use a piece of string placed around the edge to see how long your metal piece will need to be (with a teeny bit extra for gluing the finished edge). Use needle nose pliers and keep comparing your metal to the shape, adjusting slightly as you go. Just keep bending and tweaking until you get the shape as close to your drawing as you can.
For the actual metal I am using pieces of aluminum flashing, cut into 1 inch strips. My brother got me this flashing years ago, and I’m still using it. Honestly, probably 1 roll will last you for life. It will make hundreds of cutters because you need so little metal to actually make one. But if you don’t have aluminum flashing you can also use an old coke can cut into 1 inch strips (the problem with cans is that you have to splice several small pieces together to make your cutter, rather than having 1 strip of solid metal for the whole thing, but it will do in a pinch). I usually don’t find that the edges are overly sharp, but you can put a strip of scotch tape over one edge if you find that the cutter is too sharp to use. When you get the cutter the way you want it, secure the edge with super glue and paper clip it together until the glue dries completely. These cutters are not meant for daily or heavy duty use, but just for a few specialty cookies it is a great way to avoid purchasing lots of cutters that you will never use again.
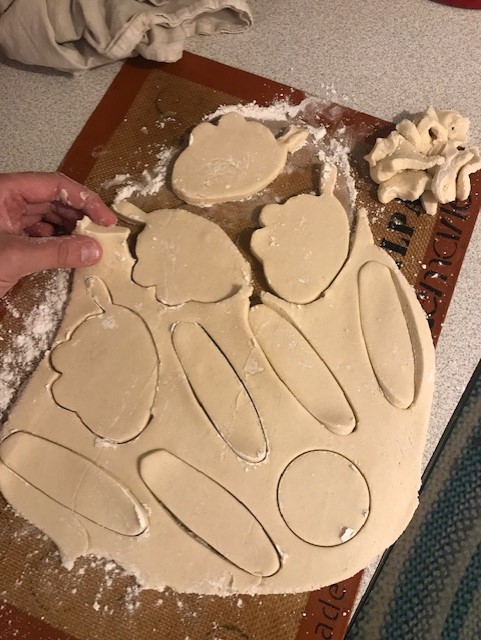
See my weird cookie cutter shape? It almost looks like a frog smoking a cigar or something. haha. But just wait and see what we can do with it! When you are making cookies with “delicate pieces” like this fork end sticking out, it helps to “peel away” the scraps from the shape, rather than lifting the shape out of the dough. That way your small parts are not disturbed or ruined.
Your cookies should be just brown on the bottom and still pale on top. That keeps the cookies soft.
One of the most time consuming parts of making sugar cookies is mixing up the royal icing. I like to put my icing in plastic wrap “bullets” that I thread through the piping bags. If you make the icing ahead of time and let it sit there, then all the bubbles will come up to the top so that when you pipe your cookies you won’t be getting ugly bubbles in your final product. See? I knew you were smart. I love working with you. And I’m pretty sure the phrase “Ugly Bubbles” should be a thing. (“Oh you heard about Marge. She took a bath in ugly bubbles today. She’s in a horrible mood.”)
Here we can see the shape from that weird frog/cigar cutter I made. Yessssssss it’s SPAGHETTI! 🙂 For the spaghetti you will need super stiff royal icing dyed with 1 drop of ivory and a small tip (I used Wilton 2
). Pipe the first layer in kind of a doodle pattern and let that dry before you pipe any more. If you pipe all the spaghetti at once it will sink into itself and not look like individual noodles anymore.
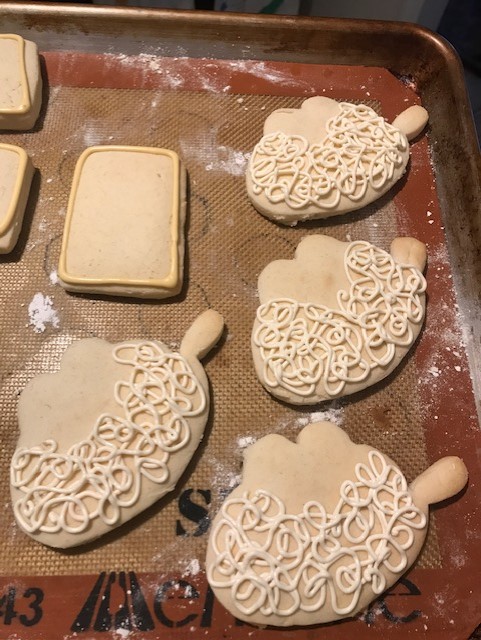
Make your second layer after the first layer dries. Let each layer dry so that your noodles look separate and distinct, like real spaghetti.
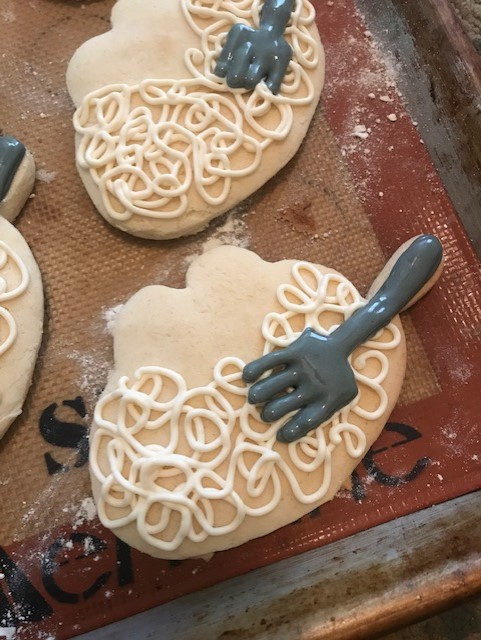
After the white dries make a nice little fork on that “cigar” that the frog is smoking. 😉
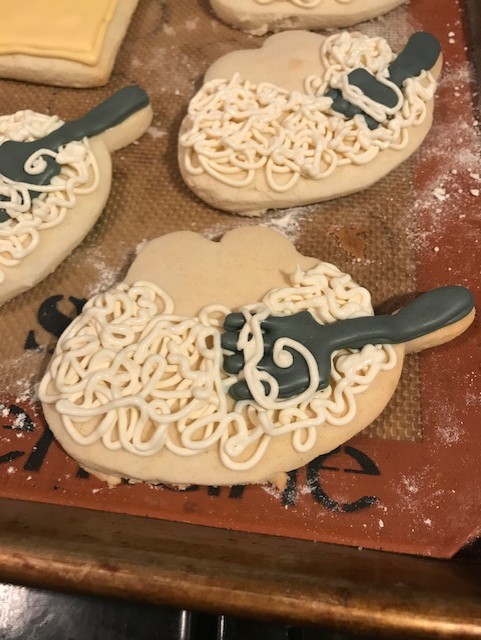
Let the fork completely dry before you do the final layer of spaghetti. Your colors will run if you try to pipe the noodles on top before the darker color is dry. Use your imagination and just make the noodles look like they are twined in the tines of the fork.
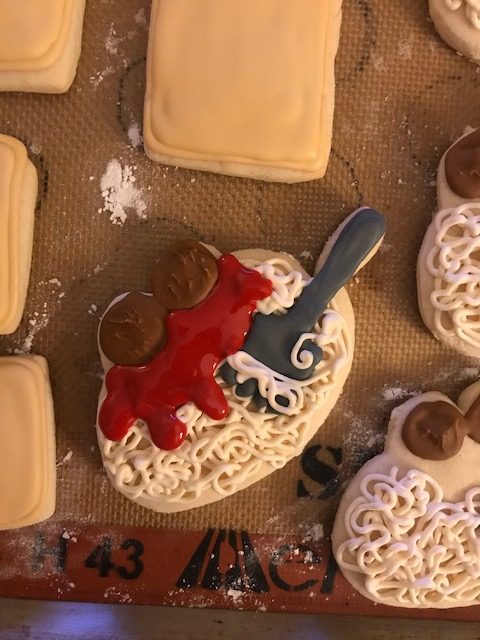
Let the cookies dry overnight before you do the “sauce” layer. Anytime you are using light colors (like the light noodles), you have to make sure that they are completely dry before letting them touch the darker colors. If the lighter icing has any moisture in it at all then it will soak up the darker colors, so make sure it is completely dry before you add anything on top. I did the meatballs and dried them slightly before I added the sauce– use a super thick brown color and use a toothpick to kind of “dab and lift” the icing to make some texture on the meatballs.
“On top of spaghetti, all covered with . . . ” hmmm. This could be a problem. No one likes cheese on cookies, even those who think of cheese like a religion (Guilty). I thought about this one for a while, perplexed at what I could use.
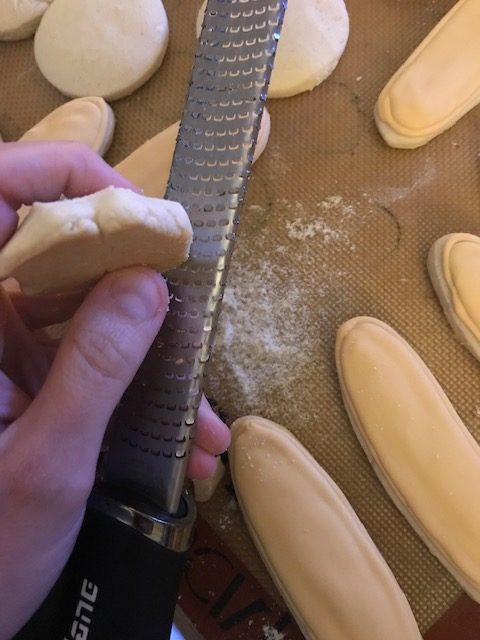
When I was trying to think what to use for Parmesan cheese on my “spaghetti sauce,” I had a moment of brilliance (don’t get used to it. They are few and far between, and generally only after imbibing copious amounts of coffee). I decided to grate a leftover sugar cookie with my citrus zester. It made perfect crumbs that I sprinkled over my icing when it had just set (not dry yet, but wet enough to “hold” the crumbs). I had the most luck kind of pinching a handful of crumbs and dropping them in clumps. A super fine shower of crumbs (like zesting right over the cookie) just soaked in. Clump the crumbs up a little bit with your fingers when you put them onto the red icing– they will stay more distinct.
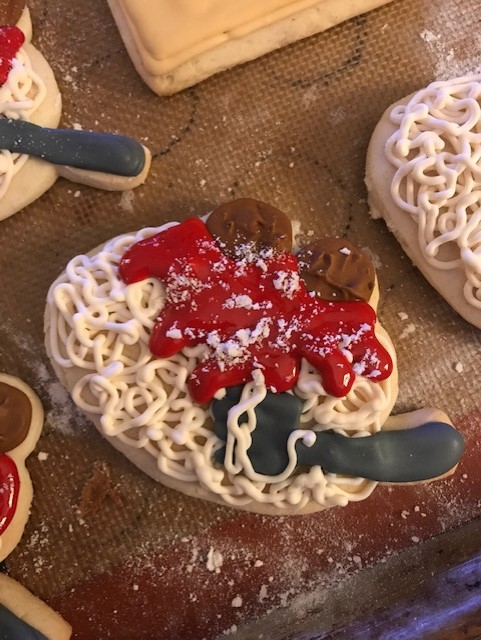
Now, seriously. How cute is that. Oh my gosh it is so cute I just want to pinch those little saucy cheeks.

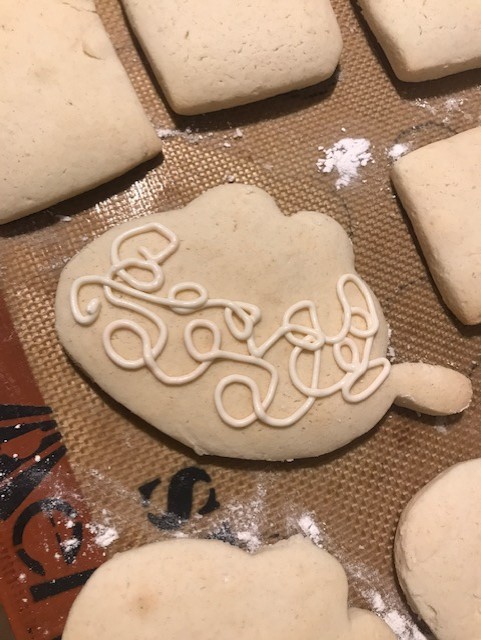
I know Olive Garden sometimes has that weird, third grade looking logo now. But I always think of their trademark as the classy, cursive, old-school font, so that’s what I did. Getting a font exactly right is tricky. You can use edible marker to trace it out beforehand if you want to get it exactly right. But I just freehanded the logo and it looked ok (practice tracing a few times on wax paper overtop a printout of the logo if you want to try your hand at it before you put the writing on an actual cookie). It wasn’t perfect but these are cookies, after all– not Monets. haha. Just have fun with it.

If you like you can give the edges of your “Olive Garden” signs and the exterior of your “meatballs” a little brown airbrush detail to make them look 3D. I mean seriously. How cute is that cookie. And you MADE THE CUTTER OUT OF FREAKING NOTHING. You are a genius. Does the world know how incredible you are???

The tomato slices I just hand painted with some food gel mixed with everclear (this evaporates immediately but gives you a painting base for the color). Then I piped on a few yellow dots for seeds. To finish the Olive Garden signs make some vines and grapes– and make sure, just like when you did the spaghetti, that you allow the first layer to dry before you add another layer of grapes so that they don’t melt into each other while they dry. Anytime you want dimension with icing you have to allow the bottom layers to dry before you add the top layers. Otherwise they will ooze into a single mass of icing while drying, and you will lose the 3D effect.

Mamma mia! Sono belli!
You did it. And I’m just so proud of you.
Now let’s go to Olive Garden and have some spaghetti. 😉

Disclosure: This post may contain affiliate links, which just means that we get a few pennies if you purchase through our link. I never recommend products that I don't personally use and love. Thanks!