

It’s a cold, rainy day, and you step into your neighborhood coffee shop. Suddenly, the chills and shivers melt away, and the warmth and cozy chatter of the room envelope you, chasing the blues away. You are instantly enveloped by the intoxicating smell of roasting coffee. The little bell on the door jingles, inviting you in.
There it is . . . glittering like a jewel on a velvet bed . . . the dessert case. Slowly, almost reverently . . . you approach. The beauties seem to smile coquettishly at you, each beckoning to you . . . “Pick me! Pick me! Pick me!” How to choose? That chocolate chunk cookie looks mouthwatering . . . but the pecan roll . .. goodness. How will you pass that up?
And then.
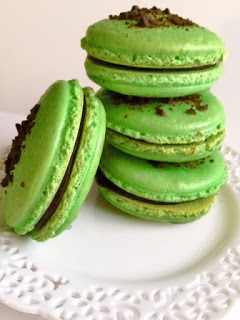
And then . . . you see it. Across the room, like a glittering Cinderella finally entering the ball, guarded by the cashier, lie the macarons. These exotic beauties whisper to you, above all the other delicacies clamoring for your attention. Their flawless, pastel shells glow with perfection and the promise of incredible, creamy fillings. You automatically go to them. It’s love at first sight.
It’s hard not to be obsessed by these dainty beauties. For all their ethereal beauty, they are fickle and incredibly difficult to make. To read more about my Macaron angst, check out my Strawberries and Cream Macaron tutorial here. These are like the pretty girl who broke your heart at prom. They have gorgeous looks and hearts of stone. Want a baking challenge? Then you’ve definitely found the right cookie. This cookie will knock you down, steal your dog, and kick your tail. Around the block. Twice. Yes. I know those are sentence fragments. Sometimes you ‘gotta do what you ‘gotta do.
Even the best, most experienced pastry chefs and patisseries throw away roughly 25% of their daily macarons. Yes. This means that even those who paid thousands of dollars to learn how to make these things still struggle. Everyone has “bad macaron days.” So don’t feel bad if you don’t get them, right away. These cookies are so unpredictable, they should have their own weather channel. I strongly recommend that other macaron tutorial I mentioned, above, before you try this one. Entire books have been written on proper “macaronage” and technique. I can’t possibly cover it all in a single recipe. But once you get some of the basics down, you will love making these mint chocolate macarons.
So . . . take a deep breath. And let’s do this.
Basic French Macaron Recipe (adapted for my own use from Allrecipes.com)
Ingredients:
100 grams egg white (the whites from 3 large eggs)
1/4 tsp. cream of tartar
50 grams white sugar (roughly 1/4 cup)
200 grams powdered sugar (roughly 1 2/3 cup)
110 grams almond flour (roughly 1 cup)
Mint Ganache Filling Ingredients:
8 oz. semi sweet chocolate chips
3/4 cup heavy whipping cream
2 tsp. corn syrup
1/4 tsp. peppermint extract
Directions: Whip room temperature egg whites and cream of tartar with the whisk attachment until the whites begin to foam. Slowly pour in the white sugar and begin to whip the whites on high. Meanwhile, pulse your almond flour and powdered sugar in a food processor until the mixture is well combined. Sift your almond flour/powdered sugar through a sieve and throw away the pieces that are too large to pass through the sieve. When the whites have whipped into stiff peaks, fold the almond/sugar mixture into the whites, gradually and carefully until they reach proper “macaronage.” Pipe the circles onto a silpat, using a template, if desired, and slam the cookie sheets 6-8 times on the counter to dislodge air bubbles. Allow circles to dry for 20 minutes before baking at 285 for 20 minutes, one sheet at a time, in the center of the oven (move oven racks, if necessary. Do not open the oven until the 20 minutes are up, and use an oven thermometer for best results. When your macarons are done, they should feel “firm on their feet.” Remove entire silpat to cooling rack and allow to cool, completely, before removing almond shells from the silpat.
To make the filling, melt the chocolate chips and heavy cream together over medium low heat. Add the corn syrup and peppermint extract and stir. Allow to cool in a metal pan before using.
Now, in pictures!

Since we have a challenging baking project, today, let’s start with something easy that will make us feel good. Get out a nice, big knife and finely chop some chocolate. You can use any kind of chocolate that you like; I used semi sweet chocolate chips, for this. Chop the chocolate finely, but you still want some pieces in there– don’t pulverize it. Sit your chocolate aside. Macarons are kind of a “GRAB IT AN DON’T DELAY ONE SECOND!” kind of cookie, so it will help you to have all of your equipment and garnishes ready to grab.

Go ahead and start the marathon macaron process. Take a deep breath. Ready? Let’s jump in.
Start whipping your egg whites, cream of tartar, and white sugar. You are making your meringue– and you want to make sure that you work quickly, now, so that your almond flour mixture will be ready at the same time your meringue finishes. Don’t overbeat your meringue. If you overbeat it, the macarons will be ruined. If your almond flour isn’t ready by the time your meringue is finished, and you wait, your macarons will be ruined. If you overstir your mixture, your macarons will be ruined. Are you starting to see a pattern here? Yep. These things can be ruined practically without even trying. So read through all your directions, first, and have everything set out and ready to go. You won’t have time to go scrambling for things in the heat of battle. 😉
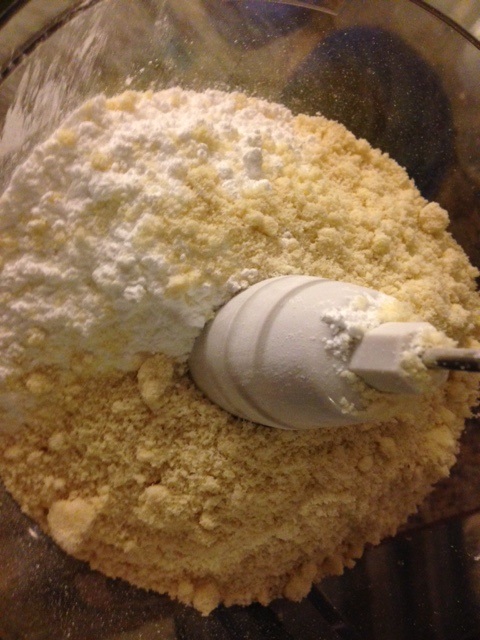
Without waiting, when that meringue starts whipping, go ahead and make your almond flour mixture. Use a food processor to grind together your almond flour and powdered sugar. These two ingredients need to be completely combined– but be careful not to pulse the almond flour, by itself, or on the bottom, or you risk making almond butter instead of your proper sugar/flour mixture. Run your mixture through a sifter or fine mesh sieve and throw away the few rough pieces that won’t pass through the mesh. These pieces will tear up your macarons if you allow them to stay in the flour.

By now, your meringue should be about ready. When you get soft peaks (the meringue kind of droops its head when you pull the beaters out), go ahead and add your color and whip for 1 more minute. You are finished when you get stiff peaks (the peaks stand straight up, with no drooping, as in my photo, above), and you can hold the bowl upside down over your head without any movement. Please make sure your meringue is ready before you go holding it upside down over your head . . . haha. That could get messy.

This is where is really starts to get tricky. Begin to add your mixed and sifted flour mixture to the meringue. Make “J” folds– take your spatula down through the center and sweep it left along the bowl, as if you are forming the letter “J.” Rotate the bowl and make another J. I usually add the flour mixture in 3 different parts. Continue to mix in the J fold as you go.

This is perhaps the trickiest part of making macarons– knowing when you have achieved proper “macaronage.” Macaronage just means that your batter must be perfectly mixed. If the batter isn’t mixed enough, your macarons will have points when they bake. If it is overmixed, by even one J fold, you will have macarons that come out flat, misshapen, cracked, and “footless.” Goodness. Take your time. Your batter is finished when it is super smooth and shiny, and it settles slowly, like volcanic magma . . . or like an old man settling comfortably into a chair. It should fall in smooth ribbons from your spatula when you pull the spatula out. This is the best way I can describe this part of the process. Yes. I know how hard this is to picture. Yes. I read these same descriptions, so many times, and so many times I thought I “had it” with the proper stage, and my macs still came out as trash bombs.
The best advice I can give you for nailing proper macaronage is practice, practice, practice. Eventually, you just get the hang of it and know the feel of the dough, and then it kind of falls into place. In the meantime, prepare to make a lot of landfill bait.
One way to kind of help yourself get there without destroying an entire almond crop is to bake just a few macarons per tray. That way, you can make a few when you feel your batter is starting to look right, a few more a few J folds later, and even a few more after a few more folds. Eventually, even if it’s through trial and error, you will get it. And you will be able to know how the batter actually felt and looked for that one elusive perfect batch.

After you have achieved proper macaronage, pat yourself on the back. Congratulations. The hardest part is over, now. Place your macaron batter into a large piping bag and pipe your macarons. I strongly suggest using a template– you can print many of these out, online, or you can just draw your own, as I did, here. The pattern will show through your silpat or parchment paper, and you can easily slip it out from under the silpat after you have finished piping.
Now– let’s do the part that will make your neighbors think you have gone insane or possibly need anger management counseling. Take your cookie sheets and slam them (Yes– from like, 6-8 inches above the counter) down about 6-8 times. Hold onto the silpat so that it doesn’t flap as you’re slamming. You will start to see little bubbles appear on the surface of your macarons. That’s good. That’s what the slamming is for– getting those air bubbles out of your macarons so that they will bake perfectly. The slamming also helps to get rid of any teeny “tails” that may be left from the piping bag. If you have a few that are stubborn and don’t want to go away, just wet your finger with a little water and smooth these down. Overslamming the sheets can actually ruin the macarons as well as not slamming them at all can. Sigh. Can we ever win this game???

Now, before the macarons have dried, quickly add your top garnishes. Remember I told you that you’d be glad you had that chocolate chopped, ahead of time? Yep. You’re welcome.
Just sprinkle a little chopped chocolate on top of your macaron shell. Now . . . this shell needs to rest.
What?
You heard me. These are pampered little French cookies. They are more demanding than a hormonal, pregnant woman. They absolutely will not perform without rest.
Le sigh.
While your cookies are resting (this means that you don’t touch them or mess with them for at least 20 minutes, so they have time to dehydrate and form a “skin”), go ahead and preheat your oven to 285 degrees. Yes. EXACTLY 285 degrees. 275 will collapse your meringues and cause overextended feet. 295 will brown the shells too quickly, burning the outside before the inside finishes baking.
I told you. These are fickle cookies. They just like it how they like it.
In fact, you really should have an oven thermometer to make sure your oven isn’t lying to you. You want to look at that, rather than at the gauge, to make sure that your oven temperature is exactly 285 degrees for the entire baking time. I have actually sat in front of my stove, hypnotized, watching that oven thermometer and leaping up and adjusting the heat if it varies even 5 degrees. So, if you’ve ever received a macaron from me, you know what it cost me to give it to you.
Now that’s love.

The macarons need to bake, 1 sheet at a time, for exactly 20 minutes. Not a second more, not a second less. When your timer goes off, go ahead and remove the sheet from the oven and immediately slide the silpat onto a cooling rack. These cookies are so sensitive that even allowing them to cool on the cookie sheet will burn their delicate little bottoms. No camping for these gals . . . they like everything plush.
In fact, you can even see the drying sheet lines on the cookies, just from their cooling on the drying rack, through the silpat. Unbelievable. It’s like the princess and the pea. These babies feel everything, and they react, accordingly.

While the cookies are drying, go ahead and make your ganache. Lots of chefs make their ganache by almost boiling the heavy cream, and then pouring it, all at once, over a bowl of chocolate and allowing the two ingredients to sit and melt together. But to me, there seems to be an easier way. I just place my chocolate and cream into a saucepan and heat on medium low heat until the two are melted and creamy. That’s it– no trying to stop before I boil my cream, no tentative stirring to see if my cream is hot enough to melt the chocolate . . . melting together from the start works like a charm.
Ganache is like the sweet, devoted husband married to the demanding, loudmouthed wife (the macaron). Maybe it isn’t fair, but they seem to need each other, somehow.

Ahh . . . creamy and beautiful. Go ahead and add your mint extract and corn syrup. I usually pour my ganache into a metal baking pan, after this step. You don’t have to do this, but pouring the ganache into a thinner layer helps it to cool faster, and that means you get to eat cookies faster. It seems like a no brainer, to me.

When the ganache has cooled, use a tsp. cookie scoop to place a little bit of filling into the shell of a completely cooled macaron.

Gently twist the sides together until the filling comes just to the edge. Chill these in the refrigerator for at least 24 hours before serving to allow the flavors to meld. Everything will kind of melt together and be one batch of loveliness.

Photo by Jill Lang
You can even make some extra gigantic ones, just for fun (giant shells take 5 extra baking minutes). Gaze at their beauty. Remember your courage. Taste your results.
And pat yourself on the back.
Because you did it. And I’m just so proud of you.

Disclosure: This post may contain affiliate links, which just means that we get a few pennies if you purchase through our link. I never recommend products that I don't personally use and love. Thanks!


Pingback: Fabulous Funnel Cakes – Cookies for England
Pingback: Heavenly Angel Food Cake – Cookies for England
Pingback: Sinful Chocolate Éclairs – Cookies for England
Pingback: Marvelous Mousse – Cookies for England
Pingback: Coconut Cream French Macarons – Cookies for England
Pingback: Coconut Cream Cupcakes – Cookies for England