Yum
Sweet Santa Cookies
I once wrote a letter to Santa that went something like this:
“Dear Santa, Enclosed you will find my Christmas wish list. I have helpfully included the toy catalog, with the pages numbered, and the desired items circled. I would like to point out that I have been extremely good this year– I believe the word “angelic” has been mentioned. I would also like to point out that, since our family is employed by the Armed Forces, all gifts can, technically, be tax deductible, so don’t be shy when packing those gifts under our tree. I would also like to point out that, this year, I have reserved the horrible fruitcake for our own use. If you shortchange me, this year, I will have other plans for that fruitcake, in Christmases to come. Enjoy the delicious cookies AND milk– I look forward to doing business with you again, next year.”
I was a very imaginative child. No wonder I always gave my English teachers fits.
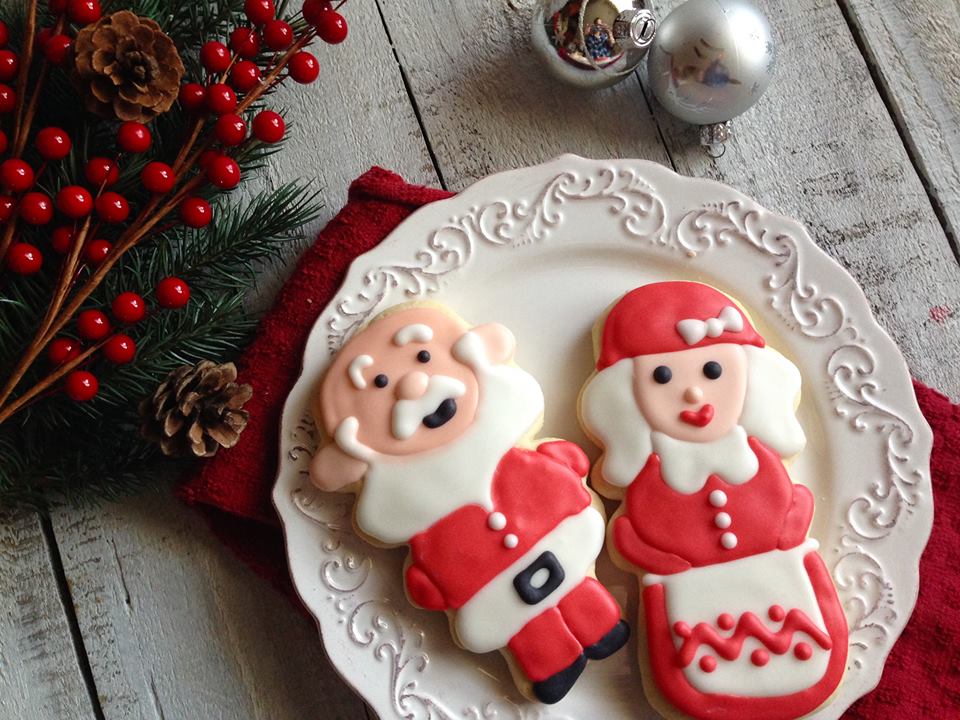
Even as an adult, I still smile when I think of Santa, at this time of year. Whether he’s a disinterested mall Santa with a greasy fake beard, or a legitimate Father Christmas with a real velvet robe and REAL whiskers (“Go ahead! Pull them!”), Santas just make everything more jolly. And I can only imagine that, if I were to leave cookies for Santa, this year, I’d get extra points for these– you can never go wrong including the wife, in the deal. As the old saying goes, “The husband may be the head of the home, but the wife is the neck on which that head turns.” 😉
What are we waiting for? Let’s do this!

Start out by baking your cookies. I am using my gnome cutter from the woodland cookies we made,
here, and I trimmed the gnome’s hat into a round shape, for the jolly old guy’s little bald head. 🙂 Cutters are so easy to make into something else . . . the top of a rattle becomes a cauldron for Halloween. A star, bent, becomes a starfish . . . a gnome becomes Santa. You can even slim up a bride cookie and instantly help the little lady lose 10 pounds. It’s a beautiful thing. For a cookie recipe and more on how to get the cookie to stay the shape that you want, check out my basic cookie tutorial
here.
I am using all 17 second icing colors, for these cookies. For more on how to make royal icing, check out my tutorial
here. I’m assuming that you’re all experts, by now, so we are moving on to the fun part– making cookies cute enough to tempt Santa. Hey . . . that diamond necklace isn’t gonna buy itself, here, folks. We need all the help we can get!
Start with your light copper icing– I put a teeny weeny bit of copper coloring in a lot of white, and the skin came out pretty well. Go ahead and outline and flood Santa’s face in the above shape. If you’d like his face to be a different shape, then, by all means, go ahead. Play plastic surgeon and rearrange faces to your heart’s content.
Now, add a face to the Mrs. Claus. Her face isn’t as round– you might want to make yourself a rough sketch, to look at, before you start. I always draw out a rough pattern, first, before I start piping. It’s much easier to refer to your drawing than to zone out and make all the Clauses with horrifying faces. This is the Claus family– not the Addams family, after all.
Now, let’s give Santa something. He’s always giving to others . . . time for him to receive a gift, for a change. Give him some little ears and a nose. You want to make sure that the Santa faces have dried for 10 minutes, or so, before you add the facial features, or the nose will blend into the face– and be completely swallowed by it. Eeeek. Face swallows nose . . . not pretty. I generally find that, by the time I have finished my Santa faces, the first faces are dry enough to continue adding details. But you can wait 10 minutes or so, to be sure, if you like.
Give Mrs. Claus a nose. We have to be fair, here. He gets one, she gets one.
Next, grab some 17 second white icing. Wait another 10 minutes until the features are getting dry enough to continue, and then add sideburns, eyebrows, a mustache, and a beard. Goodness. So cute. I could just eat this little guy up. And, with cookies, you can totally do that.
Give Mrs. Claus some hair and an apron. Wait a few minutes to add the collar, or it will blend into the hair portion. I know that Mrs. Claus is usually pictured with a tight bun in her hair, but I got to thinking– if this was really her busy season, and she was really dealing with a husband stressed out about working all night, she’d say to heck with her hair, and most likely just leave it down. Plus, I felt it looked more youthful, and just in case Mrs. Claus was feeling like Diva Claus, I wanted her to rock what she had for the special evening.

Now, get some 17 second red. Give Santa a vest and one leg. “What??? Poor dear! Why are we giving him only one leg!” Well, I’ll tell you . . . it has to do with that “melting” thing, again. If we did both legs at the same time, they would melt into each other and become one leg– two items smooshed together until they have no identities of their own. And we just can’t have that. Go ahead and do all of Santa’s “one leg” sections, before you do the second leg. That will give them time to dry, and when you come back, the first legs will be ready to partner up and waltz the night away. Some people may be worth melting for, but this isn’t one of them. No melting features!
Go back to Mrs. Claus, now. Give her a nice, generous bust, a red cap, a cute little rosebud mouth (basically a teeny heart), and a red outline around her apron.
The Santa legs are ready to tango, now. Go ahead and add the second leg, as well as Santa’s little arms. You always wanted to be his right-hand man, right? Well, now you can be both his right AND left hand man (or woman).
Let the red dry for an hour or so. Red and white colors bleed very easily, so we want to make sure that they are always dry, before adding details of the opposite color. Give Santa a little white belt (you can add sparkling sugar if you want it to look 3D and more “furry”) and 2 white buttons.
Take the red and give Mrs. Claus some arms and a little bit of decoration on her apron. I tried a few different things– you can do candy canes, if you like . . .
Or a simple zig zag and dot thing. Pick whatever pattern you like and embellish away.
When the red has dried for several hours, give Mrs. C several buttons and a cute little bow on her head. I found (after several different bows) that I liked them best when I made a simple white dot, allowed it to dry for 10 minutes, and then added triangles to the sides. That made the center dot more distinct. This bow was made all in one motion, and it’s cute, but it kind of ran together, a little bit. I’ll show you the other bow, down below, here, in a minute.
When the cookies have dried for about an hour, go ahead and add some black details. Give Santa a little belt buckle, a smiling mouth, 2 cute little eyes, and one shoe. Yep . . . that same “it’s not me, it’s you” thing, again. We don’t want his shoes to melt together. Do all the first shoes before coming back and doing the second ones.
Just like at the store . . . when you buy one shoe, they go to the back and get you the second shoe. Make the old guy a nice set. He deserves it.
Give Mrs. Claus some eyes, too. Notice the white bow, here– this was one in which I did the center, separately, as I described above. Lots of times, decorating cookies is kind of a process– you experiment a few times and decide what you like, best, as you go along.
Let the cookies dry, overnight, for best results. You worked hard on these cookies– and you don’t want your hard work to be ruined.
So put your cookies out for Santa. Slim him up, if you want some brownie points . . . er, cookie points. Maybe even write him a note, explaining how much time you put into his Christmas cookies, this year.
It never hurts. Because you did it. And I’m just so proud of you.

Disclosure: This post may contain affiliate links, which just means that we get a few pennies if you purchase through our link. I never recommend products that I don't personally use and love. Thanks!





Pingback: Enchanting Elf Cookies – Cookies for England