
The first time I ever heard the name “royal icing,” my brain somehow thought it had something to do with Britain and the Royal family. But, unfortunately, the only thing royal icing and the Royal family have in common is that both are . . . a little stiff. Bwahaha. Sorry. O_O Serious.
Yesterday we learned the basics of baking sugar cookies, here. Today it’s time to graduate to flooding! Unless you’re Noah, flooding probably isn’t something you know a whole lot about. Get ready for all that to change. Soon, you will be decorating such gorgeous cookies that everyone will ask you how in the world you do it. You’ll also be able to stack the cookies, without them smudging (oh– that is a beautiful thing). You’ll be a pro in no time!
What are we waiting for? Let’s do this!
Royal Icing Recipe (adapted from basic Wilton recipe)
1 bag powdered sugar (2 lbs).
5 tbsp. meringue powder
1.5 tbsp. almond extract
1/2 cup warm water (plus a few extra tbsp., if necessary)
Directions: Stir powdered sugar and meringue powder together, to combine (a few turns of the mixer blade works well for this– just keep speed low so powdered sugar doesn’t do that little “sugar geyser” thing). Add in extract (may substitute clear vanilla extract for the almond, if preferred, but you need to use a clear extract to avoid coloring your icing) and warm water. Mix until thoroughly combined, adding a few more tbsp. of warm water, if necessary. Once you have this basic icing, it keeps for several weeks. It doesn’t have to be refrigerated. Store your extra, uncolored icing in an old Country Crock container, or another container with a good seal, and take out what you need, as you need it.
Now, in pictures!

Royal icing is incredibly versatile. You can use it to make 3D garnishes, outlines, and those beautiful, shiny cookie tops. It will keep for weeks in an airtight container, ready to go to bat for you whenever you’re ready. Today, I need some dark gray icing, so I took a little of my reserved white icing from the Country Crock container where I keep it, and I kept this little bowl of icing covered with a wet washcloth (without allowing the washcloth to touch the icing) until I was ready. Whatever you do, don’t let royal icing open to the air, or it will dry out. That ruins it. Game over. Hand it the pink slip. Hear the fat lady sing. Keep it fresh by covering it with an airtight lid, or, for more temporary purposes, a wet paper towel or washcloth.
A good tip I read, somewhere, is to use a spray bottle full of warm water when you’re mixing your icing. If you find that the icing is too thick, add a spray of water. This “spray” thing is so much easier than trying to get a single drop out of your faucet. If you don’t have a spray bottle, I think a medicine dropper would work, too– you basically want something that can administer about a drop of water, at a time, since the icing is very sensitive to liquid and can change, completely, if you add too much or too little.
I am using this icing for piping. See how it’s satiny and smooth? You want your icing to look like that. Too little water will result in grainy icing, while too much will result in a puddle. You may have to play around with your consistency, a bit, to get it right. A teeny bit of black gel gave me the color I needed. Experiment with the color (use a little, first, to see if you like the shade, especially if it’s a new color), and be sure to scrape the bottom of the bowl thoroughly when you are mixing the color in so it doesn’t get white streaks in it from not being mixed all the way through.
I like to use 17 second icing for almost all of my decorating. What???? Basically, this means that it takes a drop of icing about 17 seconds to completely melt back into the bowl of icing, when I drag a knife through and drizzle icing over the top. You can also drag a knife through the icing and count (use a clock, since we tend to speed up counting when we are waiting for something). When your icing takes 17 seconds to “heal,” it’s ready to go. Cover it with a wet paper towel or washcloth and start getting your piping bags ready.
Here’s a TIME SAVING tip!!!! Who hates washing out icing bags? Who hates pouring icing into icing bags, only to have the whole thing tip over and spill everywhere? Me, me, me, me, me!!! I can stop those worries for you forever. This will blow your mind and change the way you decorate.
The icing never touches the bag.
You heard me. No bag to wash. No bag to fill. No cleanup. Easy peasy. Let me show you how.
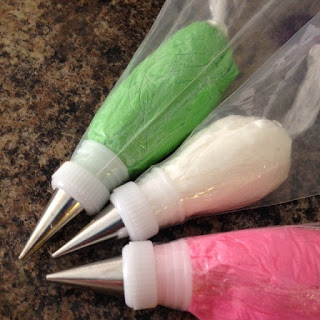
This is not an icing bag. This is magic. This is beauty. This is so beautiful that, if it were a girl, you’d ask for its number. This is nothing more than a sheet of plastic wrap, with a blob of icing in the center. Roll it up like a piece of hard candy and tie a knot in one end. Done. See? Told you that you’d love this.
Place the longer end of an icing coupler around the end that IS NOT knotted.
Thread that sucker into a reusable bag. Yep. Perfectly fine to use those “throwaway” bags. And you won’t be throwing them away. You’ll be saving money AND saving the environment! I can almost hear the universe sing for joy with you. Right now the end is long. Don’t worry. It’s easier to thread through the bag tip that way. We’ll take care of that in a minute.
I have lined up all the pieces so you can see the order in which to place them. First, little hard candy thing full of icing. Coupler. Thread the long end through bag and cut off that end, close to the tip. Put your metal piping tip of choice (#3 is good for outlining, so that’s what I’m using today) on the outside, and seal it with a coupler ring. When you first start to use the icing, go gently until it flows. It has to thread its way out of that bag, and you don’t want to pop it. I’ve done that, and it ain’t pretty– trust me.
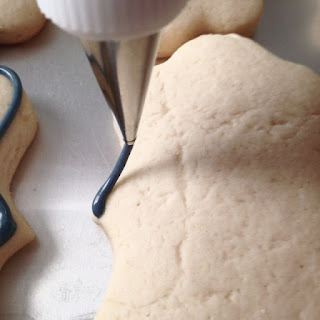
Pipe your cookies. See how my icing isn’t super stiff? I use 17 second icing for both outlining and flooding. It’s stiff enough to hold an outline, and smooth enough to create a nice, shiny surface of flooded icing. That’s perfect icing for me. Experiment and find what you like best. I also find that it’s easier to pipe straight lines when you hold the piping tip a little off the cookie. Kind of let the icing fall into place. It’s like kids. Push them too hard, and it gets really shaky . . . not pretty, folks. But give them a little space– a little guidance– and things tend to fall into place. Yep. Same with icing.
Generally, you get a little bump where the icing you started with meets the icing you end with. No problemo, man. Just use a toothpick to smooth it over. Easy peasy. See? Told you that you’d be an expert in no time.
Meet your new best friend. Yes. Ohhhhhh yes. These seemingly simple plastic bottles will save you so much stress and nonsense. These beautiful things are about a buck at Walmart. Get them. Get them now. Before someone else does. I should be hearing car keys jingling as you run to your vehicle. Because these are the best. These are for flooding icing. Dear Noah! Are you listening! Flooding! These bottles work great for icing that you want to be a little runnier than your standard, 17 second icing. If you are making a lot of cookies, then making the icing runnier, and, therefore, quicker to fill up your “cookie dam,” really helps save you some time.
Flooding icing will be a little runnier than piping icing (that 17 second icing that will work for both, but just takes a little longer to “fill in.” Think of piping icing as the dam, and flooding icing as water in the reservoir. You want it to flow enough to fill the corners, but not so runny that it overflows the dam. Make sense? Good. I do about 11 seconds from knife to icing “heal” on flooding icing. Again, just my preference.
If your head hurts, here is the general breakdown:
— 17 second icing makes a great outlining and flooding icing, as long as you allow the outlines to dry a little (15 minutes or so) before flooding. The flooding will also be a little slower, so it’s best to use this when you have only a dozen or so cookies to decorate.
— 11 second icing is the “flash flood” icing of the decorating world. You need to outline in 17 second icing, but the flooding icing will quickly and easily fill in the cracks. It’s more prone to run over, though, so fill carefully and be sure not to overfill your “dam” of icing. This is great for doing a lot of cookies very quickly, since the icing basically zips right into the corners.
Notice my flooding icing bottle is upside down. Royal icing tends to get bubbles in it, and these bubbles naturally float to the top of wherever they are. So if you store your bottle upside down in a handy dandy juice cup (Fine. Use a coffee cup. Be that way, if you must), the bubbles will fly merrily to the top, leaving your perfect icing at the bottom. You’re so smart. I love working with you.
Take this handy dandy plastic bottle and “flood” your cookie. That just means kind of tracing inside your piped (and dried) outline. Don’t overflow it– it’s OK to have a few spaces. But get your tracks fairly close together. They will kind of ooze into a solid.
You can speed up this oozing process by swirling the icing gently with a toothpick. I usually have to use the toothpick to get the icing into the little nooks and crannies.
Sometimes, despite the best of intentions, one of those pesky little air bubbles gets in there. No worries. Your icing is still wet– just use your toothpick to pop that little guy. Beware of dried icing– if you don’t catch the bubbles early, trying to pop them can do more harm than good– scarring your poor, innocent cookie for life (dramatic music plays in background). Royal icing dries out quickly– so keep all icing bag tips not in use covered with a damp paper towel so that they don’t dry up on you. And pop those pesky bubbles before the surface dries.
There you go! Beautiful cookies, outlined and flooded. Let them dry a few hours before decorating. Let them sit overnight if you want them really dry.
And that’s all there is to it! Before long, you will be mixing and creating like a mad scientist, in your home laboratory . . . I mean, uh, kitchen. It’s so much fun– watching your ideas and imagination come to life.
You did it! And I’m just so proud of you.

Disclosure: This post may contain affiliate links, which just means that we get a few pennies if you purchase through our link. I never recommend products that I don't personally use and love. Thanks!


Pingback: Pyrex Starburst Cookies – Cookies for England
Pingback: Classic Gingerbread Men – Cookies for England
Pingback: Perfect Princess Cookies – Cookies for England
Pingback: St. Patrick's Day Cookies – Cookies for England
Pingback: Classic Amish Whoopie Pies – Cookies for England
Pingback: Sweet Strawberry Pie – Cookies for England
Pingback: Soft Tea Sugar Cookies – Cookies for England
Pingback: Festive Winter Mitten Sugar Cookies – Cookies for England
Pingback: Sweet Santa Cookies – Cookies for England
Pingback: Sinful Nutella Whipped Cream – Cookies for England
Pingback: Red Velvet Cupcakes with Cream Cheese Icing – Cookies for England
Pingback: Quickest Cookies Ever – Cookies for England
Pingback: When life hands you lemons . . . – Cookies for England
Pingback: Hero Cookies, part I– Policemen – Cookies for England
Pingback: Pittsburgh Steelers Cookies! – Cookies for England
Pingback: How to Do Brush Embroidery with Royal Icing – Cookies for England
Pingback: Enchanting Elf Cookies – Cookies for England
Pingback: Minion cookies without a custom cutter – Cookies for England
Pingback: Reclaimed Barnwood Cookies – Cookies for England
You're so welcome! Hope it saves you some headaches down the line 🙂
Thank you Emilie! This is one of the best icing tutorials I have seen! Thanks for sharing!