The holidays are coming, and that means holiday baking is upon us! I love this time of year– everyone is in a festive mood, the Christmas sweaters make their annual debut, and I can hear Bing Crosby crooning over the Walmart loudspeakers. Ahh . . . it’s just great.
In the next few weeks, we will be going through a flurry of recipes, to help you find the perfect ones for your holiday guests and get togethers. It is also time for COOKIES!!! Hooray!
You’re probably thinking, “Why the heck hasn’t she made more cookies, lately?” Well . . . I’ll tell you why. I have a 3 year old and a 1 year old. Royal icing sugar cookies take roughly 6 hours per batch, of decorating– the complex ones take longer. And although I love it, I just don’t have time to make them, as often, now that my baby is on the move and my toddler doesn’t nap 😉 Time is precious. But I’ll try to carve out some time, here, to make some Christmas cookies soon– deal?
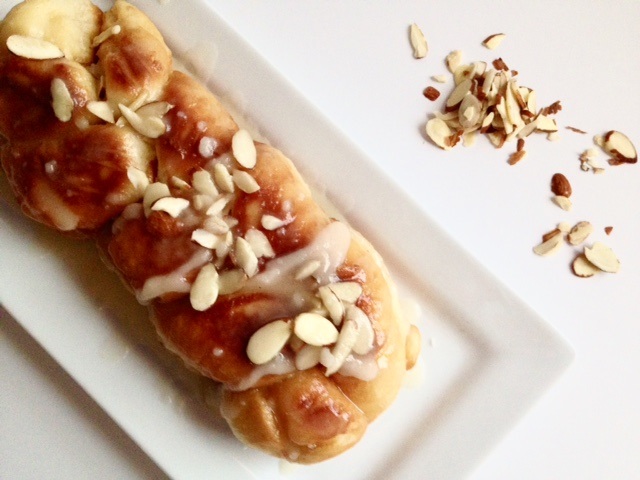
For now, though, we’ll have to be content with what I’m already making during the days, anyway. And today . . . we are previewing the gorgeous Vanilla Almond Braid. This little beauty is a showstopper of a breakfast centerpiece, and the best part is . . . you can make the dough ahead, and freeze it for a special breakfast (like Christmas, when you need to be with the family instead of chained to the stove). This is actually crafted from the same dough which we used to make Krispy Kreme style donuts, here, the other day. Technically, you could use this same dough and make a stack of piping hot doughnuts, as well as this gorgeous braid. Everyone will be so impressed! And I won’t tell them how easy it was, if you don’t 😉
Well . . . show me the dough! Yes. Here it is.
Vanilla Almond Braid
(adapted from a basic doughnut recipe)
Ingredients:
4 1/2 tsp. instant yeast (or 2 packets regular, active dry yeast)
1/4 cup warm water
1 1/2 cups warm milk
1/2 cup white sugar
1 tsp. salt
2 eggs, room temperature
1/3 cup shortening
5 cups all purpose flour
Glaze Ingredients:
1/3 cup melted butter
2 cups powdered sugar
1 1/2 tsp. vanilla
2-3 tbsp. warm water
Directions:
Mix warm water, warm milk, sugar, and instant yeast together in a bowl. Whisk to combine. If using active dry yeast, add a proofing step to your preparation. Add eggs, shortening, and 1/2 cup flour. Whisk well. Add salt and whisk again. Add enough flour to form a stiff batter. Knead dough, adding flour as necessary, until you have a soft dough that feels like a human earlobe. Place dough in greased bowl and mist top with cooking spray. Cover and allow to rise for 1-1.5 hours, until doubled in size. When dough has risen, divide dough into equal pieces (depending on how large you want your braids to be) and roll each piece into 3 strands. Braid the strands and cover with a kitchen towel. Allow braids to rise for roughly 40 minutes, until quite puffy. Fry in 350 degree oil, or bake in a 350 degree oven until finished. Drizzle with glaze and sprinkle with toasted almonds, if desired.
For glaze, simply combine ingredients and whisk until smooth.
Now, in pictures! 🙂

Start out by mixing the warm water, warm milk, sugar, and instant yeast together in a bowl. If you are using active dry or rapid rise yeast, let this mixture sit for about 5 minutes, until the yeast foams. I prefer to use instant yeast, because I can add it directly from the freezer to a recipe, and I’m good to go– no waiting required. Here  is the kind of instant yeast I use for regular breads. Trust me– try it once, and you’ll never go back to regular yeast packets. Whisk your ingredients together so that they are well mixed.
Your yeast should be all nice and mixed in. Now, now. Everyone meet everyone and play nice.

Add your eggs and shortening. You know, I just realized that my eggs look like eyes in a face. Weird. Quickly– stir them in and make the face go away. Creepy.

Whisk in about 1/2 cup of flour– this helps to break up the shortening and also insulates the yeast from the salt that we are going to add next.
Add the salt.
See? Told you it was next. (How did she know that? Creepy! First the creepy eyes and now the creepy future telling . . .) Whisk everything in there.

Continue adding flour, little by little, until you have a shaggy dough. When the dough gets almost too thick for the whisk, go ahead and switch to a wooden spoon and add flour slowly until you get a soft dough.
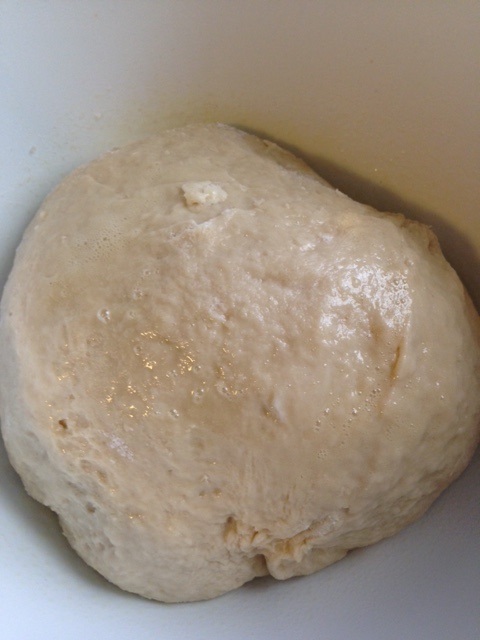
Knead your dough on a floured silpat until it is soft and pliable– the consistency of a human earlobe. Place your dough ball into a greased bowl and mist the top with cooking spray. Cover the bowl with a towel and allow the dough to rise in a warm place for 1-1.5 hours, until it is puffy and almost doubled in size.
When your dough has risen, go ahead and gently deflate it. My mom used to let us kids “punch” the dough to get it to deflate– and I still get a little thrill each time I do it. 🙂 Now, you have some decisions to make. Do you want one big braid, kind of like a challah? If that’s the case, go ahead and leave the dough in a big lump and prepare the braids. If you want a series of smaller braids (I’d recommend this if you want to fry the dough, because the smaller braid are easier to turn over), then divide your dough into 3-4 dough balls. Divide each dough ball into 3 pieces and roll the pieces into strands. Basically, you’re making each dough ball into 3 long strings. Pinch these strings at one end, to hold them together, and then gently braid them.
You can’t braid??? You never had Barbies, did you? Oh . . . my Barbies were often the victims of my creative child hair-dos. 😉

When you get your dough into a nice braid, pinch the other end together, also. This just helps the dough to hold together as it rises and swells. We don’t want our braids popping, now, do we?
Cover your braids with a towel and let them rise for 35-40 minutes, until they are nice and puffy.
Now . . . you have a choice, again. Choices, choices, choices!!!! You can either fry your braids (in which case, they will taste more like a doughnut), or you can bake them at 350 degrees for roughly 15-20 minutes, until golden brown (they will taste more like a sweet roll). Either way is awesome. If you are making donuts, also, try a fried one and see what you think. If you don’t want to mess with hot oil, baking is great.

Since I am reusing my doughnut dough recipe, I am going to fry this braid. I placed the entire braid into 325 degree peanut oil and let it turn brown around the edges. I flipped the braid over, carefully, with tongs, and allowed the other side to brown, as well. When the braid was finished, I moved it to a drying rack to cool a little bit.

And then . . . I drizzled it with delicious, glazed goodness.
And I went nuts . . . literally. You can use any kind of nuts you like (or leave them off, if you don’t like them), but I found that slivered almonds were gorgeous on top. If you want your nuts to have an even more amazing flavor, toast them in the oven, first, before adding them (bake them about 5 minutes at 350, turning the nuts halfway through baking, until they become deliciously fragrant). Toasting nuts really gives them an awesome flavor boost.

I bake a lot. I bake just about every day. And, usually, I don’t eat what I make– by the time I’ve made it, photographed it, and written about it, I’m sick of it. But I tell you what . . . I took one bite of this vanilla almond braid, and my eyes rolled back in my head. It was that good. I literally had to stop myself from stuffing in bite after bite. And it’s ooooohhhh so pretty, too. If you wanted, you could make a Christmas wreath out of your braid (although you’d probably have to bake this, rather than fry it, since it would be fairly large). Imagine how pretty a wreath of braided dough would be on Christmas morning. Sigh. 🙂
And that is exactly what your family and Christmas guests will think, on Christmas morning, when you serve this little marvel with steaming mugs of holiday coffee or hot chocolate. The best part is that you can freeze your dough, if you want (more on that, here), to have it ready to go, ahead of time. This means (whispers . . .) . . . amazing breakfast . . . with almost zero effort. Ahh . . . it’s a beautiful thing.
Because you did it. And I’m just so proud of you.

Disclosure: This post may contain affiliate links, which just means that we get a few pennies if you purchase through our link. I never recommend products that I don't personally use and love. Thanks!