It’s been a little while since I made cookies. I can see your stern face, now. Isn’t this blog called “Cookies for England?” Wait. Let’s start over and do that in an English accent. It seems fitting. “I say there . . . isn’t this called ‘Biscuits for Britain?’ This is absolute poppycock!”
Oh well. Life happens. I have a toddler and a baby, so I don’t have time to make cookies every day. But that’s OK– because these ones today are really cool, and I think you’re going to like them! 🙂 I wish I could reach through the computer and give you one, because they’re quite tasty, too! So let’s make some cookies!
What are we waiting for? Let’s do this!
Photo: Jill Lang
I love the beach . . . the energizing rush of the surf . . . the gorgeous, windy breezes tousling your hair . . . watching the sunset sparkling on the water . . . it’s bliss.
There’s just something about the relaxed, laid-back setting of the ocean that puts everyone at ease. I always smile when I find a bit of sand at the bottom of my bag, after a return from the beach. It’s like the ocean has sent a little something with me to say, “Don’t forget me. I will be waiting for you.” And somehow, I always long to answer that call and return.
Let’s see if we can recapture that relaxed, beachy feel in edible form! These would be perfect for your next beach vacation, or even for a luau or beach party! What are we waiting for? Let’s get started! To begin, I wanted to point out that I got some of the ideas to get me started on this from
Clough’D 9 Cookies,
Sweet Sugarbelle, and
Make Me Cake. I always try to credit artists for their work. I have made some changes and switched some of the designs up a bit, but I wanted to give credit for my inspiration photos! 🙂
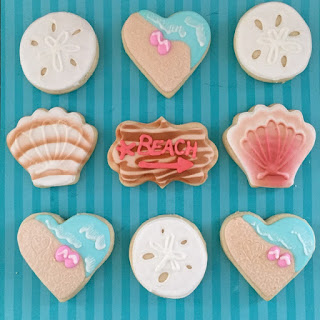
Today, I’m going to show you how to make some “Beach” signs and seashells. I chose to use a rectangle plaque cutter for this, but a plain rectangle would work fine, too. Outline and flood the cookies in light brown icing. Allow to dry.
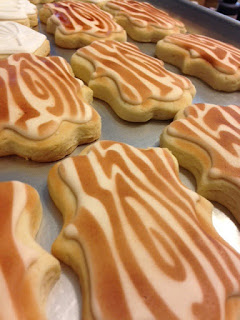
I wanted the base to be light brown so that the airbrushing detail really stood out. Go ahead and airbrush a wood grain on the cookie with a dark brown airbrush color.
So cute. I love this little “plank of wood” cookie.
Make the whole tray. Hey . . . sometimes you can’t see the forest for the trees. Haha. These are so cute. I think sometime I might do some kind of woodsy theme with these. All together, they look just like a woodpile. Maybe a Christmas idea? “Roasting chestnuts on an open fire . . .”
I made some coral colored icing (mixing pink and a touch of orange) and piped some beachy details, like a sign pointing to the beach, and a star fish, just for fun.
Now for the shells. Take a piece of cardboard and cut it into a round-ish shape.
Oooooh . . . look at that loveliness. Look at it. Doesn’t it look like a Tiger’s Eye? This is copper airbrush sheen. Swirl it up (it tends to separate), and pop that gorgeous copper color into your airbrush. We are going to make these cookies shine . . . literally.
Starting at the bottom, apply a layer of sheen right by the cardboard. Don’t airbrush the entire cookie.
Move up a bit and do another tiny line of airbrushed copper. You can add several colors, for depth, if you like. Some pink or even a touch of black would look very realistic.
I just did plain copper sheen, and I liked how it turned out. Next time I might put the layers closer together. Look at a real shell, and see what colors the lines are.
I decided to try a few more– I made a little blush of pink at this shell’s heart. “Please. Please. Stop it. I’m blushing . . .”
I did a bit more pink and then covered with some of that copper sheen. I love it.
The next one I did, I focused more on copper and less on pink. I liked that one, too. It’s always nice to have a little variety.
Photo: Jill Lang
Photo: Jill Lang
Photo: Jill Lang
These beach cookies were so fun! You could draw the person’s initials, or a heart with an arrow through it, in the “sand,” if you want. Just an overall, fun collection.
I feel like pulling up a beach chair and watching the sunset. 🙂 I think I can hear the call of the ocean, now! Sigh. 🙂 Bliss.
You did it. And I’m just so proud of you.

Disclosure: This post may contain affiliate links, which just means that we get a few pennies if you purchase through our link. I never recommend products that I don't personally use and love. Thanks!





Pingback: How to make Royal Icing Transfers – Cookies for England