Sparkling Snowflake Cookies
When I was a kid, I absolutely loved to make paper snowflakes (ah . . . who am I kidding . . . I love to make those things now, too). There was something so magical about taking a regular piece of paper, folding it, cutting random shapes all over, and then opening it, slowly, to reveal a piece of beautiful, one-of-a-kind lace.
So you can just imagine how much fun I had making these snowflake sugar cookies. Each one is different, and each one has a specific beauty of its own. So gather your kids together and make snowflake cookies– you will create some beautiful cookies, and some pretty awesome memories, too. Giving your time to your loved ones is the best thing you could give them, anyway. While you do it you might as well make snacks. 😉
What are we waiting for? Let’s do this!

To start, make yourself some snowflake cookies. You’re all cookie pros by now, right? Well, just in case you need a refresher on how to make and cut out sugar cookies without the mess, check out my cookie baking tutorial, here. Bake yourself some snowflakes in the size and shape of your choice and allow them to cool.
Meanwhile, prepare yourself some 17 second icing. I like to make my icing bags while the cookies are baking so that they have 20 minutes or so to sit and allow the air bubbles to rise to the top. That way, I have fewer air bubbles in my cookies. Hooray! The great news about these cookies is that they take only 2 colors of icing– white and ice blue. For more on how to make royal icing and how to know your icing consistency is right, check out my tutorial here.

Outline and flood some of your cookies in blue. I allow the outlines to dry for about 15 minutes before flooding– luckily, it takes me about 15 minutes to outline all the cookies. By the time I’m finished outlining the last one, the first one is ready to go. It’s a beautiful system 🙂 Pop any air bubbles that may sneak in there, before your cookies dry.

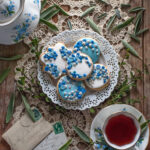
Outline and flood some in white, too, for variety.

Allow the cookies to dry, uncovered, for at least a few hours. Overnight is better, if you have time to do that. The icing will look dry, but it’s a treacherous lake under a thin sheet of ice. You don’t want to break it and ruin all your hard work while you’re adding details. Dryer is safer.
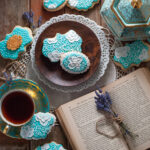
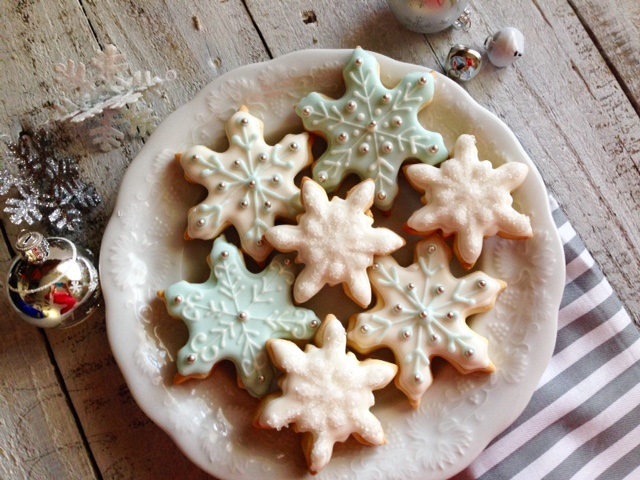
We will start with our dried blue cookies. You can make any pattern you want, really– as long as it’s symmetrical. Symmetry makes everything look better, in my opinion (gazes in mirror and tries to decide if my face is symmetrical . . . decides to change viewpoint . . .). Basically, whatever pattern you use, do the same thing all around the snowflake, and it will probably look pretty good. For this one, I am starting with a straight line. I added 2 dabs of white to the ends and added sugar pearls there, for a little holiday shimmer.

Add a second line and 2 more pearls.

Again, there is no “right or wrong” here– just have fun and be creative. I am just showing you a few designs I used, in case you’re having a brain freeze (brain freeze with snowflakes . . . get it? Sorry. O_O Serious). I added a third line, with pearls, and then added pearls to the center and in each space, with a drop of icing.

Here is another design I tried– same basic lines and pearls, with a curlicue at the top, and a few V shaped lines down the stems. I ended with a pearl in the center.

Another one without the curlicue and adding a few extra pearls in the center . . .

Ahh. Aren’t they pretty? Just have fun and try different patterns. See what you like best. They will be pretty (and, more important, tasty!) no matter what design you choose.

I did a few white snowflakes with blue piping, just for variety.

Another easy decorating idea is to pipe a design in white icing and then sprinkle the cookie with sparkling sugar. I love the sparkling sugar from King Arthur Flour, here . They are a great, Vermont-based company with a passion for baking and a great community outreach. Every product I have ever tried, with their name on it, was absolutely top-notch. You can’t go wrong with their baking supplies. It’s worth the little extra money, in my opinion, to get baking supplies that work perfectly, every time. Just my two cents.

Shake the excess sugar off the cookie, and Bingo!! You have an adorable, sparkling little snowflake.

Allow your cookies to dry, overnight, to make sure that they are really nice and dry. The sparkling sugar will stick so tightly that you can stack these without losing a rainfall of glitter every time you touch them. That is A OK in my book. Of course, handle them with care, anyway.

Because they really are gorgeous. I wouldn’t be surprised if Santa gives you a few extra presents when you leave these babies out for him on Christmas Eve.
Because you did it. And I’m just so proud of you!

Disclosure: This post may contain affiliate links, which just means that we get a few pennies if you purchase through our link. I never recommend products that I don't personally use and love. Thanks!