
It is no secret that I love tea. Tea is that most blissful of beverages that can, at once, calm you, give you energy, warm you, cool you, and bring a stressed, fragmented world back into focus again. There are many, many kinds of tea, and so I can’t help wincing when someone says nonchalantly, “Oh, I don’t care for tea.” Oh dear. That’s like saying, “I don’t like people.” You have to take each one individually– because each has its own unique personality 🙂
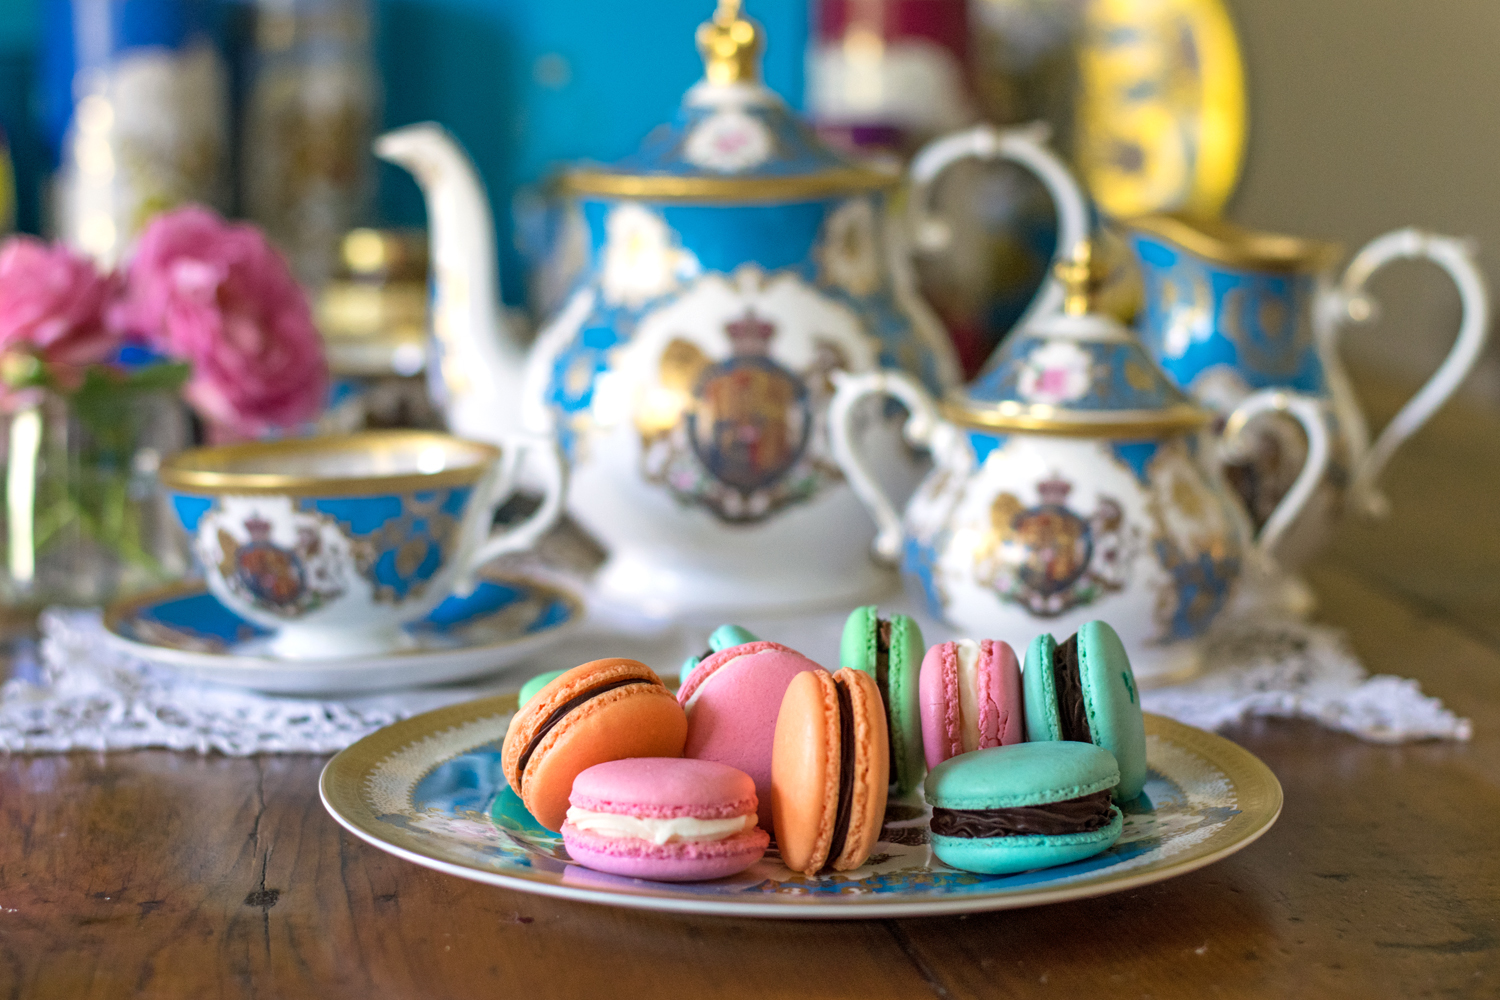
Earl Grey French Macarons are the perfect accompaniment to a steaming cup of tea on a chilly morning, with the steam rising lazily from your cup as you gaze out onto the first breaths of a new day. The delicate white chocolate flavor in the filling complements the Earl Grey tea perfectly. You just might find that you have a new favorite morning tradition.
What are we waiting for? Let’s do this!
Earl Grey French Macarons
Macaron Ingredients:
100 g. egg whites
1/4 tsp. cream of tartar
50 g. white sugar
200 g. powdered sugar
110 g. almond flour
Gray food coloring gel, optional
Earl Grey Ganache Filling:
1/2 cup heavy cream
1 cup white chocolate chips
2 Earl Grey teabags
Directions:
Whip room temperature egg whites, cream of tartar, and white sugar with the whisk attachment of yourstand mixeruntil the whites reach stiff peak stage. Meanwhile, pulse your almond flour and powdered sugar in afood processor
until the mixture is well combined. Sift your almond flour/powdered sugar through a sieve and throw away the pieces that are too large to pass through the sieve. When the whites have whipped into stiff peaks (add color if using at the stiff peaks stage and mix a few seconds to incorporate), fold the almond/sugar mixture into the whites gradually and carefully until they reach proper “macaronage.” Pipe meringue circles onto a silpat
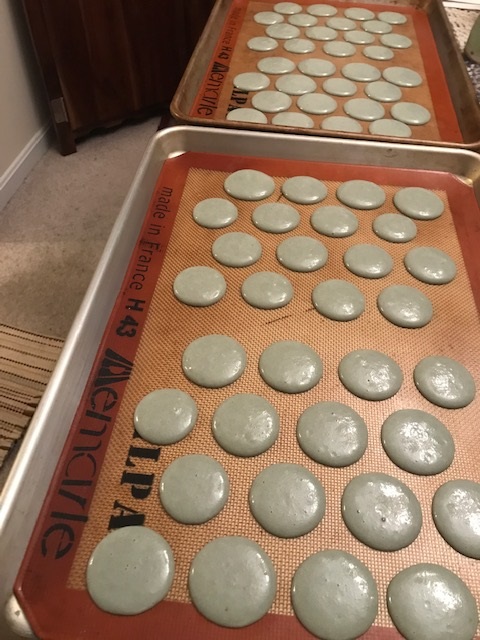
, using a template, if desired, and slam the cookie sheets several times on the counter to dislodge air bubbles. Allow circles to dry for 20 minutes before baking at 300 degrees for 20 minutes, one sheet at a time, in the center of the oven (move oven racks, if necessary). Do not open the oven until the 20 minutes are up, and use an oven thermometer for best results. When your macarons are done they should feel “firm on their feet.” If the macaron shells are soft or crack when gently touched, bake for 2 more minutes and test again until they are firm on their feet. After baking, remove entire silpat to cooling rack and allow shells to cool, completely, before removing them from the silpat.
To make filling, warm cream over low heat, allowing the teabags to steep in the liquid while warming. When the cream has small bubbles along the sides (but has not boiled), turn off the heat, remove teabags, and stir in white chocolate chips just until melted. Allow warm ganache to chill in the refrigerator until it reaches the consistency of caramel sauce. Whip with the whisk attachment of your mixer until the ganache is fluffy and then chill again until it reaches a pipeable consistency. Fill cooled shells with Earl Grey/White Chocolate Ganache and chill finished macarons in an airtight container in the refrigerator overnight. Shells are perfect after 24 hours of curing but may be stored several days in the refrigerator or up to a month in the freezer.
Now, in pictures

Many people are dismayed the first (or second, or even like, 50th) time they make macarons. They have seen these pretty little cookies gazing happily at them from behind a bakery counter somewhere. When they find that these TEEEENY little cookies are like, $3 apiece, they scoff, “How can a cookie the size of a quarter cost 3 dollars? You have to be kidding me. I will go home and make my OWN!”
So they go home and look up a recipe. There are many recipes, and they seize one and don’t read the directions. They skip steps (Awwww I don’t need to do that!), or forget to slam the trays (How stupid is that? Is that a joke?), or don’t put the trays in the direct center of the oven (I’m short on time– I’ll bake them together), or don’t measure the ingredients with a kitchen scale (Aint nobody got time for that!), or don’t pay attention that it’s a rainy day (they don’t call it “weeping meringue” for nothing!). . .
And their macarons fail miserably. Bravely, they try again. And yet, something happens and their shells are misshapen, with odd, gnome-like hats (some call these points “macaron nipples” but eh . . . I prefer gnome hats 🙂 or devastating cracks. Some have feet and some don’t (the macaron “foot” is that little ruffly edge around the bottom. You WANT feet, FYI). It looks a lot like macaron heartbreak alley.
They become obsessed. They read everything they can read about these devilishly difficult little delights. They try all the so called “tricks”– aging the egg whites. Using a dehydrator. Only making the meringues in a convection oven. Using a fan. Cracking the oven door. Not daring to crack the oven door. Poking a voodoo doll. Screaming profanity. Drinking wine.
Well, maybe not those last few. Well, maybe not every time.
The fact is, the recipes that seem the most simple are often the most deceptively so. Buttermilk biscuits is a classic example of a recipe that takes few ingredients but is insanely difficult to get right . . . the first time. After years of failure, I finally got the biscuits RIGHT. And all that it took was learning the technique– learning how to “feel” the dough– when it had enough of this or that. A recipe can’t teach you that– only experience can. And I had a very similar battle with French macarons.
I had never eaten a macaron before I made them in my own kitchen, so I wasn’t sure if what I created was right or not. Over the years I ruined enough macarons (more on that here, along with devastating photos of a few of my most ignoble failures) to make a Parisian chef pâtissier cry “Oui, oui, oui,” all the way home. But I dug in my heels. I didn’t give up. I kept trying, and then I started keeping a notebook where I wrote down each thing I did, and the results I got, so that I could look up what went wrong and fix it next time. And finally, one glorious day, the heavens opened and I made my first, beautiful batch of perfect, delicately footed, divinely tasting, no hole in the center, honest-to-goodness French Macarons made in my humble American kitchen.
Since then I have visited Paris, and went to the glorious macaron Mecca of Pierre Herm̩, arguably the finest pastry chef in Paris. And I bought a box of his glorious French macarons (made, presumably, in his not so humble Parisian kitchen), and I studied them. I looked at how they formedРtheir foot height, their solid interior, the way that the filling had melded perfectly with the crispness of the meringue shell. And I tasted.
And I realized that I had finally learned to make a macaron just the way it’s supposed to be. Of course, I still make mistakes. And of course, I will never be as creative as Pierre Hermé with my flavors. But just like you’d put your Grandma’s chocolate chip cookies up against the famous Neiman Marcus chocolate chip cookie any day, I think my humble little macs are pretty darned good– especially for “un Americain.” 😉
Good macarons start with properly beaten egg whites. “But what did the poor little eggies dooooo??? Why are we BEATING THEM????” *sound of wailing in the distance*). Eh. Think of it like beating a rug– it will look better, after. No eggs were harmed in the making of these macarons– they are just getting a nice day at the spa 😉
There are schools of research about what types of egg white to use. Traditionally, egg whites were aged in the refrigerator for 5 days before usage. The purpose of this LOOONG aging was to dehydrate the egg whites so they would not be too moist and make the meringue shells wrinkled during the baking. But I got sick of waiting 5 days to try again when I failed a batch of macs (like, um, every time), so one day I tried cartoned egg whites. Why not? I could measure them exactly, and then I didn’t have 293847293874398 hopeful egg yolks in my fridge, waiting for me to whip them into something delicious. And you know what? I’ve used cartoned egg whites ever since, and I get the best results from them. Shhhh . . . don’t tell the macaron police.
There are several different ways to add your sugar to your whipping egg whites. The third (and least popular) method is the Swiss Meringue method, in which egg whites and sugar are heated (awkwardly and together– like a weird first date with your best friend’s cousin who arrives with no front teeth) together over a steaming double boiler while you whisk and try to keep an eye on the perilously clinging candy thermometer to reach a golden temperature.
Nah. Not for me. Not many people use this method. I think perhaps the Swiss should stick to cheese and chocolate.
Then there’s the Italian method. This involves whipping your egg whites, alone (they are ALONE and happy and don’t need no SUGAR!!!), and then pouring boiling hot sugar syrup into the bowl while the egg whites whip, being careful not to scald yourself, and also careful that you don’t let the sugar become even 2 degrees too hot, which means that if you don’t start your egg whites whipping at PRECISELY the correct second, then your sugar will turn to caramel, and your egg whites will be whipping their little hearts out, but you have to scrap them because the sugar is overcooked. Also, if you don’t have a stand mixer, this method is next to impossible. Many pastry chefs do utilize this method because the finished meringue (once you work out the kinks of preparing it) is very stable and produces nice, tall “footed” macs almost every time, without deflating and being as subservient to both weather and temperature.
But you know. Nah. Not for me. I prefer to keep all of my fingers and not have them scalded off by boiling sugar water, especially with small kiddos running around asking me for goldfish crackers and the meaning of life.
So that brings me to the classic French method, and the only method that I ever use– first, because the ingredients are not heated, so it’s safer with kiddos around. Second, because I know this method best– I know when I have achieved proper “macaronage” and what went wrong when I run into mistakes. Like the way you always take when you go home from work . . . you just know it. Why change it? So today, we are going to be doing the classic French method of macaron preparation. Oui, Oui!
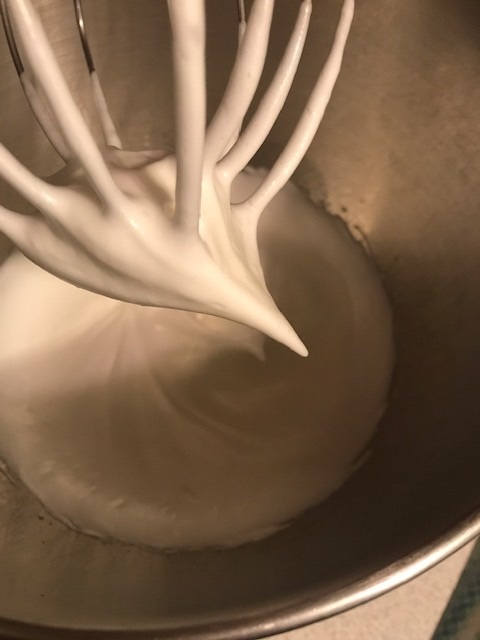
Start by mixing together your white sugar, cream of tartar (this stabilizes the meringue so that it is not as delicate), and egg whites in the bowl of your mixer, using the whisk attachment. You can use a hand mixer, but the stand mixer is SO much easier. Your egg whites should be whipped to stiff peaks– that is, when you hold the whisk out sideways, the egg white should form a peak without bending. Don’t beat past this point, or you will cause your mixture to break and become watery, and then you will have to start over again.
While your egg whites are whipping, whirl your almond flour and powdered sugar together in a food processor. This just helps to break down the almonds even more, and allows the mixture to blend. SIFT these ingredients before you incorporate them into your egg whites. In fact, I read somewhere that the French sift their almond flour/powdered sugar mixture 3 times. I was skeptical, but this past time I sifted 3 times, and each time I found coarse almond pieces that I threw away. And my macs were the smoothest, most beautiful little creatures I’ve ever made. From now on, I sift three times. Don’t mock the French. Lesson learned.
If you choose to use color, add in a drop of gel food coloring (don’t use liquid colors, as this will disrupt the ratio of liquid to solid ingredients and possibly ruin your macarons) right after you have achieved stiff peaks with your egg whites. Just a few quick whirls and the color should be incorporated without overmixing the egg white. I used one drop of black food coloring gel to make these a beautiful gray.
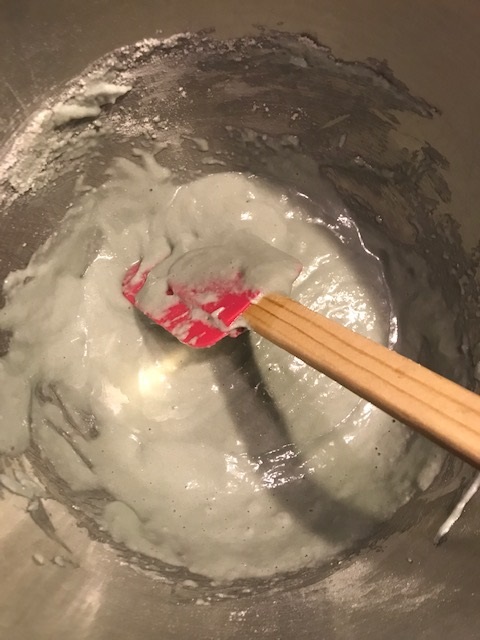
I next add my dry (thrice sifted) ingredients to my egg whites in 3 batches, carefully folding after each addition. Adding the dry ingredients gradually helps to keep the egg whites light and fluffy, without completely deflating them. This gradual mixing of dry into wet ingredients is called the “macaronage” process, and I believe it is by far the most tricky part of making macarons, as it is so incredibly difficult to gauge when the batter is *just* right. Most macarons die nobly on the field, here, in hallowed macaronage stadium. I wish I had a trick to tell you how to do this perfectly the first time– some people describe the macaronage process as “lava flowing.” I don’t know about you, but I’ve never observed an active volcano throwing lava at me, so that comparison doesn’t help me a whole lot. Others say the batter should be “ribboning” off the spoon. Um . . . what? If your spoon has ribbons on it, maybe that’s the reason you’re having trouble baking. Hmmmm. She wore a yellow ribbon? *tries not to giggle*
Honestly, this part just needs to come with lots and lots and LOTS of experience. I just know by looking/feeling when my batter is ready to go. One fold too few, and your macs will have the awkward “gnome hats/macaron nipples.” One fold too many, and they will be liquid and flat when they come out of the oven. Yes. They really are that ridiculously precise. I know my batter is ready when I can quickly fold and pull up my spatula, and the mixture forms a line from my spatula to the bowl for about a split second before breaking. Perhaps that is the aforementioned “ribboning.” I have no idea. But when I can lift it up for about a second without it breaking, I know it’s ready. It takes practice, and nothing that anyone can tell you will help you until you finally get it right and then say “OHHHHHHHHH this is what it’s supposed to look like!” And you will get it right every time after that.
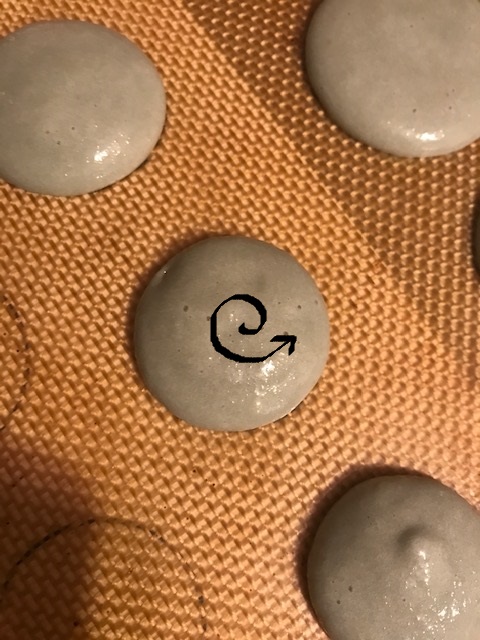
Piping is important, too. Start with your piping bag held straight up over your silpat. You can put a template underneath the silpat to make sure that all your meringue shells are the same size. I’ve been using the same beat up template for years (there are many free printables online– I drew out my circles by tracing around a juicy juice container cap). I have drawn a corkscrew in the motion of how you want to finish the piping. Holding your piping bag straight down, and then curl it around like a smile as you stop pressing the batter out. This movement will allow your macarons to be even and round, rather than misshapen and pointy, or smaller on one end. You can always tell a novice macaron maker by the unevenness of their shells. The more experienced you become, the more uniform your macarons will be.
Now here you will shriek, “I seeeeeeeee Macaron nipples in your photo! You promised me that if I got my macaronage right, there would be no NIPPLES!!! Call the macaron censors and bleep this out! I can’t LOOOOOOOOOKKKKKKK! Make it go AWAYYYYYYYYY!!!!!!!!!!!!!!”
There, there. No worries. This is not a point, but merely a soft spot where the piping tip let go of the batter. Do you know how I know that?
Because all those little soft “points” will go away when I bang my cookie sheets on the counter several times (to get rid of bubbles in the batter), if you’ve done the macaronage correctly (and you have, because you listened. Well done. You’re a genius), then the soft points will disappear when you rap the baking sheets on the counter. Undermixed macaron batter will be too thick, and those “macaron nipples” will not go away, even when you rap the cookie sheets on the counters. In a pinch you can wet your finger with water and gently smoosh down the points before baking. But note that undermixed macarons have more problems than just the awkward nipples showing like it’s a chilly day in 7th grade gym class– they will also not be the right texture and will probably not have that nice, even foot, if they have one at all. But you are learning, so don’t stress. Just understand. Take notes and understand what’s happening so that you can do it right next time. Don’t worry about it. You’re doing great.
Let your finished, “banged” cookie sheets sit for 20-40 minutes, until your piped macs have become less glossy and have a definitely dried shell on the top layer of batter. You should be able to gently “pet” the macarons with your finger, without getting batter on your fingertip. I always make one ugly “practice macaron” just for this purpose, so that I don’t ruin a good one (the little squidge of batter at the end that isn’t big enough for a whole shell is a great candidate for this). Do not bake without the matte “shell” of dryness being there. If you bake before your macarons dry a little bit, then they will crack in the oven and not produce those beautiful feet. On a humid day (or climate) you may have to dry your shells under a fan to get them to form the necessary skin. But do not bake until you can touch them without getting batter on your fingers, or all this hard work will be for nothing.

Get your oven preheated (use an oven thermometer— even 10 degrees in either direction will be their death sentence) to 300 degrees, so that it will be ready when your macs are. These are ladies of leisure. Do NOT keep them waiting.
Some people try to save time and bake several trays of macarons at once. Nope. Don’t do that.
Bake them one tray at a time, at exactly 300 degrees, exactly in the center of the oven. Move your oven racks around if you have to. If you don’t do them one at a time, in the center, at 300 degrees, there’s a good chance that you will ruin them. One tray will be wrinkled and underdone, and one tray will be too dark on the top or bottom, or both. One at a time. Exactly 300 degrees (monitor temperature with your oven thermometer, NOT by cracking the door– do not do this, ever ever ever ever), for exactly 20 minutes. Do not open the door under any circumstances (your shells will deflate, wrinkle, or crack). Do not pass Go. Do not collect $200.
Don’t be discouraged. I can smell your discouragement. In no time this will be old hat and you’ll be teaching me the tricks. We got this. Don’t give up– we are so close!!! These pesky, particular little treats are ALMOST there!
After 20 minutes gently open your oven (if you open the oven before this, the shells will deflate, but after 20 minutes they are solid enough that you can) and press lightly on the top of your test macaron. It should be “firm on its feet,” with no wiggle. If it feels watery and wiggly, give them 2 more minutes in the oven and try again. When they are firm but not too brown, take them out of the oven to cool. I splashed mine with some Jackson Pollock-esque silver airbrush color, just to make them fancy and kind of mod-cool looking.
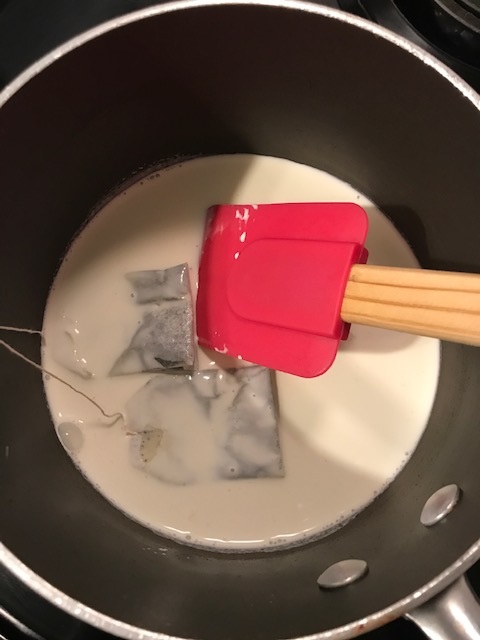
While our cute little shells are cooling (and most likely our second tray is baking), let’s start on the filling. Start your heavy cream heating in a medium saucepan. Place your teabags into the cream to start steeping and enveloping the sauce in its delicious, Earl Grey essence. You don’t want your cream to boil– just slowly warm it until a spoon lifted from it after stirring has a faint whiff of steam coming from it. There can be teeny little bubbles starting around the edges, but that’s enough. No boiling.
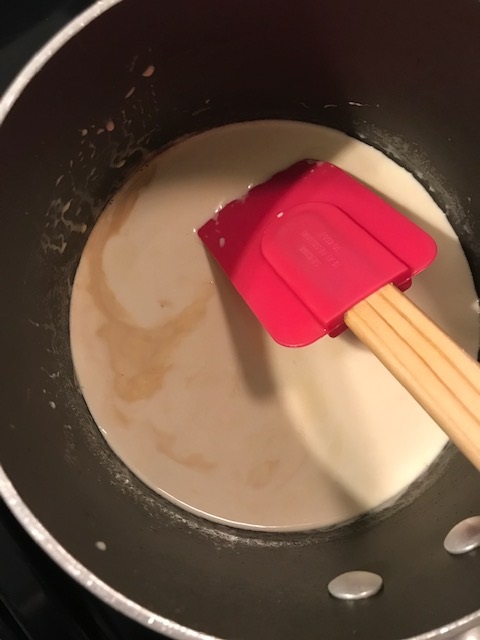
When the cream is “nice and warm,” turn off the heat, take out the teabags, and see that dreamy little “tea cloud” that is left behind. That is pure FLAVAHHHHH, baby.
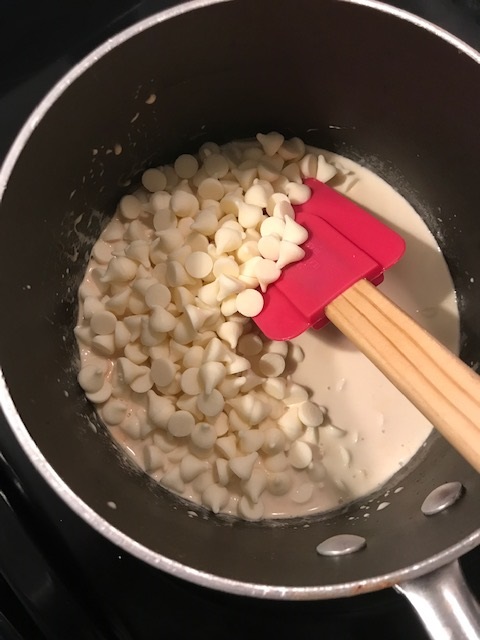
Mix in your white chocolate chips. Even with the heat off, the warm cream should melt the chocolate. Just keep carefully stirring, and slowly the chips will melt into a little puddle of ooey, gooey loveliness.
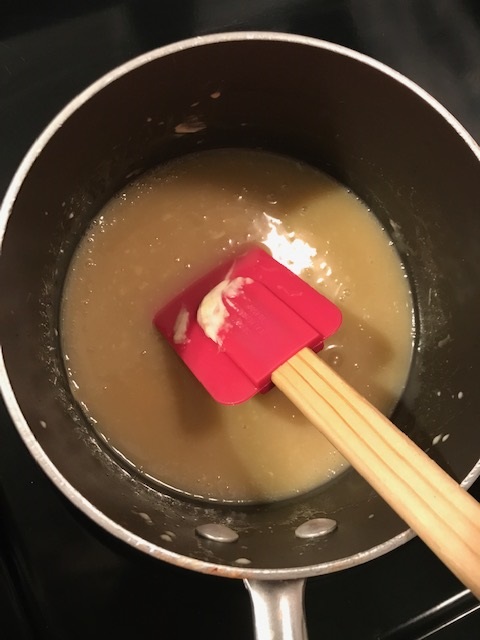
When the chocolate is completely melted, you will think “Wow that’s a funky color. How did white chocolate and white cream turn BROWN???? MY WHOLE LIFE IS A LIEEEEEEEEEEEE!!!!”
Well my love, you added tea. So your filling is the color of tea. See? That’s how you know you did this correctly. A+ for the day. 🙂
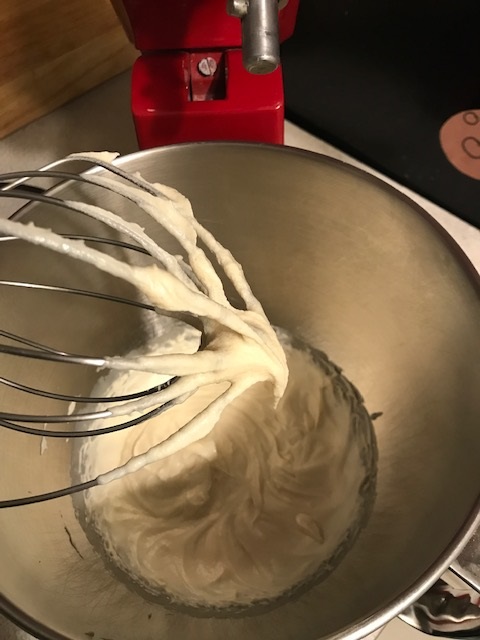
I put the warm ganache in the fridge for 1/2 hour or so– until it is about the consistency of caramel sauce. Then give it a quick whip with the whisk attachment of the mixer. It will turn into whipped ganache, which is just a lighter, easier to pipe filling. I let this filling chill a bit more in the refrigerator until it’s completely cool before I use it to fill my macaron shells. It just makes the task go a little easier when the filling is fully chilled.
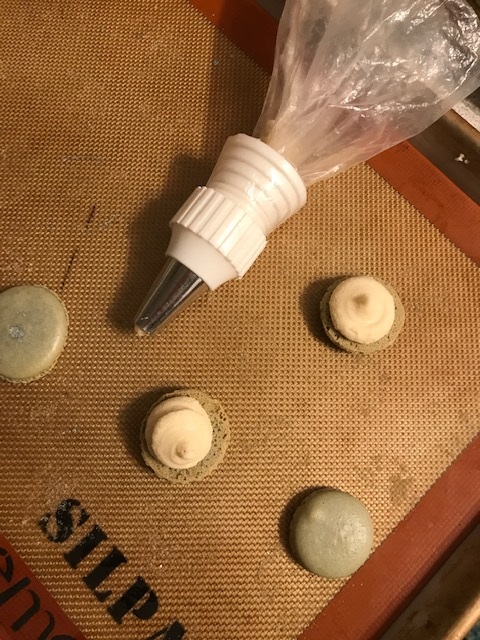
When the filling is cool, pipe it into your PURDDDYYY little macaron shells. Don’t take your filling right up to the edge of the shell, because when you put the shells together the filling will “squish” a little bit, and you need a little bit of clearance for it to expand.
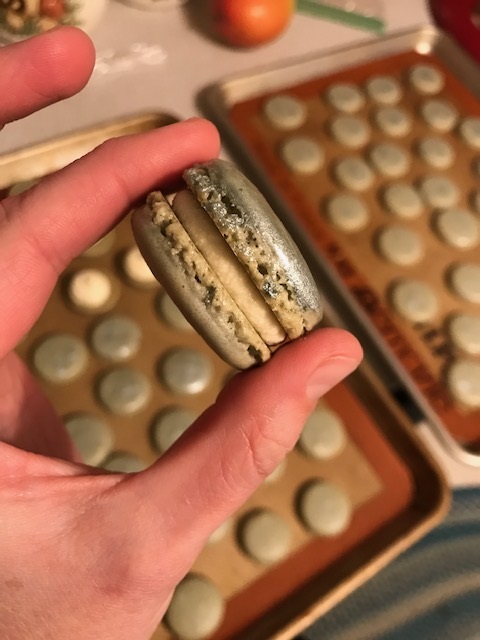
Even though you are brilliant and used a template to pipe your macarons, there may be some slight variation in shape and size, so try to pick shells that are about the same size to pair together. Look at you, playing macaron matchmaker. How . . . SWEET! “Matchmaker, matchmaker, make me a mac . . . I mean, um . . . match.”
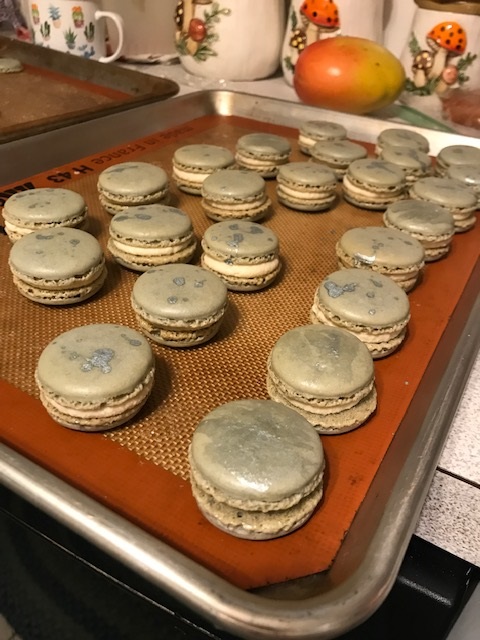
And voila, just like that, you have a cute little army of Macaron men. Or maybe they are Macaron women. I don’t know. It’s impolite to ask. And I totally want to mention the Mango photobomb. It was one of the prettiest mangoes I’ve ever seen, and I’m pretty sure it wanted a selfie. Look at that shameless photobomb. Mango HUSSY!!!!!

The great thing about ganache is that it gets firm when it’s cold (because of the chocolate, mostly). So pop these babies into an airtight container and let them chill out (literally) in the fridge overnight. Or, you know, if your garage is as cold as mine is, you can use the extra “walk in” to store them. Just make sure they are in an airtight container so the shells don’t get soggy.

The interesting thing about macarons is that the shells are not generally flavored. However, when you put them together with their filling, an amazing thing happens. The shells almost “become one” with the filling. Hey. We are better matchmakers than we thought.
The shells kind of absorb the filling, and the filling kind of goes into the shells. So what you end up getting is one perfect, nougat-like bite of all the flavor of the filling, along with the crisp, chewy shell. Two became one. Are you sure you haven’t done this mac-making, I mean matchmaking thing before? You’re darned good at it. *looks around fearfully* Toooo good at it . . . who ARE YOU????

Macarons are at their VERY BEST at 24 hours after being filled. They are the apex of both crispness and chewiness at this time. Each day they remain filled, the shells become a little less crisp. So for best results, let them chill overnight in the fridge in an airtight container. Then freeze the ones you haven’t eaten yet for a decadent treat on another day.

Or, you can do something even better– package some of them up nice and pretty, with maybe a little bit of twine and some dried flowers from the garden, and share them with a friend. I made myself a macaron box from a piece of pretty cardstock using the envelope punch board that I use for everything (homemade cards, envelopes to fit my mismatched orphaned cards, gift boxes, gift tags, jewel boxes for my homemade bath bombs . . . everyone seriously needs one of those, and for 12 bucks you can’t go wrong. Perfect Christmas gift for the person who has everything).

Look at that. Seriously. So cute.

And when you give your homemade macaron box with the GORGEOUS homemade Earl Grey macarons inside to a friend, she will get “ALL THE FEELS” and know how much you care. You were willing to do 239487239487239487 stupid little steps to get these macarons right for her. You were willing to sit there and create a box FROM NOTHING to store them in. You were willing to turn your entire GARAGE into a refrigerator JUST FOR HER! Because you FREAKING LOVE HER!
(Um . . . why are you shouting?)
You’re right. Less talk, more tea. Um . . . please pass the macarons?
You did it. And I’m just so proud of you.

Disclosure: This post may contain affiliate links, which just means that we get a few pennies if you purchase through our link. I never recommend products that I don't personally use and love. Thanks!


How does you make the box? It’s gorgeous
Aww thank you Amy! For this box I used my envelope punch board from We R Memory Keepers. But since then I have found a really great tutorial for a beautiful macaron box from Stamping with Amore on youtube (she actually made the box when I asked her for a better tutorial! 🙂 Here is the link for it: https://www.youtube.com/watch?v=kEntMgFGHWU
The mango photobomb is the BEST.
haha! I didn’t notice it until afterward. hehe.
Earl Grey is my Favorite!!
🙂
I’ve never been brave enough to try baking French macarons at home before, but you have inspired me to give them a go! So far, I have specialised in eating them. Love your photos too, the butter knives love wonderful in them. Best wishes, Joanna, The Afternoon Tea Set
I hope you give them a try and that you love them! 🙂 Thank you for the beautiful tea knives! 🙂 XO — Emilie