Forest Moss Cookies
As the weather starts to get cooler toward autumn, I start to be able to see more of the beautiful little treasures in the woods. Tiny mushrooms sprout from under the falling leaves, acorns scatter across the ground, and I start to notice the woodsy treasures of lush, green moss.
Oooh . . . moss is neat. When I was a kid, my siblings and I used to gather moss from the woods and pretend that it was velvet. We would arrange our “jewels” (acorns, stones, or whatever we could find and pretend was jewelry) on our velvety moss cushions. We felt so wealthy. And perhaps . . . looking back at that simpler time . . . we were wealthier than we knew.
So I figured, with all this mossy treasure– why not try to make some beautiful mossy cookies?
What are we waiting for? Let’s do this!

Start with some dough. You don’t need much. In fact, this is a perfect use for that little blob of leftover scrap dough you have that isn’t big enough to make any more regular cookies when you’re making a recipe. If you don’t have a good sugar cookie dough recipe, check out my basic sugar cookie dough,
here.
Take your dough and add some dark green food coloring. This dough is obviously thicker than icing, which is our normal coloring medium, so it will be a little harder to mix in the color. You almost have to “knead” the dough with your knife.
Go ahead. Channel your inner Irishman and knead in that color, Me Buckle!
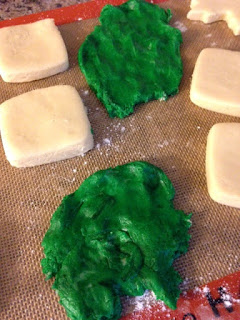
When your color is nicely mixed throughout the dough, go ahead and smoosh the dough into a few “cookies” on your silpat. These don’t look pretty. At all. Not yet, anyway. But that’s OK. Didn’t you ever read the story of the Ugly Duckling? The beauty comes later.
Go ahead and bake these cookies until they are brown on the bottom. It will be a little harder to tell because of the color when these cookies are done, so keep an eye out.
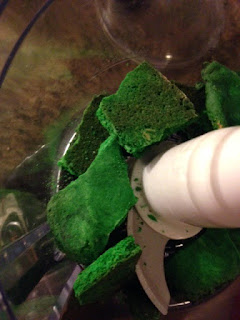
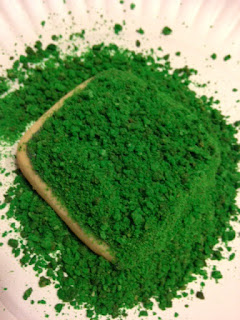
Once these little green gems have baked, allow them to cool and then give ’em the ride of their lives in a food processor. Go ahead and break them into smaller pieces to make them easier to grind up.
Look at those beautiful green crumbs. Who can’t love a green crumb? These little beauties are the basis of your mossy loveliness.
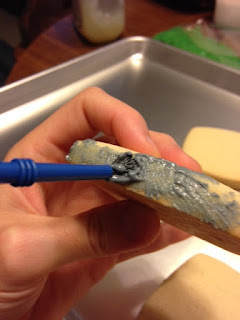
Now, let’s ROCK! Seriously. Let’s make some rocks. Take a normal cookie in the shape of your choice, and place some thick gray outline icing on the side. This cookie is a little different because we are icing the sides as well as the tops. It can get messy, so keep a wet paper towel nearby. If you’ve never worked with royal icing before (it’s a great choice because it dries hard and stackable), or if you need a good recipe, check out my royal icing tutorial
here.
Use a stiff brush (I used a trimmed cheapie from Walmart) to kind of “pounce” on the icing. Basically, just continue lifting your brush up and down, creating a textured pattern. Do this all over the sides and top of the cookie. Add a second layer of pounced icing after the first is dry, if you want a fuller coating.
Awww– there’s our little rock now.
If you want the entire “stone” to be mossy, go ahead and dump some of your crumbs on top. Use one of those little cheapie paper plates to catch the crumbs. This plate is perfect, because you can fold the whole ‘shebang in half afterward and dump those crumbs back in your bag.
Press the crumbs down lightly with your hand to make sure they get all nice and smooshed in.
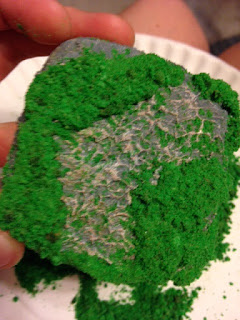
Alternatively, if you just want moss on some of the cookie, trace some mossy marks with a light pine green icing. Do the same thing– dump your crumbs and lightly press to adhere.
Dump off your crumbs and gently flick away the places you don’t want crumbs, using a paintbrush. I used that same cheapie paintbrush that I used for pouncing the icing.
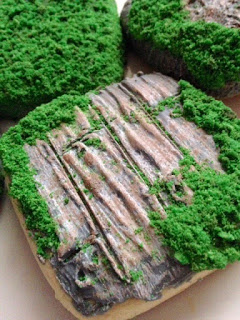
I tried some moss on the reclaimed barnwood cookies I showed you how to make the other day. See how to make those
here. The moss looked fantastic on these. I opted not to brush all the crumbs off– I kind of liked the look of the moss in the cracks of the boards. I think I may have a new favorite technique for a while! I can’t wait to see how these mossy gems look on all kinds of surfaces. And there you have it! Embellish these beautiful moss cookies with some gnomes and mushrooms for a cute woodland magic set. I may try that later. You just never know . . .
But either way, get to baking! As you know . . . a rolling stone gathers no moss 😉
You did it. And I’m just so proud of you!

Disclosure: This post may contain affiliate links, which just means that we get a few pennies if you purchase through our link. I never recommend products that I don't personally use and love. Thanks!












Thanks so much ?
You are most welcome. 🙂
Cute! I needed to read that totorial. Thank you. You made me laugh, I enjoyed it. Something to look forward to.
Thanks Jody! I’m so thankful you took the time to stop by and share your thoughts. 🙂 It means a lot to me that you enjoyed the tutorial! Can’t wait to see your finished cookies! 🙂
Pingback: Cute Hedgehog Cookies – Cookies for England