
The first part of making cookies . . . and, of course, the bare bones between success or failure, lies in your basic skills and cookie preparation. If you’re already a pro who has Paula Deen on speed dial, move right on ahead to the front of the line. You don’t need this. Have a gold star.
If you’re like me, when I started making sugar cookies, and you find making sugar cookies to be a labor intensive, sticky, tricky business that you’d rather just avoid, then read on. Hopefully I can save you some of the mistakes I made at the beginning, learning the hard way what worked best for me.
There are many different ways of doing things, and this is just what works for me. Feel free to change it up for whatever works for you 🙂
First (drum roll . . .), the recipe. Really, any recipe will work. Use your favorite, cherished, hand-written recipe from Grandma. Use store-bought cookie dough. Heck . . . even buy pre-made sugar cookies and decorate them. You can decorate on any of these mediums. The recipe I personally use is from the blog of Sweet Sugarbelle, the Queen of the sugar cookie decorating world. She allows use and sharing of this recipe, as long as credit is given to her for her work. So here is her credit, and here is the recipe. I have tweaked it a bit, and you can feel free to use whatever works best for you, too.
My adaptation of the basic sugar cookie recipe (courtesy of Sweet Sugarbelle):
1 1/2 cups powdered sugar
2 sticks (1 cup) butter or margarine, room temperature
2 tsp. extract of your choice (I tend to use vanilla or almond)
1 egg (room temperature)
2 tsp. baking powder
1/2 tsp. salt
3(ish) cups flour
Cream powdered sugar and butter until light and fluffy. Add extract and egg; beat well. Sprinkle baking powder and salt over mixture; mix well. Add flour, a little at a time, until it forms a stiff dough that does not stick to your fingers. Place on a floured surface and allow to rest for 15-20 minutes. Roll out dough to 1/4 inch thickness. Cut out shapes and “peel” dough scraps (more on this later). Bake at 375 for roughly 15 minutes until set and bottoms of cookies are lightly golden. Allow to cool on a baking rack before decorating.
Okey doke. That’s it. See? You’re going to be a pro at this in no time. Here is a little more detailed explanation if you need it.
First, let the butter and eggs come to room temperature. I always say, “Cold ingredients are the enemy of good cookies.” In order for things to cream properly, they can’t be uptight and stiff. It’s kind of like a cold room– ever go to an event where the room was freezing cold? People drift around, listlessly, staying huddled and trying to keep warm. The event is lifeless. Cookies are like that. A comfortable temperature of ingredients will bring those cookies out of their overcoats into delicious glory.
So . . . get the butter and egg out of the fridge about 1/2 hour before you want to make your cookies.

Get snacks for kids. Answer for the 1,000th time today why your toddler can’t have candy before lunch. Change a diaper. Wash your hands. Always wash your hands. Sorry. It’s the Mom in me. Everyone wash your hands? Good. Next step. Place your powdered sugar in the bowl first, and then put the room temp. butter on top. This helps prevent the “snowfall” of sugar that occurs when you start the mixer.
Oh– forgot to mention. If you’re wondering how you can tell when your butter is room temp, gently press your (clean) finger into the top. Everyone wash your hands???? ha. When it leaves a gentle “kiss” on the butter without pushing hard (you don’t want it so soft your finger almost pushes through it– that’s too soft), it’s perfect.
Your egg is ready when it starts sweating like a sinner in church. Haha. Feel the conviction? So does your egg. It’s ready, too.
Start mixing slowly. Good cookies are like good relationships– they take time. This is the start of cutting the butter into the sugar.
Once it gets pretty well incorporated, turn up the speed and “cream” it. It will turn unbelievably light and creamy.
Now, add your egg and extract of choice. This time, I chose vanilla.
Same deal– start out slow. We want a last relationship, here– not a fling. This is what your dough will look like after the egg and extract are added.
Sprinkle the baking powder and salt over the dough. Mix. Now, the flour. Start with about half of it, and mix slowly. Too much flour will give you a grainy cookie with no taste. This is about half the flour added. The dough will stick terribly to your (clean) fingers. You did wash your hands, right? 😉
This is almost there. The dough isn’t as sticky, but it’s still definitely sticking. From this point, add the flour a few tablespoons at a time, so you don’t get too much by mistake.
Sorry the pictures aren’t professional. Soon, I’ll introduce you to Jill, my neighbor and resident food photographer. There is a baby in my lap, and a toddler wanting me to play with him, so I have to go quickly.
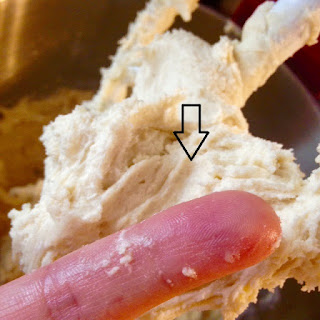
This dough is perfect. See that indention where I squished it? It didn’t come off on my fingers. It’s ready to go.
Scrape the dough off onto a floured silpat or parchment paper. I prefer silpat, and I’ll show you why in a minute. Take your fingers and gently form the dough into a mound. Add a touch more flour if necessary, but it won’t take much.
When you have it formed into a little brain-like creation, let it sit there for 15-20 minutes. It doesn’t need to be chilled, either, which is super nice, compared to most sugar cookie recipes.
Heres’s my cute little brain. Haha.
Now we’re ready to roll. Bwahaha. Sorry. Serious face. O_O Flour your pin and roll your dough to 1/4 inch thick. This is about the height of a pea.
Here’s a neat trick to make things a bit easier: rather than trying to transfer your cookies from a floured surface to your baking sheet, “peel” the scraps away from your cookies, with the dough rolled out already on your silpat or parchment. This is especially helpful to preserve cookie shapes that have small, delicate points, like these do. Just place your cuts wherever you want them to bake, since they won’t be moving. Leave enough space in between cookies so they don’t grow together during baking. A finger width is a good estimate.
Peel those scraps! Peel ’em, Girl! Er . . . boy. Whoever and whatever you are. Peel, my Pretty.
Remember I said I preferred silpats to parchment? Here is one colossal reason why (besides not killing the environment with tons of parchment waste). You can lift the whole ‘shebang right off your rolling space and transfer it to the sheet. I so love things that make my busy life easier.
You want your finished cookie to be set (i.e, firm), and have a lightly browned bottom. I like to rotate the sheets halfway through baking (move the top to the bottom and vice versa) to get more consistent browning.
Cool the finished cookies on a drying sheet, if you have one. If you don’t, they’re worth the investment– they only cost a few dollars, and I use mine just about every day.
So . . . that’s all there is to it! I told you that you’d be an expert in no time. Soon you will be whipping out gorgeous sugar cookies and wondering why you were ever intimidated, in the first place!
You did it. And I’m just so proud of you.

Disclosure: This post may contain affiliate links, which just means that we get a few pennies if you purchase through our link. I never recommend products that I don't personally use and love. Thanks!









Pingback: Vintage Pyrex Cookies – Cookies for England
Pingback: Soft Valentine's Day Sugar Cookies – Cookies for England
Pingback: Soft Tea Sugar Cookies – Cookies for England
Pingback: Soft Tea Sugar Cookies – Cookies for England
Pingback: St. Patrick’s Day Cookies – Cookies for England
Pingback: Snowy Christmas Tree Cookies – Cookies for England
Pingback: Festive Winter Mitten Sugar Cookies – Cookies for England
Pingback: Sweet Santa Cookies – Cookies for England
Pingback: Perfect Princess Cookies – Cookies for England
Pingback: How to make Cookie Pops – Cookies for England
Pingback: Enchanting Elf Cookies – Cookies for England
Pingback: Sparkling Snowflake Cookies – Cookies for England
Pingback: Quickest Cookies Ever – Cookies for England
Pingback: Flooding and Stencils and Airbrush, oh my! – Cookies for England
Pingback: How to Do Brush Embroidery with Royal Icing – Cookies for England
Pingback: Festive Pumpkin Cookies – Cookies for England
Pingback: Pittsburgh Steelers Cookies! – Cookies for England
You're welcome! Glad they were helpful.
I'm so glad! I hope you share your pictures– because I know they will be awesome!
Bravo! Can't wait to whip up a batch myself!
Very easy to follow directions. Thanks!